
Help & FAQ
Plain-language answers to the questions people ask most before and after they start using Calleague — no technical background needed, all grounded in the real screens and buttons you'll actually see in the app.
Welcome — this is the page to bookmark. We've gathered the questions we hear most often and answered them in everyday words, using the exact screens and buttons you'll see in the app. No technical background is needed: if you can use a phone and fill in a simple form on a web page, you can read and follow this page on your own.
Before you begin: To follow the steps here, you need a Calleague account and to be signed in. Don't have an account, or not sure how to log in? Read the "Sign in" section on the Getting started page first — it gets you in within a couple of minutes. We also walk you through it step by step just below, in the Getting started section.
Think of Calleague as a friendly helper that chats with your customers, answers your phone, and remembers what your business knows. You set it up once at app.calleague.ai (the web address where the app opens), and from then on it works the way you told it to.
What this page covers
Here's a quick map of the question groups, so you know where to look first.
| Group | What it answers | Best for |
|---|---|---|
| Getting started | Opening an account, signing in, the first screen | Brand-new users |
| Your assistant | The 4-step wizard: create, train, test, publish | Building your first helper |
| Calls & numbers | Connecting a number, seeing calls, recordings and transcripts | Anyone who wants to use the phone |
| Knowledge | Teaching the assistant your information from websites and documents | Getting accurate answers |
| Data & privacy | Recordings, who can see what, KVKK & GDPR | Anyone handling customer data |
| Plans & billing | Free trial, plans, payment, inviting your team | Owners and finance |
| Mini glossary | Plain meanings for technical words | Anyone stuck on a word |
New here? The quickest path to confidence is this: create one assistant, add some knowledge, and have your first conversation. Once you see it answer, everything else clicks into place.
How to get help
We're a real team and we like hearing from you. If anything is unclear or not working, reach out — we'd rather you ask than stay stuck.
| Channel | Use it for | Response |
|---|---|---|
| Email — info@arpanet.com.tr | Any question, problem, or request | In Turkish or English, as quickly as we can |
| In-app help | Quick pointers while you're working | Right where you are |
| This FAQ | The most common questions, any time | Instant — no waiting |
Calleague is made by Arpanet Bilişim Teknolojileri A.Ş. in Ankara, Türkiye.
Get the fastest possible answer
A little detail helps us solve things in one reply instead of three. Here's the quickest path.
Tell us what you were trying to do
For example: "I was on the Train step of the wizard, trying to add my website." One sentence is plenty.
Tell us what happened instead
What did you see on screen? A line like "this message appeared..." or "the button didn't work" tells us a lot. You're welcome to attach a photo of the screen too.
Add the time and number, if it's about a call
If it's about a phone call, the rough time and the number involved let us find it in the Call History tab (the heading buttons at the top of the screen) quickly.
Email it to info@arpanet.com.tr
Send those details to info@arpanet.com.tr and we'll take it from there.
Please never email us your password or full payment-card number. We will never ask for them, and you don't need to share them for us to help.
Getting started
You use Calleague from your browser; there's no program to install on your computer or phone.
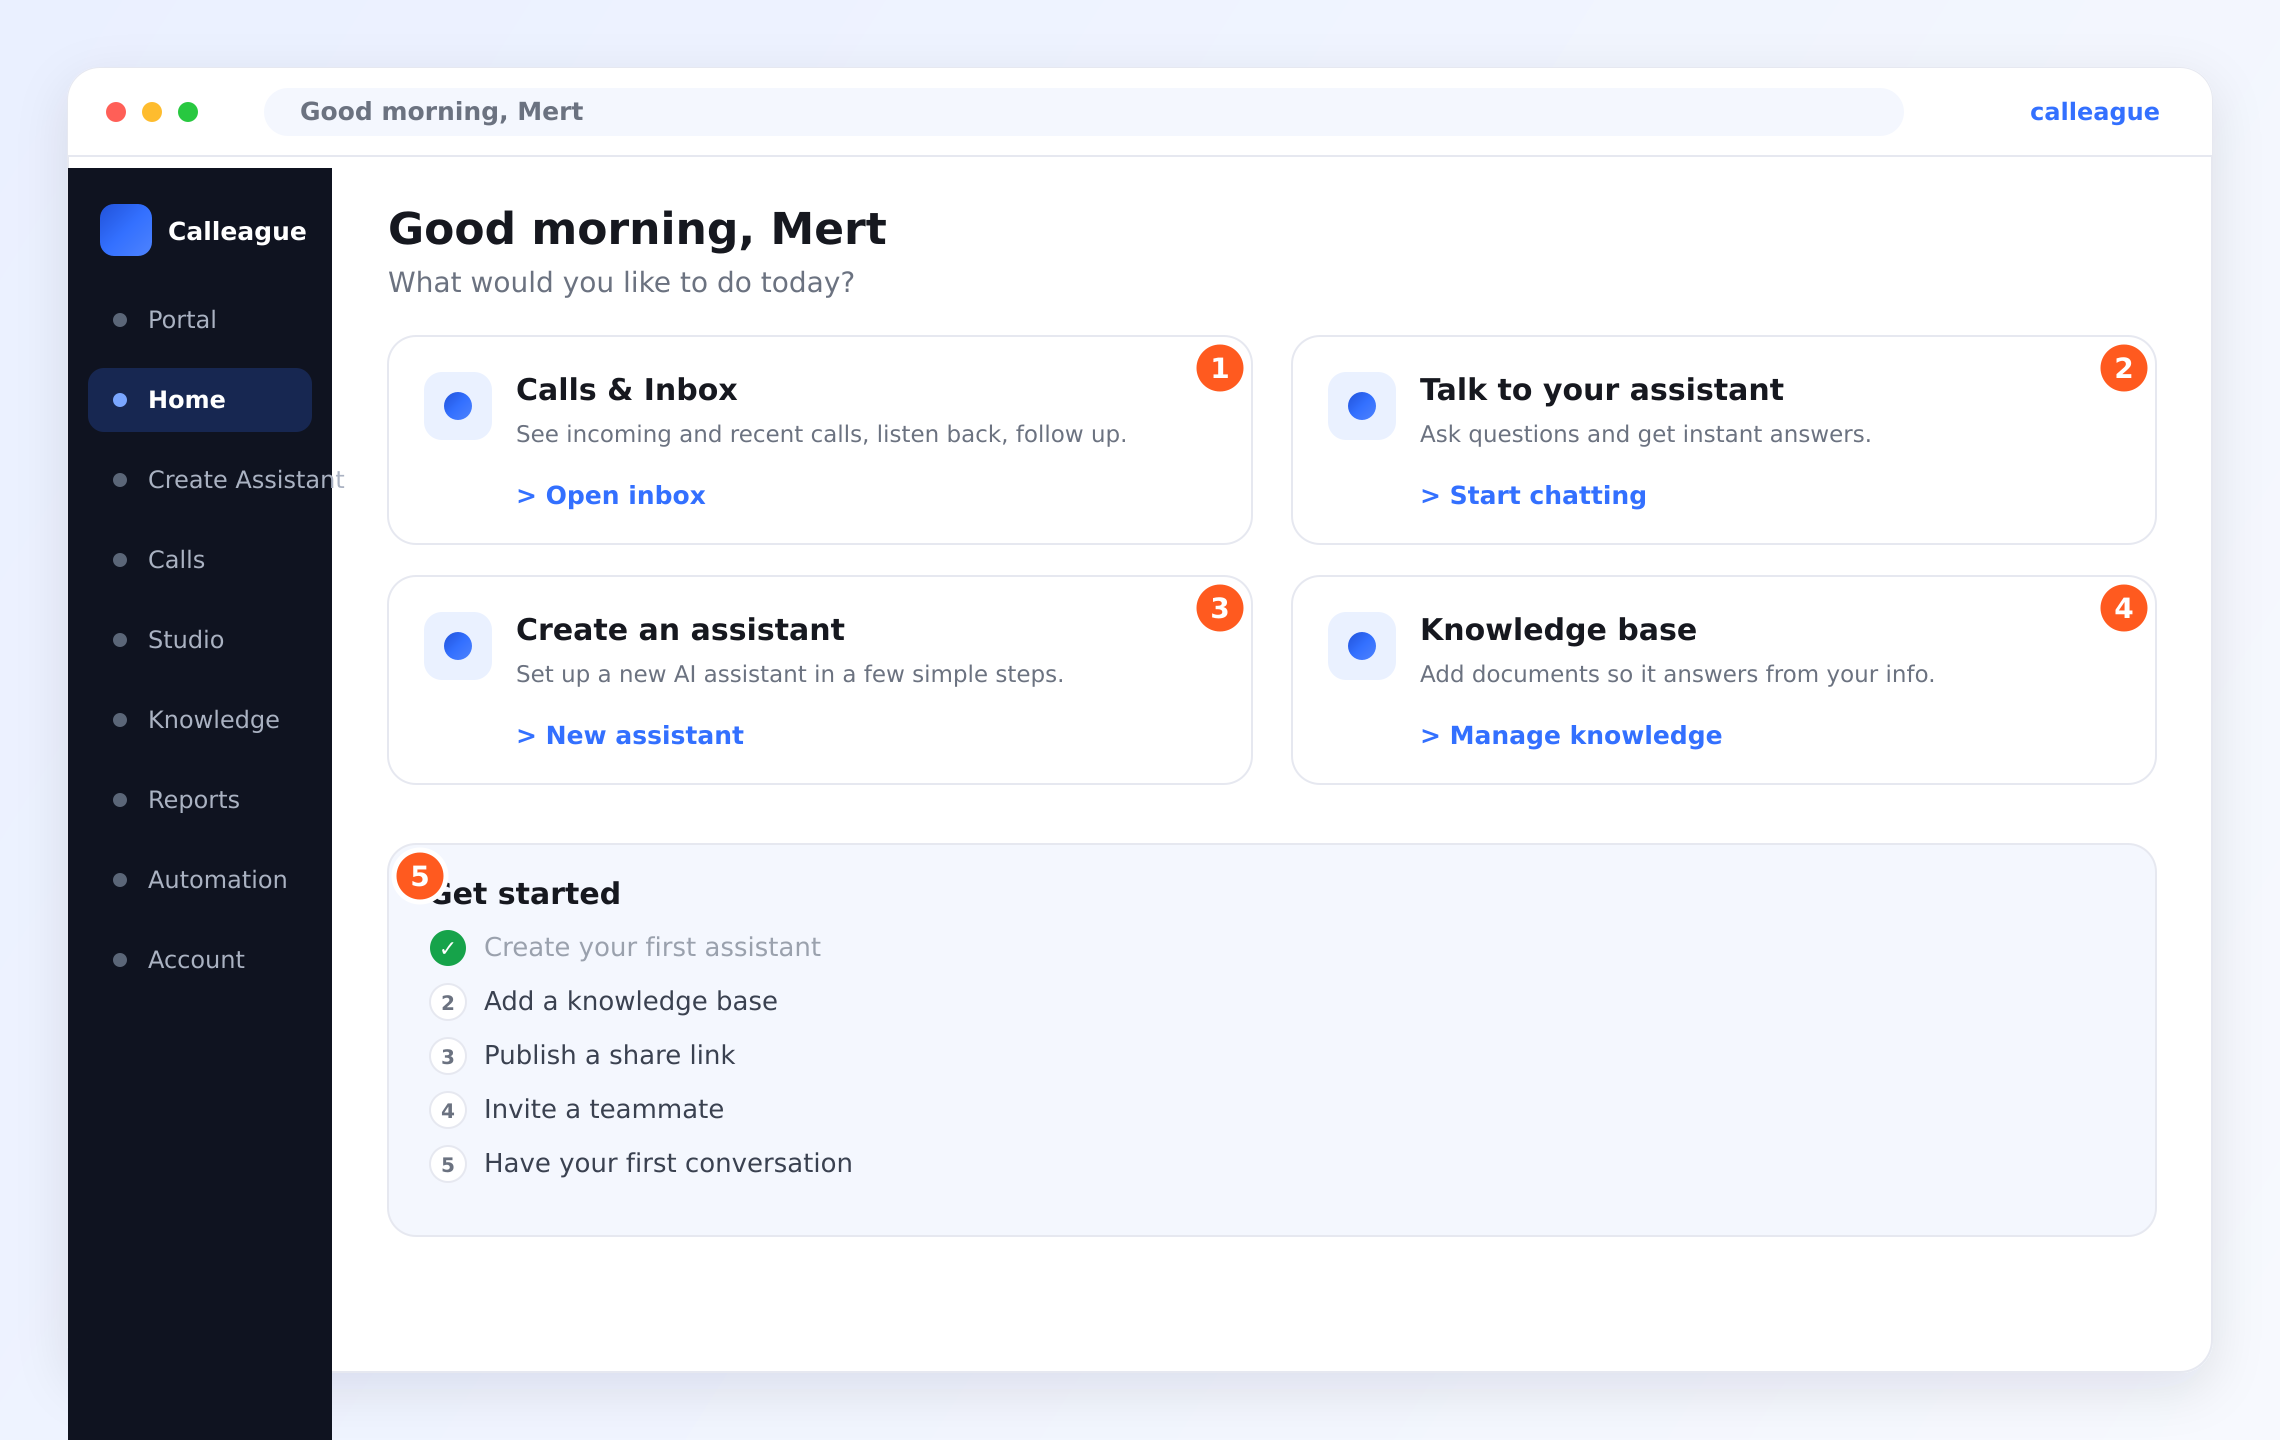
Your assistant
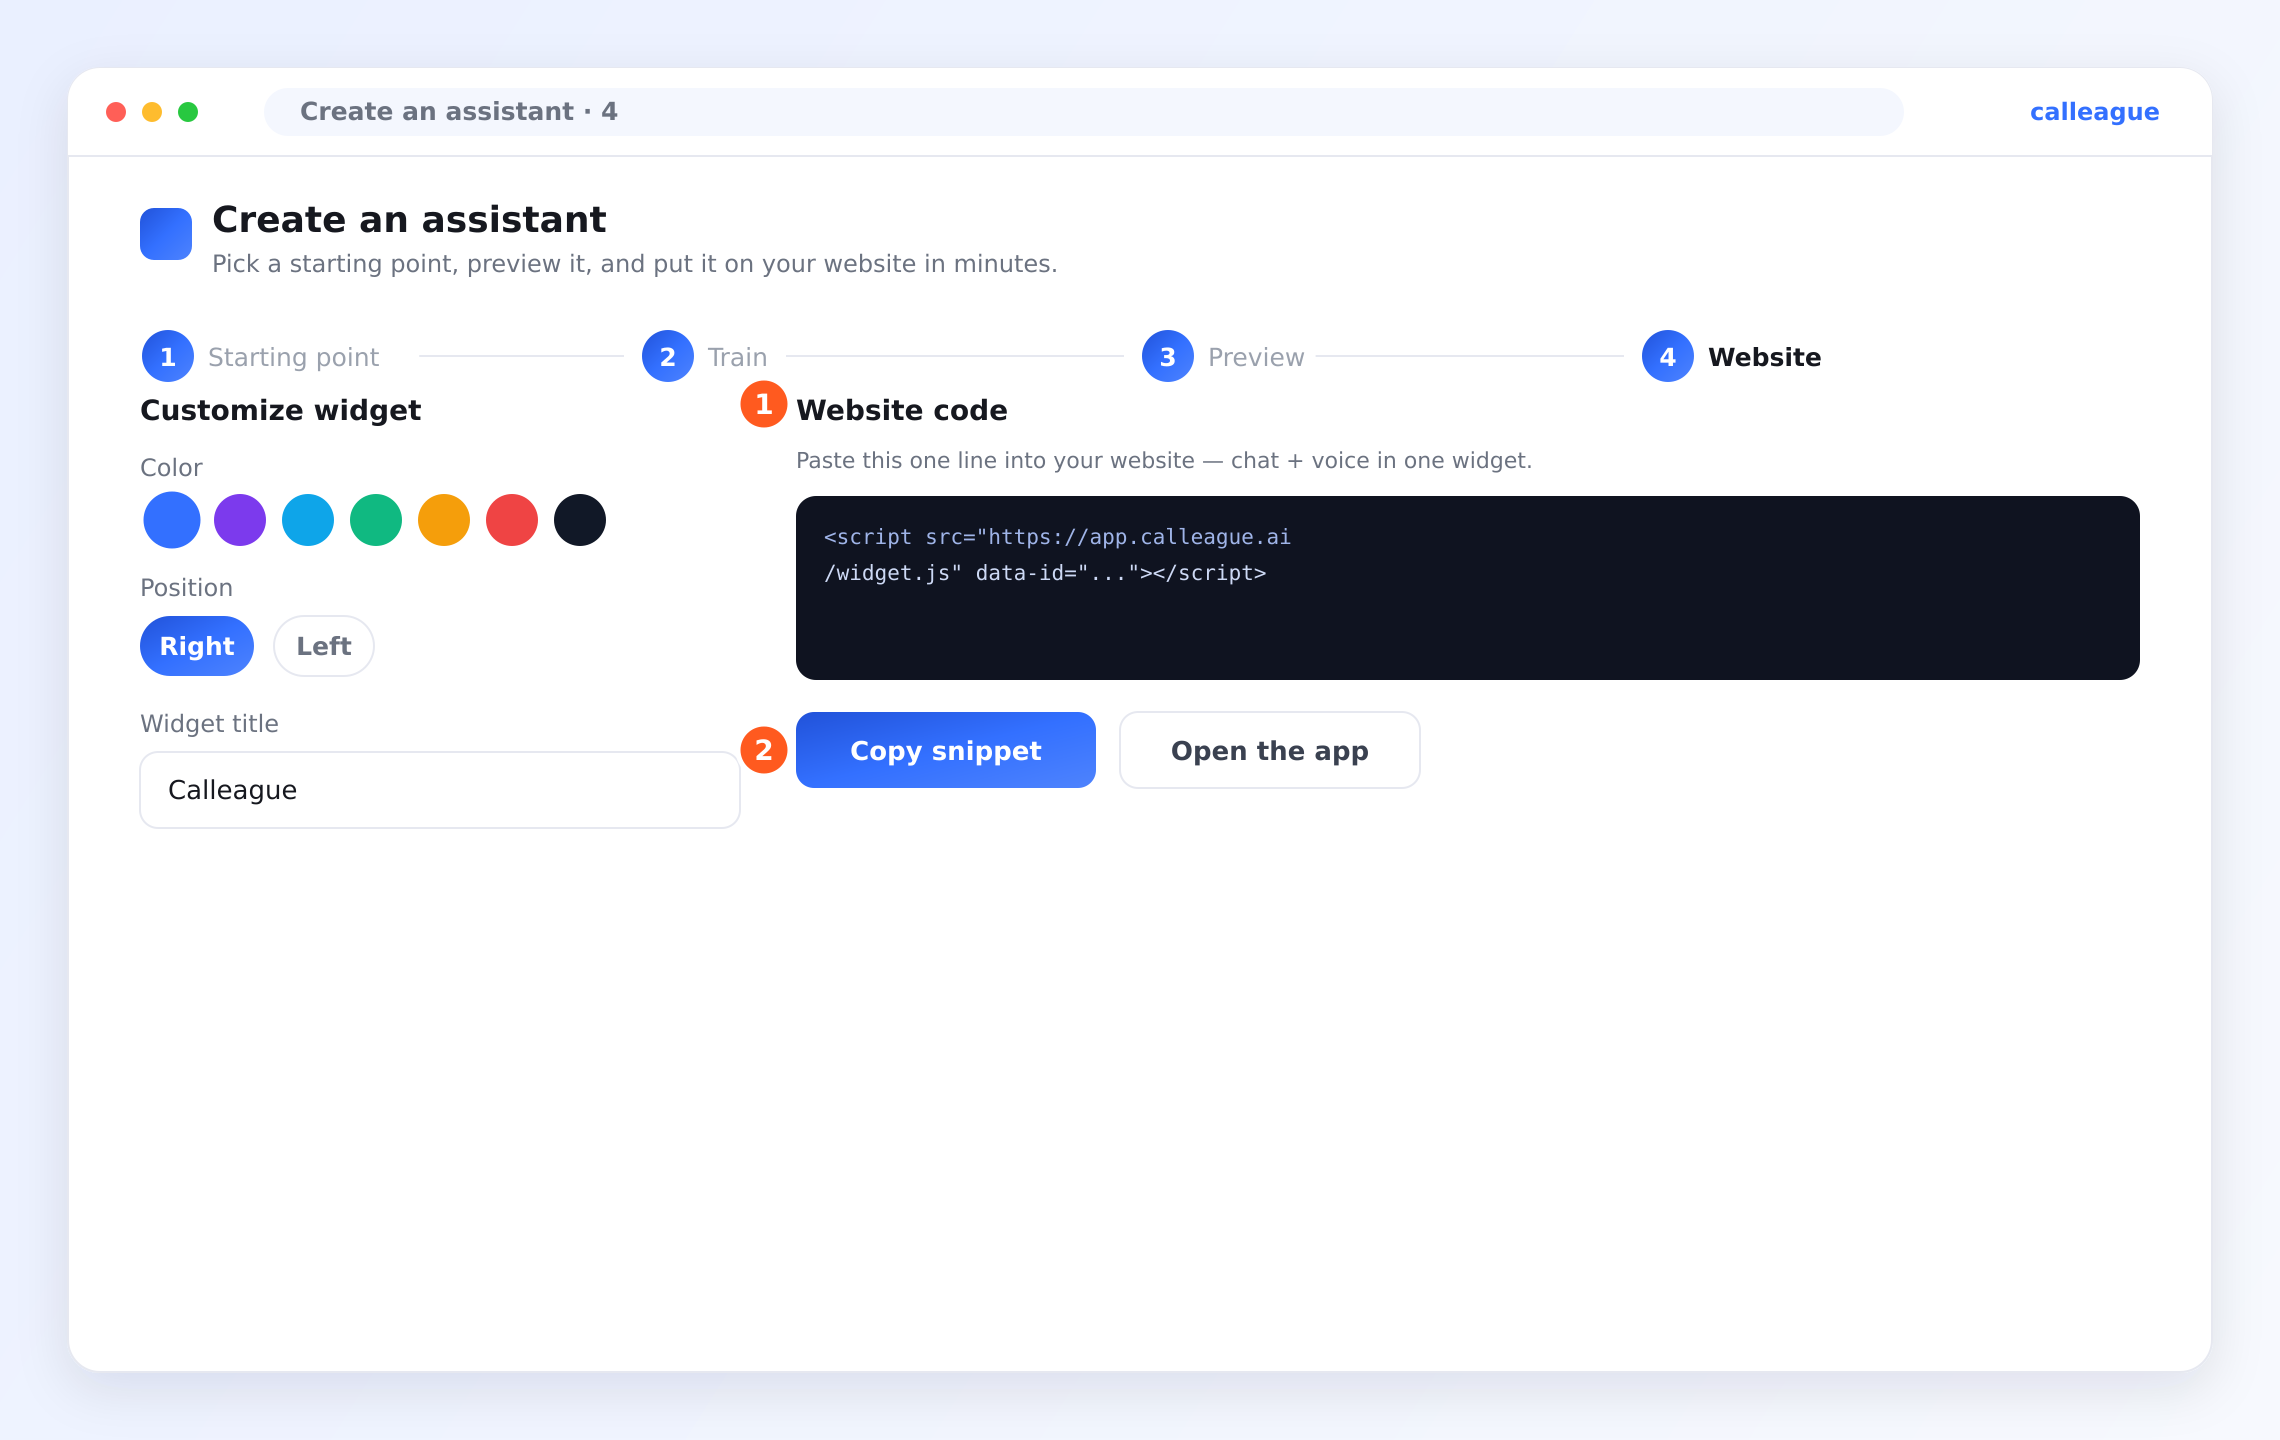
Creating an assistant is a wizard (a screen that guides you step by step) that takes you by the hand. It has four steps: Starting point → Train → Preview → Website. We show all four with screenshots below.
No website? No problem. You don't need a website to use your assistant. When you create your assistant, Calleague automatically generates a ready Share link (a ready-made chat link you send to customers) — copy it with "Copy link" and send it to your customers over WhatsApp, Instagram, or SMS. If you prefer, use Chat in the left menu to use it yourself directly; your assistant also works over the phone. In other words, you can skip the "Website" step below. (For a step-by-step path, see the "Can I use my assistant without a website?" question below.)
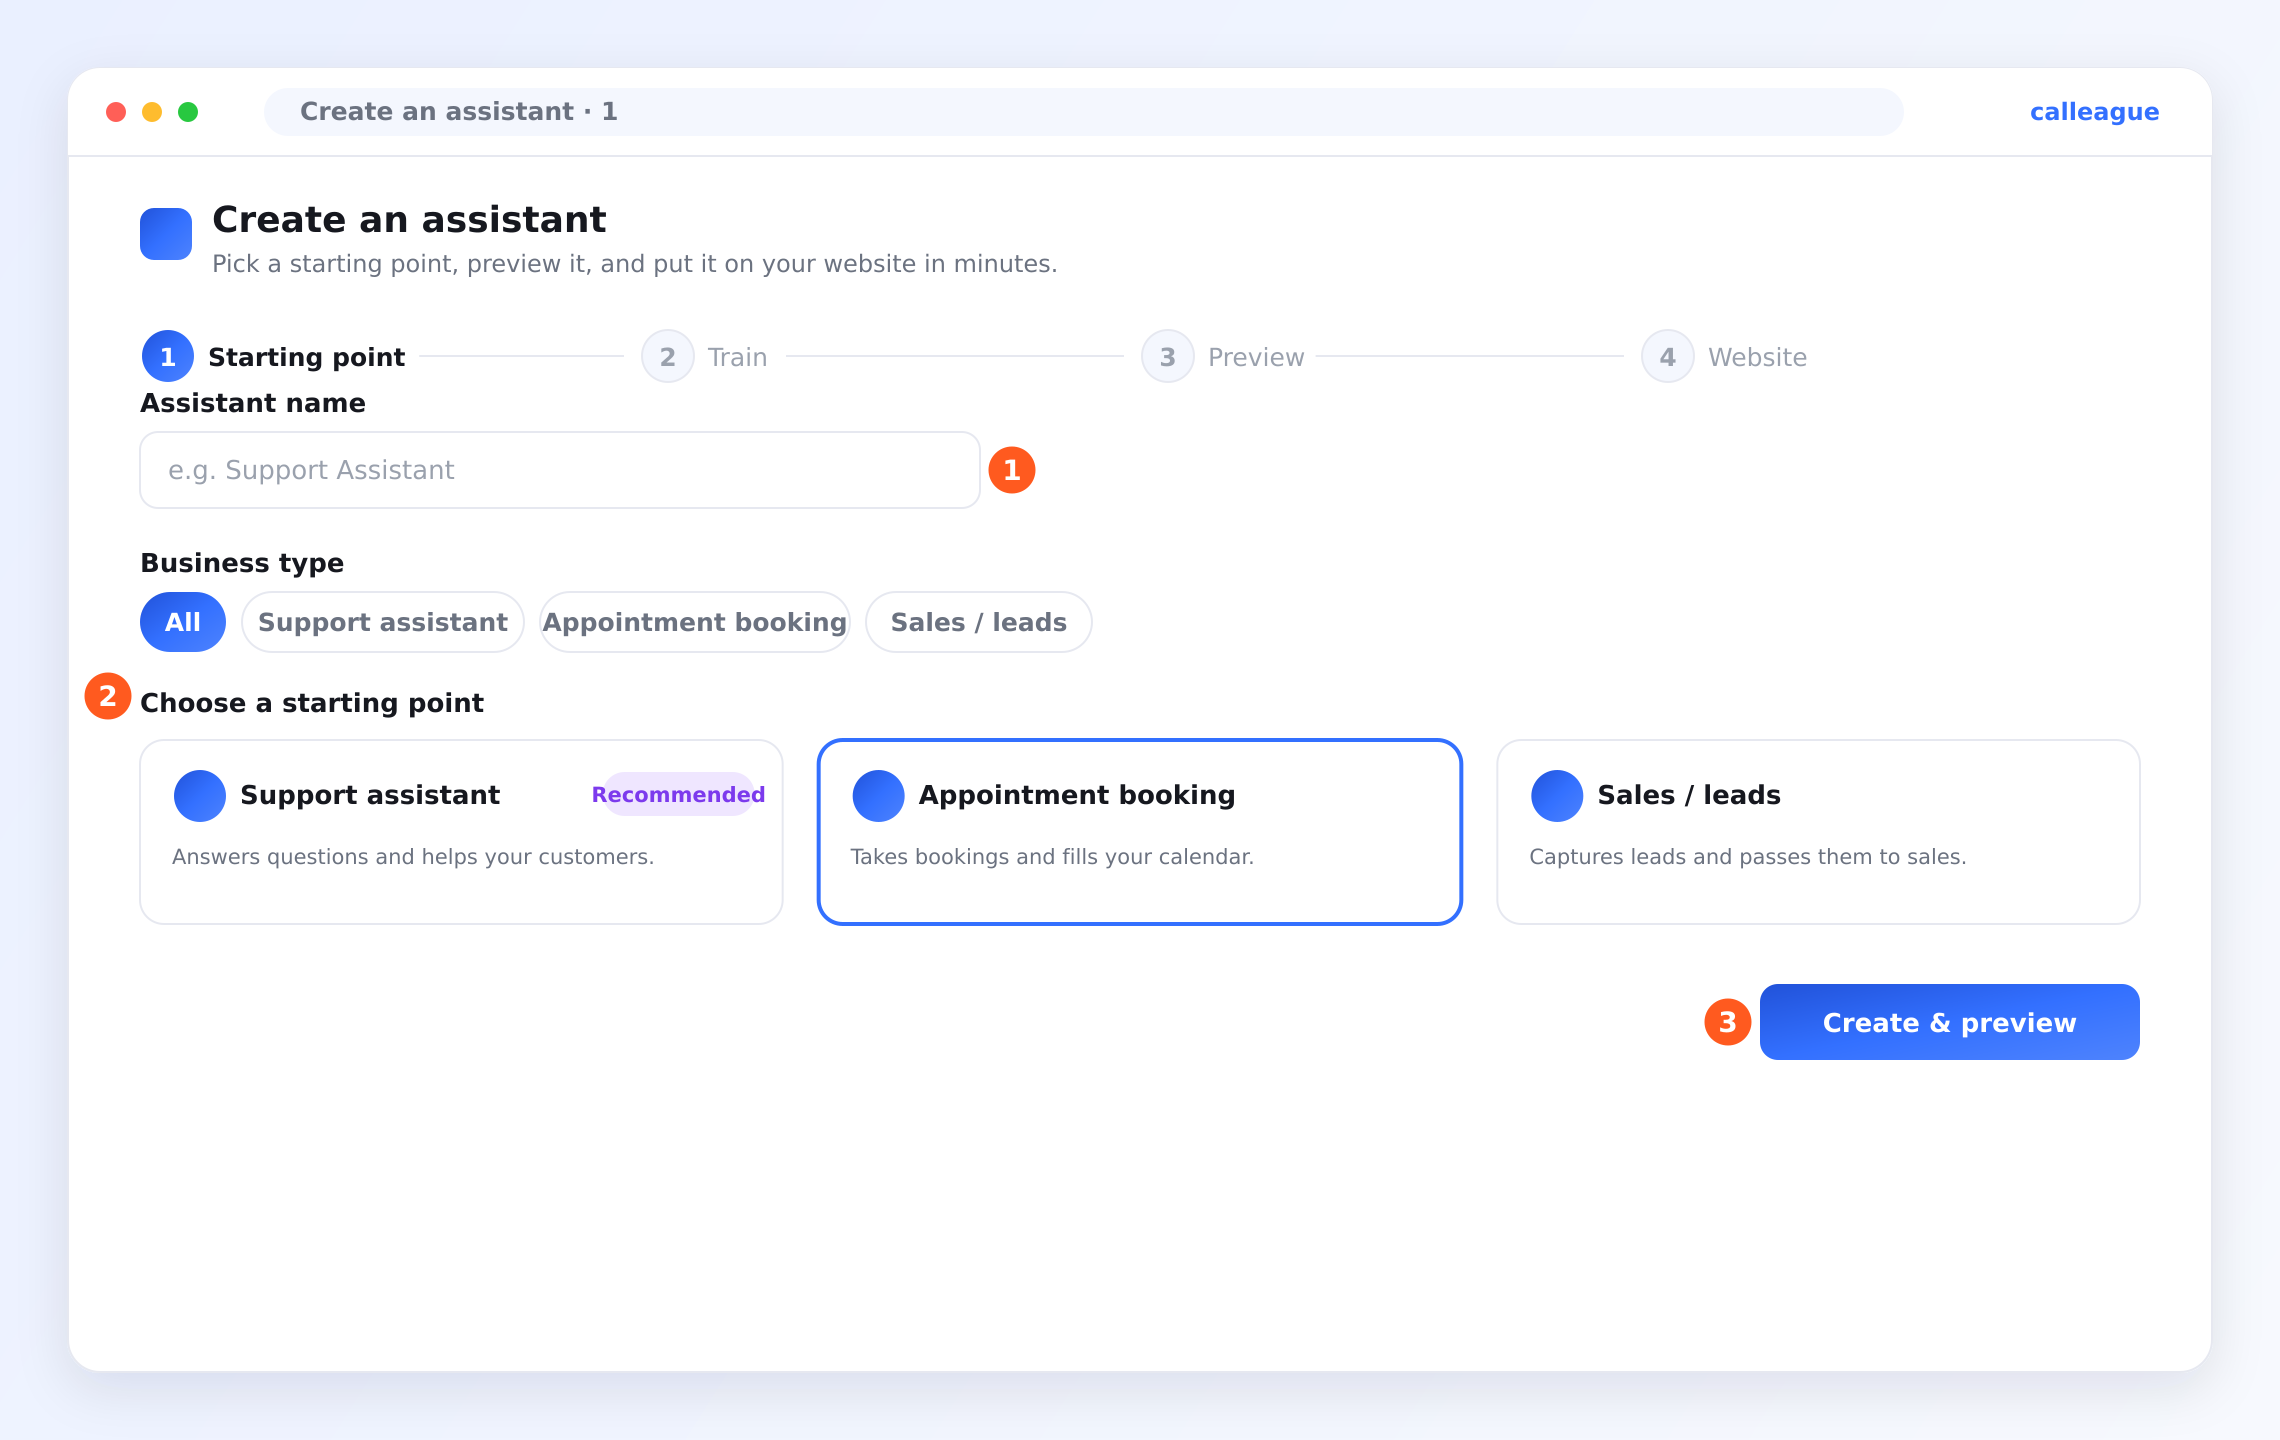
1) Starting point — name it, pick a ready-made template
In the "Assistant name" box, type a name for your assistant (for example Support Assistant). If you like, pick a business type from the row at the top ("All", "Support assistant", "Appointment booking", "Sales / customer") to narrow the cards down, then pick a card. Then pick one of the three starting points on screen — "Support assistant", "Appointment booking", or "Sales / customer". Choose the starting point closest to your business (for example, "Appointment booking" for a business that takes appointments). Don't worry if your exact industry isn't there — pick the nearest one, then customize it with your own information; you can change everything later. When you're ready, press "Create & preview".
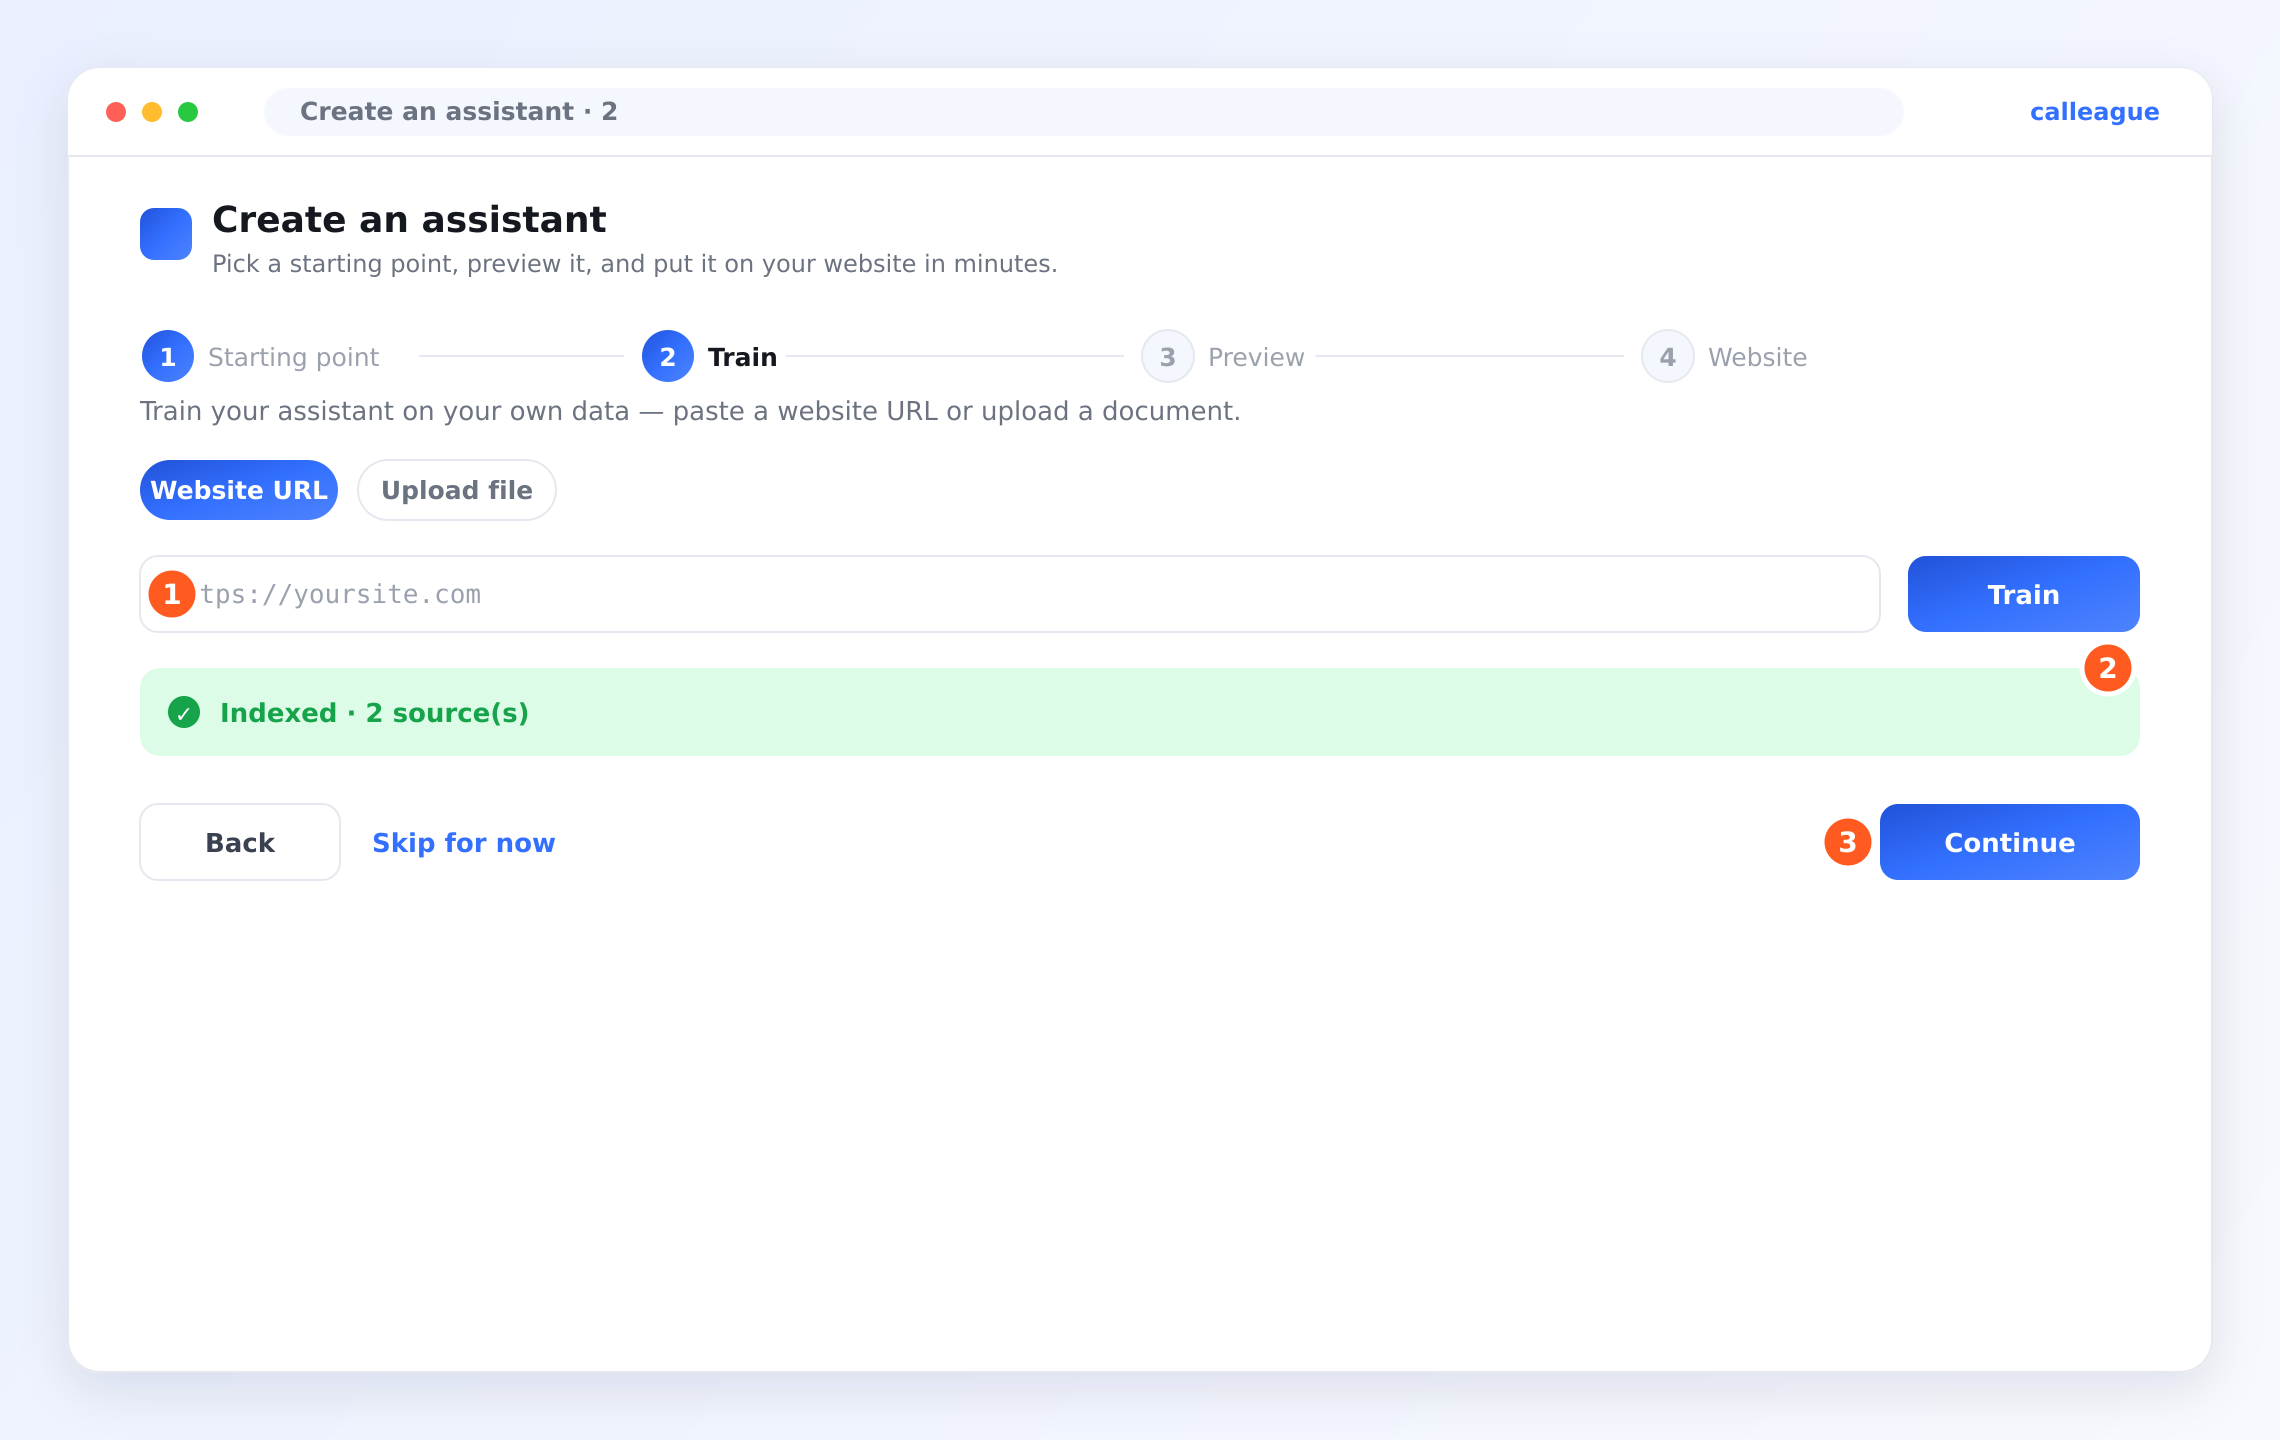
2) Train — introduce your business
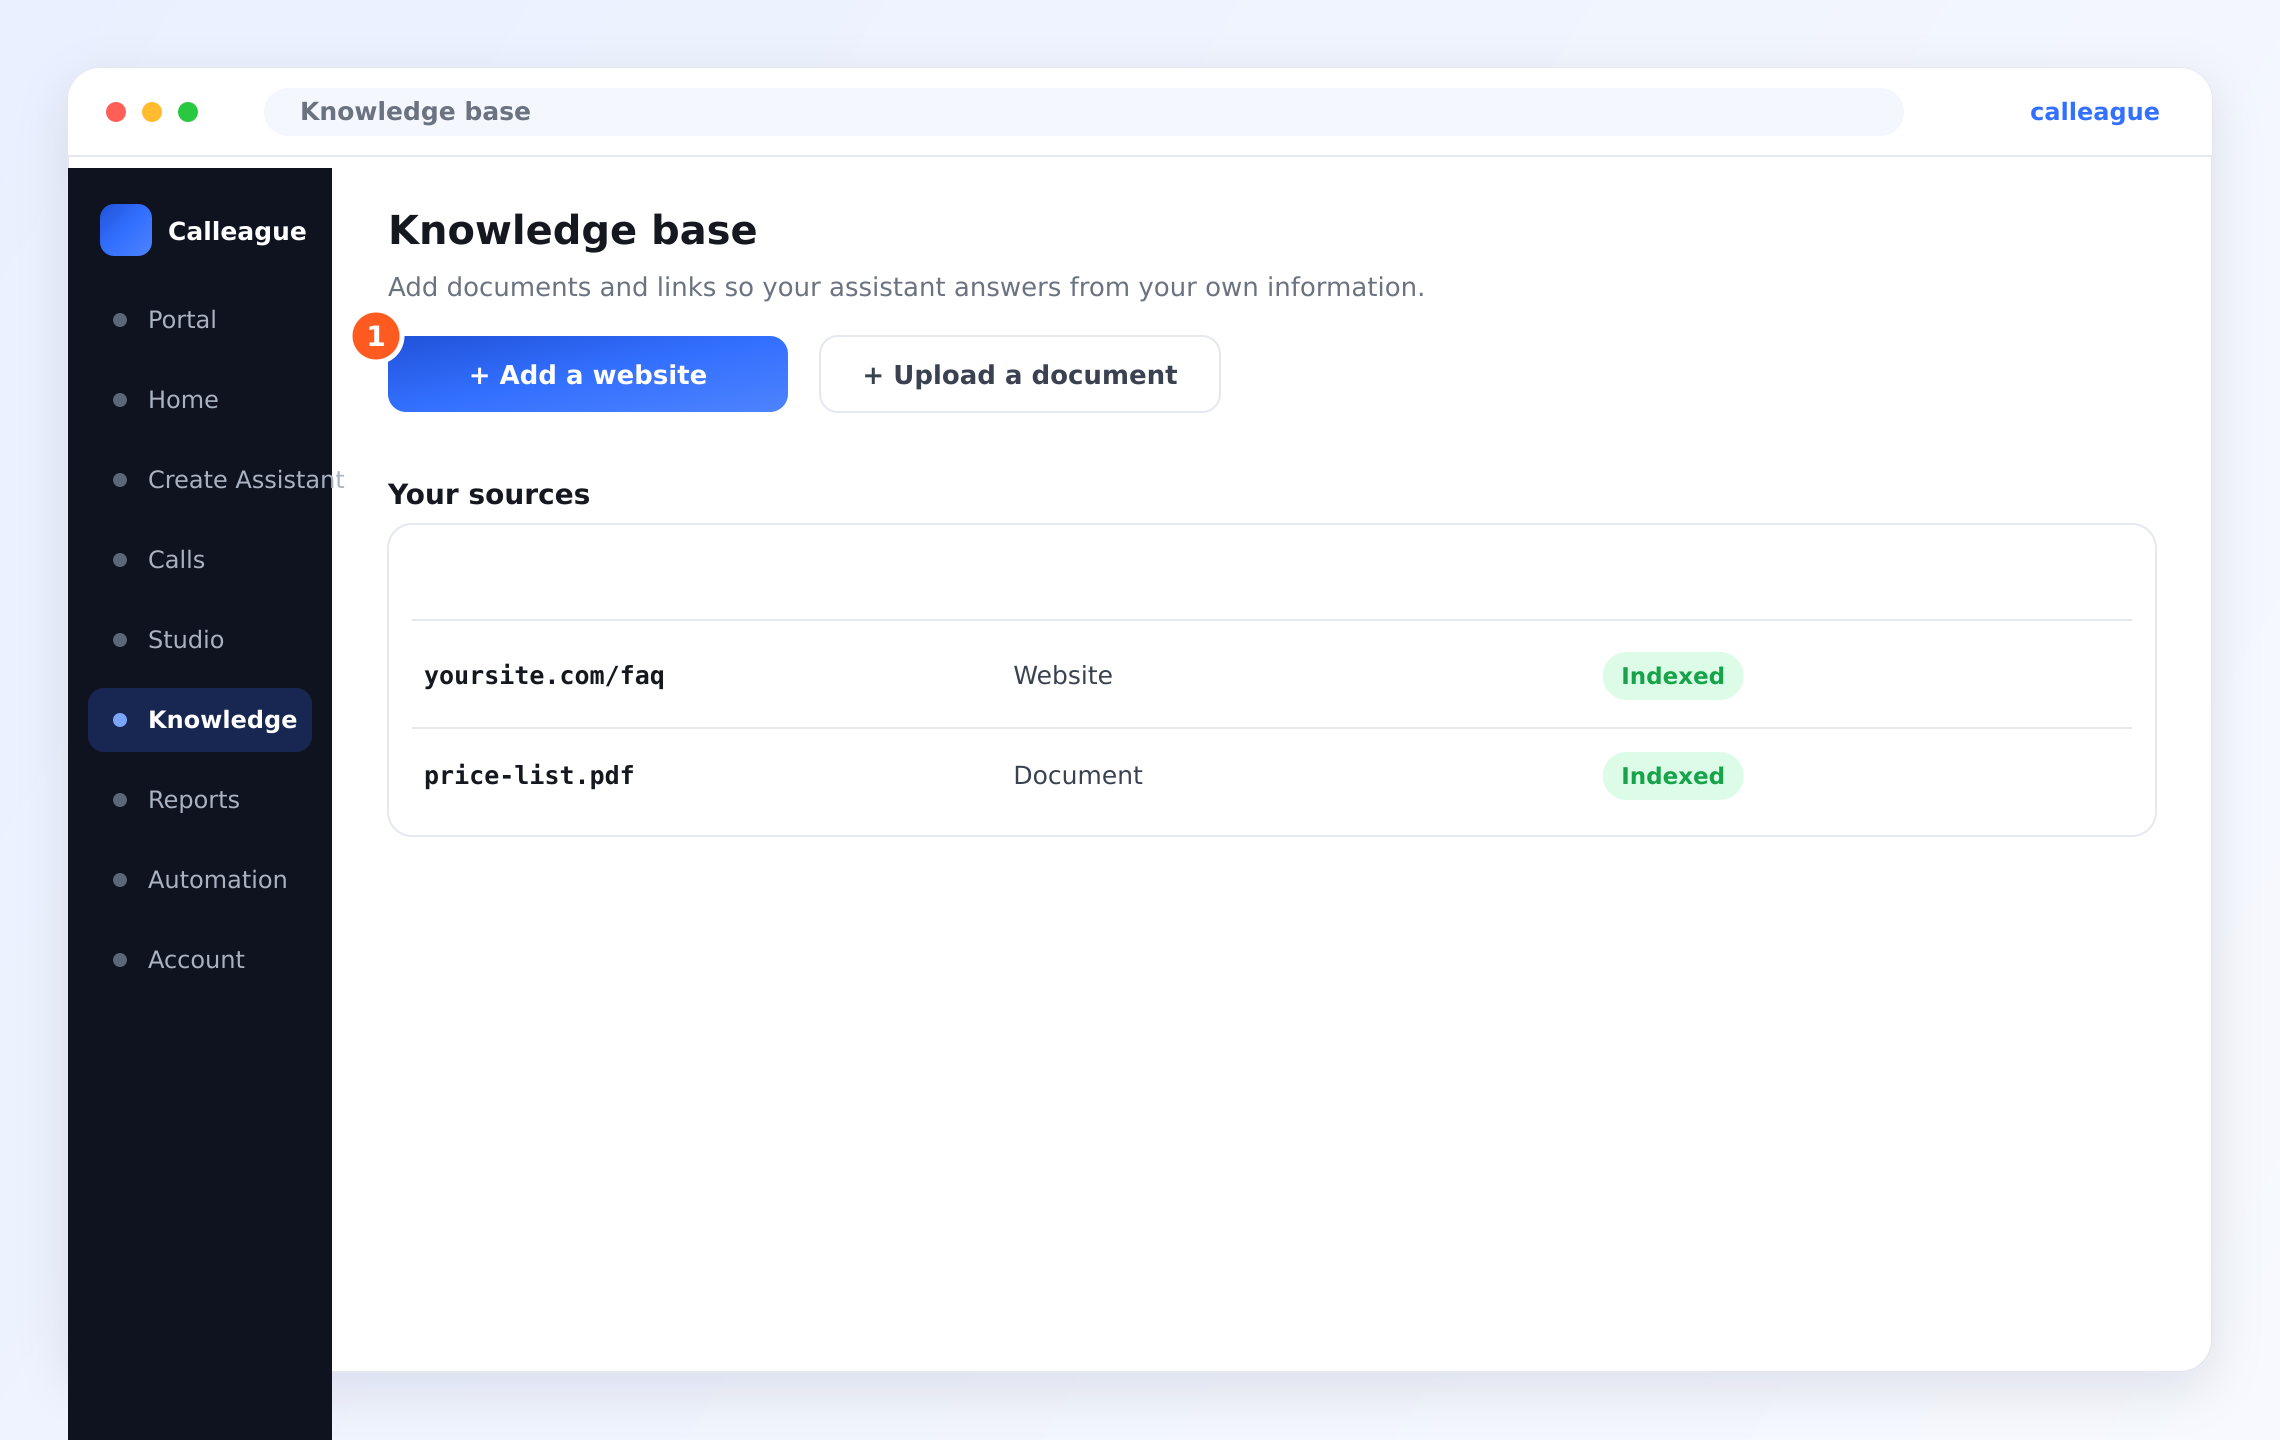
Here you teach your assistant about your business. Two easy options: paste your web address (e.g. www.yourbusiness.com) into the "Website URL" box, or add a document on the "Upload file" tab. On a phone you can also upload a photo/JPG — if your menu or brochure is a photo, upload it as is. Everything you add appears in the "Your sources" list. Once the assistant reads it, you'll see "Indexed" on screen (meaning: it has read it and now knows it); then press "Continue". No rush? Press "Skip for now" and add the information later.
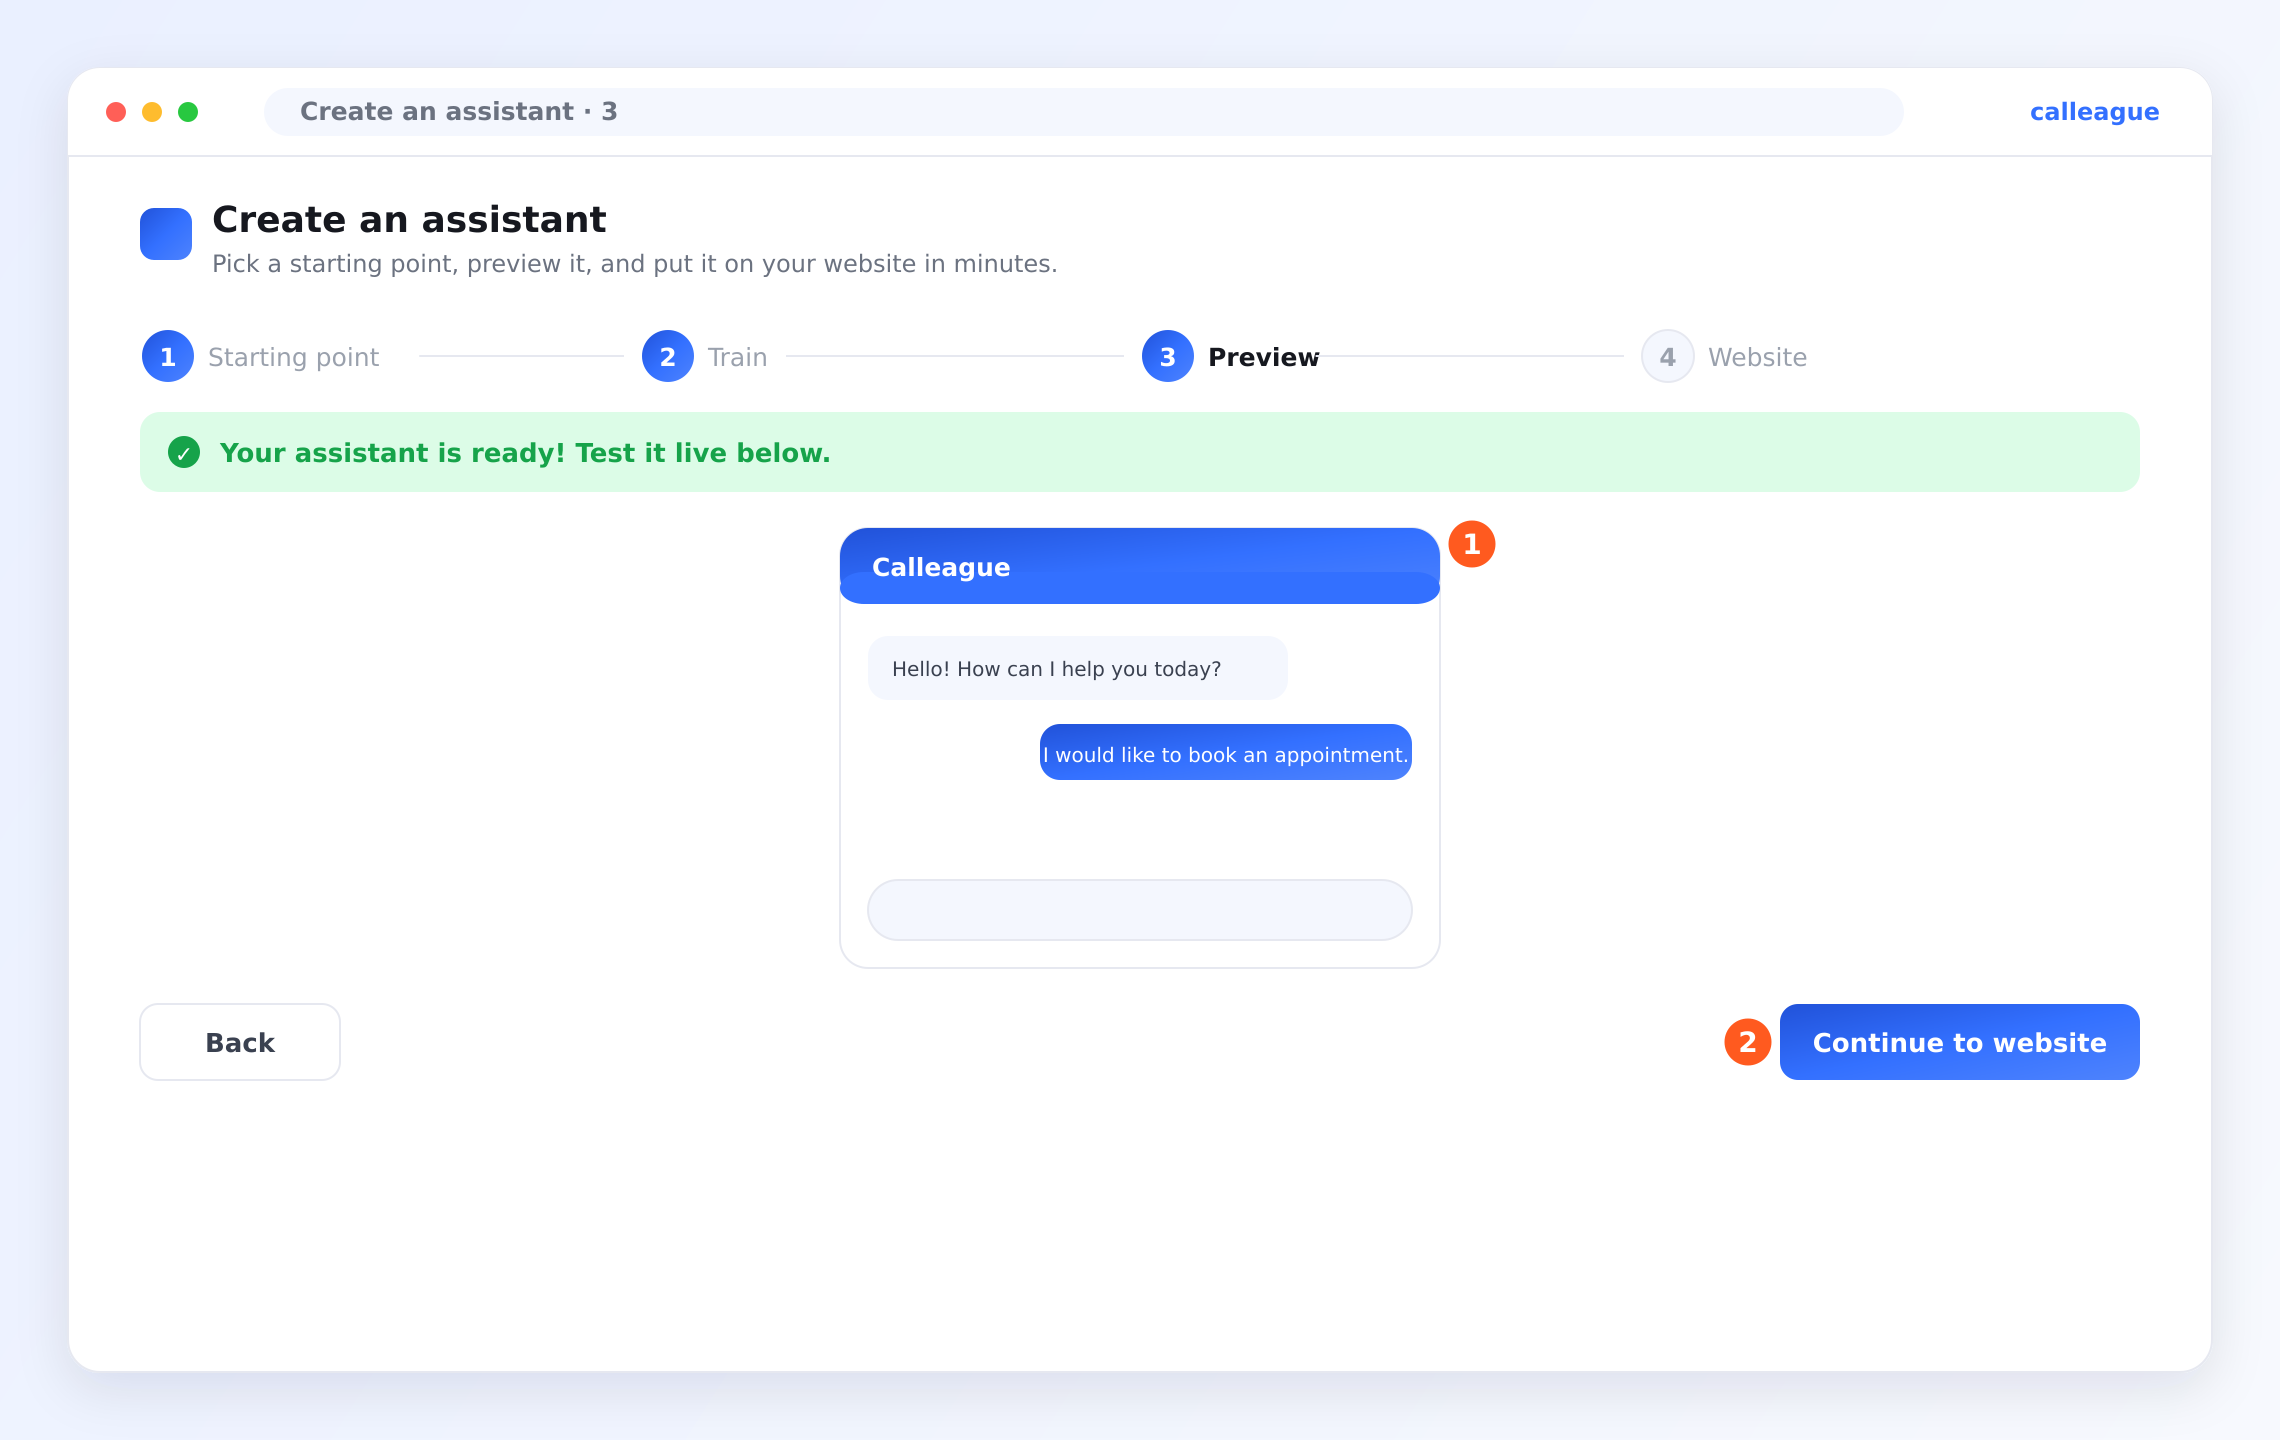
3) Preview — try it yourself before customers see it
A live chat box appears. Type a real question a customer might ask and watch how it replies. Happy with it? Press "Continue to website". If a reply isn't quite right, go back to step 2, add more knowledge, and try again.
4) Website — go live (or share the link)
First you set the look: with "Customize widget" choose the Color, the Position (Right or Left), and the "Widget title". (A widget is the small chat bubble that appears in the corner of your website.)
Then, in the "Website code" area, you'll see a single line of code. Copy it with the "Copy code" button; as a tip it says: "Paste this single line into your website — chat + voice, one widget."
You do NOT need to understand this code. All you do is copy and paste it. If you didn't build your site yourself, send this line to whoever manages your site — there's a ready-made email template in the "I can't add it to my website myself" question below; just fill it in and send.
If you don't have a website, skip this step: use "Open the app" to use the assistant directly, or share your Share link (a ready-made chat link created automatically when you build your assistant — grab it with "Copy link" and send it over WhatsApp/Instagram/SMS) with your customers. For the step-by-step path, see the "Can I use my assistant without a website?" question below.
For the full, screenshot-by-screenshot guide, see Create your assistant.
Calls & numbers
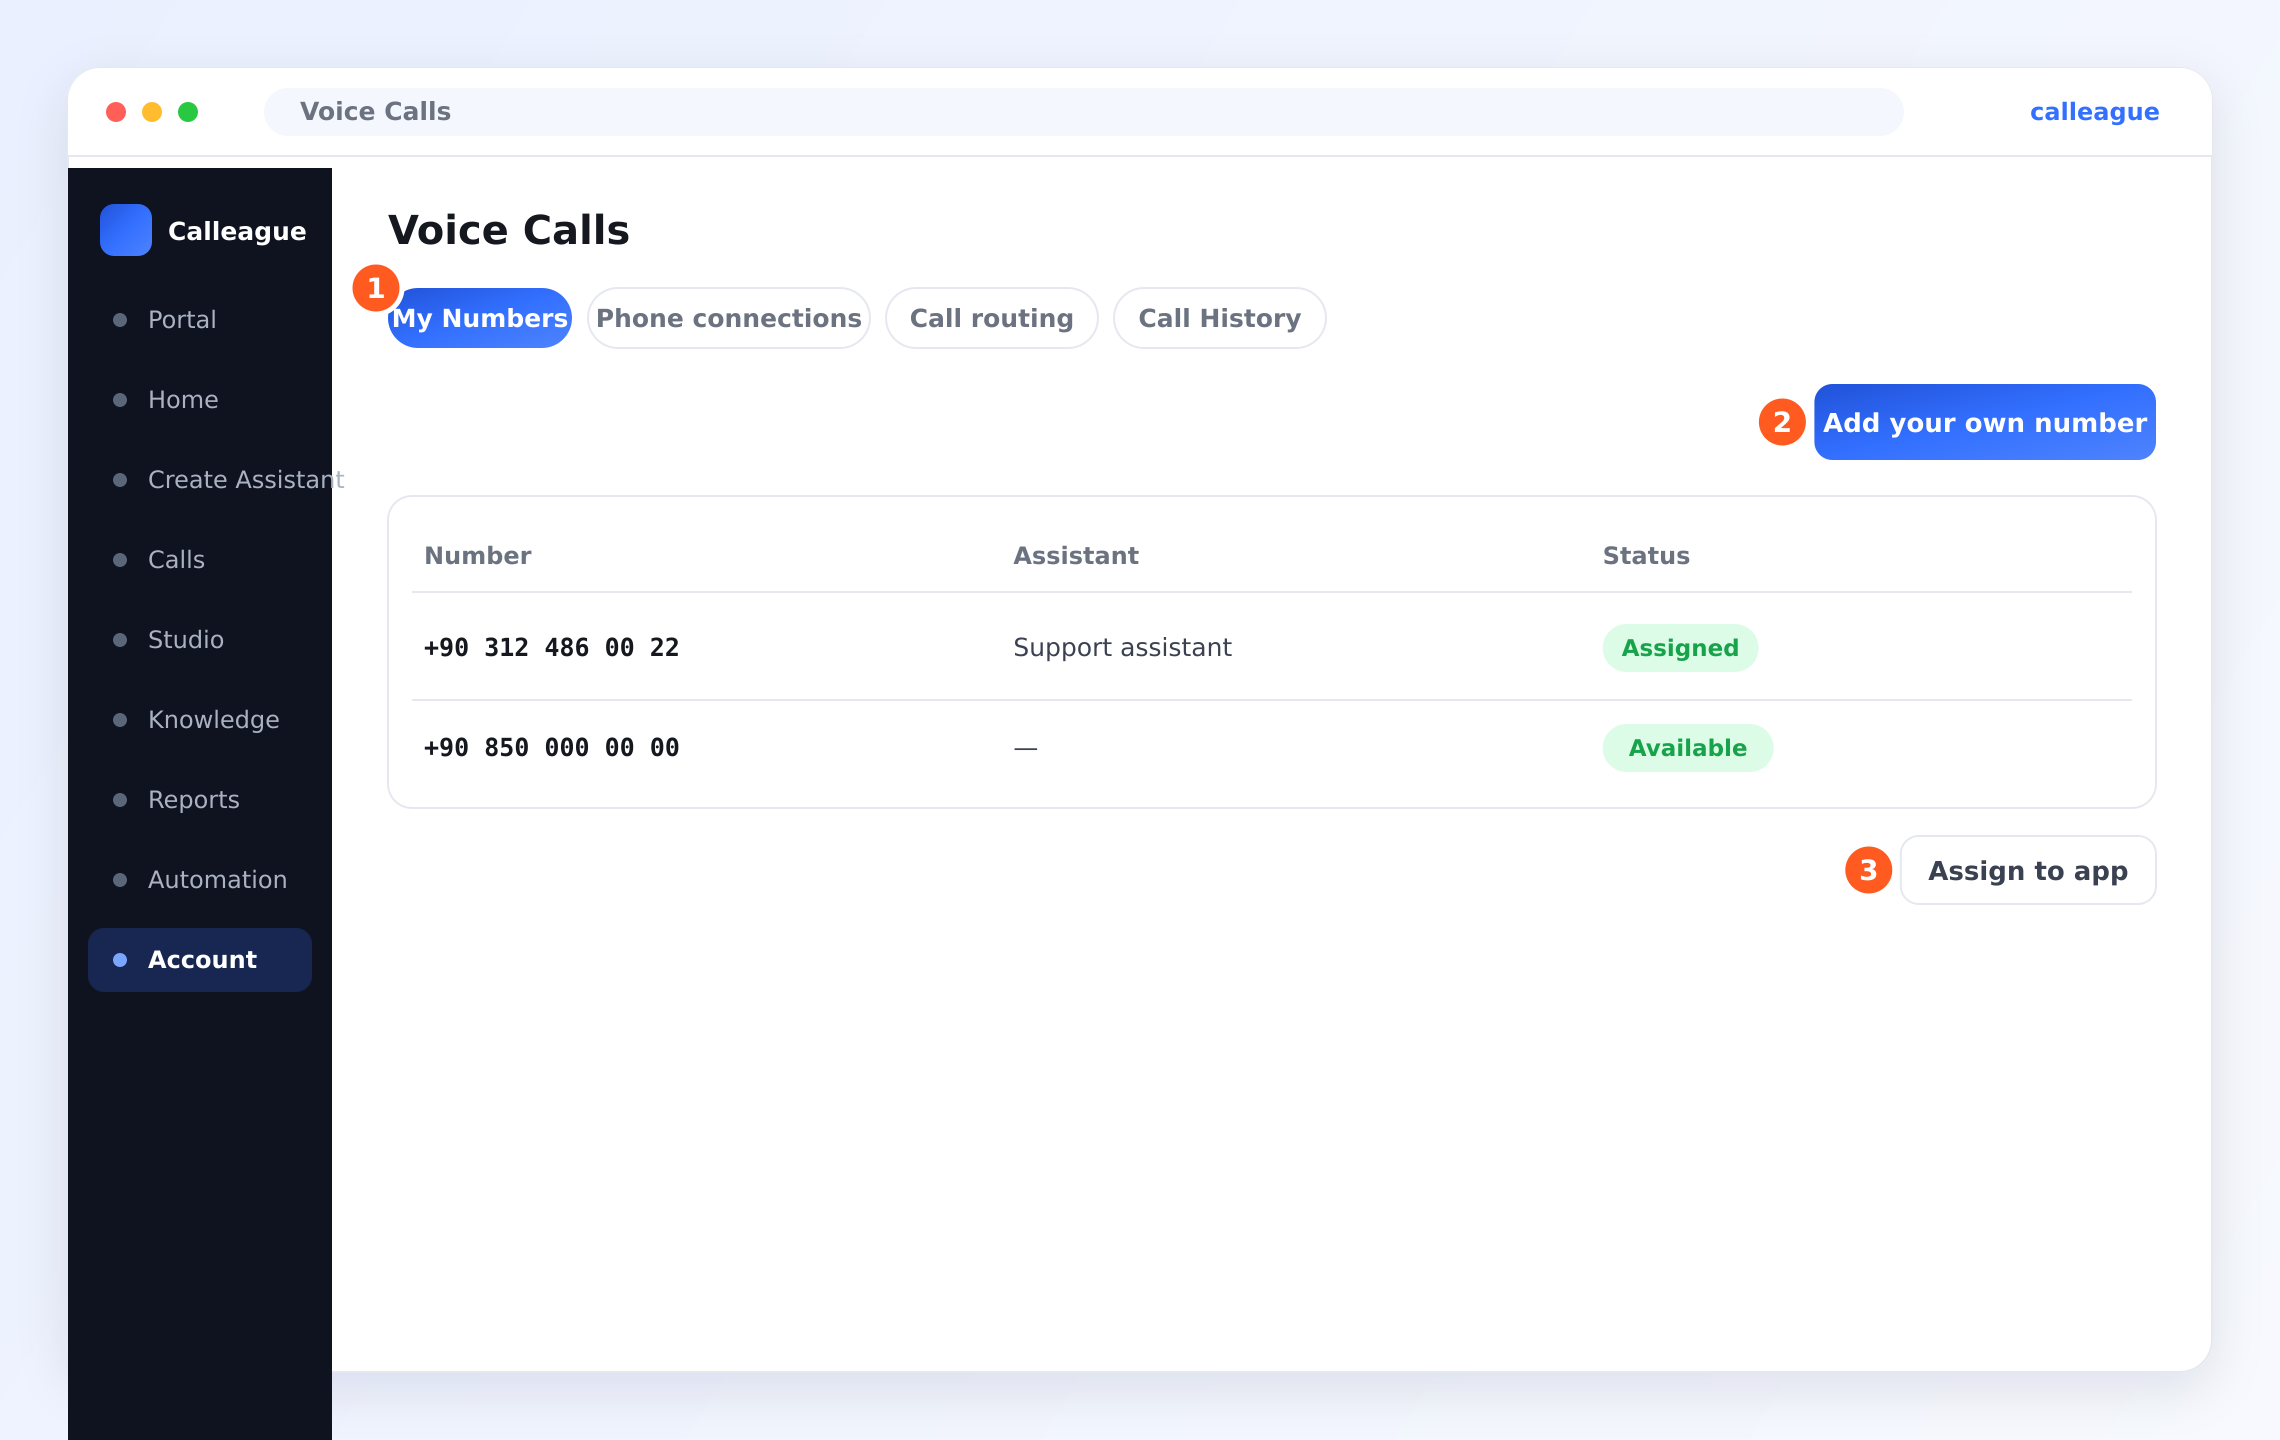
To let your assistant answer the phone, you connect a number: open Account from the left menu (on a phone, tap the three horizontal lines ☰ at the top left), then open the "Voice Calls" section on the page that appears. Then your conversations start landing in the Inbox.
Knowledge
The Datasets page is where your assistant learns your business, so it answers from your information instead of guessing. Reach it from Datasets in the left menu (on a phone, the ☰ menu at the top left).
Data & privacy
Plans & billing
If something looks different
Screens evolve over time, and small things can trip you up at first. Try this table — it solves most "wait, where is it?" moments in under a minute.
| What you see | Why it usually happens | What to do |
|---|---|---|
| I can't find where to add a phone number | Numbers live under Account, not on the Overview screen | Go to Account → Voice Calls → My Numbers and click "Add Your Own Number" |
| "Create & preview" won't continue | The "Assistant name" is empty or no template is chosen | Type a name, pick the template closest to your business, then press "Create & preview" |
| I don't see the "Indexed" message | The website or file hasn't been processed yet | Re-add the web address, or upload the file again and wait |
| I pasted the code but no chat bubble appears | The single-line code isn't on the live page yet | Make sure the code is added to your site (ask whoever manages it if needed); check the Position (Right/Left) |
| The call list looks empty | No number is connected yet, or it's a new account | On a new account this is normal; add and assign a number under Account → Voice Calls |
| I can't invite a teammate | Your role may not allow it | Ask an owner or admin to send the invite or change your role |
| My assistant doesn't know an answer | That information hasn't been added yet | Add a website or upload a document on the Datasets page |
Still stuck after the table? That's exactly what email is for. Send us the details from the steps above and we'll sort it out: info@arpanet.com.tr.
Mini glossary
Stuck on a word? Here are the plain meanings.
| Word | What it means |
|---|---|
| Artificial intelligence (AI) | The technology that lets a computer talk and produce answers like a person; your assistant's "brain" |
| Wizard | A screen that guides you step by step; you do one thing per step |
| Dashboard / Overview | The main screen you see after signing in |
| Chat (Portal) | The screen where you chat with your assistant (in the left menu) |
| Studio | The advanced area where you design the assistant in detail; the assistant's "Publish" tab opens from here (in the left menu) |
| Publish | A tab inside the assistant (open your assistant from Studio to reach it); the "Get started" box holds your Share link |
| Widget | The small chat bubble that appears in the corner of your website |
| Code / line | A small piece of text added to a website; you don't need to understand it |
| URL | A web address, for example www.yourbusiness.com |
| Indexed | The assistant has read the information you added and now knows it |
| Transcript | A phone conversation written out as text |
| Tab | The heading buttons at the top of a screen (e.g. My Numbers, Call History) |
| Share link | A ready-made chat link you send to customers; no website needed |
| Automation | Ready-made rules that run on their own (e.g. a follow-up message); not required for beginners |
| ☰ (three horizontal lines) | The menu button at the top left on a phone; it opens the left menu |
| KVKK / GDPR | Laws that protect personal data (KVKK in Türkiye, GDPR in Europe) |
Next steps
Create your assistant
Build your first assistant with the step-by-step wizard.
Getting started
The overview and your full setup journey.
Voice assistant
Answer the phone and review your calls.
Security & privacy
How your data and recordings are protected.
Couldn't find your question? Email info@arpanet.com.tr — a real person from the Calleague team in Ankara will get back to you, in Turkish or English.
Last Updated