
Knowledge base
Teach your assistant about your business — connect a website or upload a document or a photo of your menu, so it answers from your own information, in your own words. No website needed.
Your artificial-intelligence (AI) assistant is only as helpful as what it knows. The knowledge base — your assistant's notebook — is where you give it your real information: your prices, your opening hours, your services, the questions people ask most. The moment you add something, your assistant can answer from it on every phone call and every chat, accurately and in your own words.
The best part: you don't type any of it out by hand. You simply give Calleague the address of a web page, or hand it a document or a photo, and it reads everything for you. A clinic might add its price list and visiting hours; a restaurant might add its menu; a shop might add its returns rules and delivery areas. Whatever your callers ask about, put it here.
Before you start: all you need for the steps on this page is to be signed in to your account. If you haven't signed in yet, follow the "Sign in" section on the Getting started page — it walks you through signing in with your email, step by step. (Calleague has no "sign up" button; we create your account for you. If you don't have one, write to info@arpanet.com.tr or reach us through calleague.ai.)
How do I open this screen? On your phone or computer, open a web browser (like Chrome or Safari). Type app.calleague.ai into the address bar at the top and press Go / Search (on a computer, Enter); then sign in to your account. (calleague.ai is our promotional site; app.calleague.ai is the app itself — this is where you do your work.) Once it opens, in the left menu tap Knowledge (the page that opens is titled Knowledge base). If you can't see the left menu on your phone, tap the ☰ (three horizontal lines = menu) button at the top-left — the menu opens, and you can pick Knowledge there.
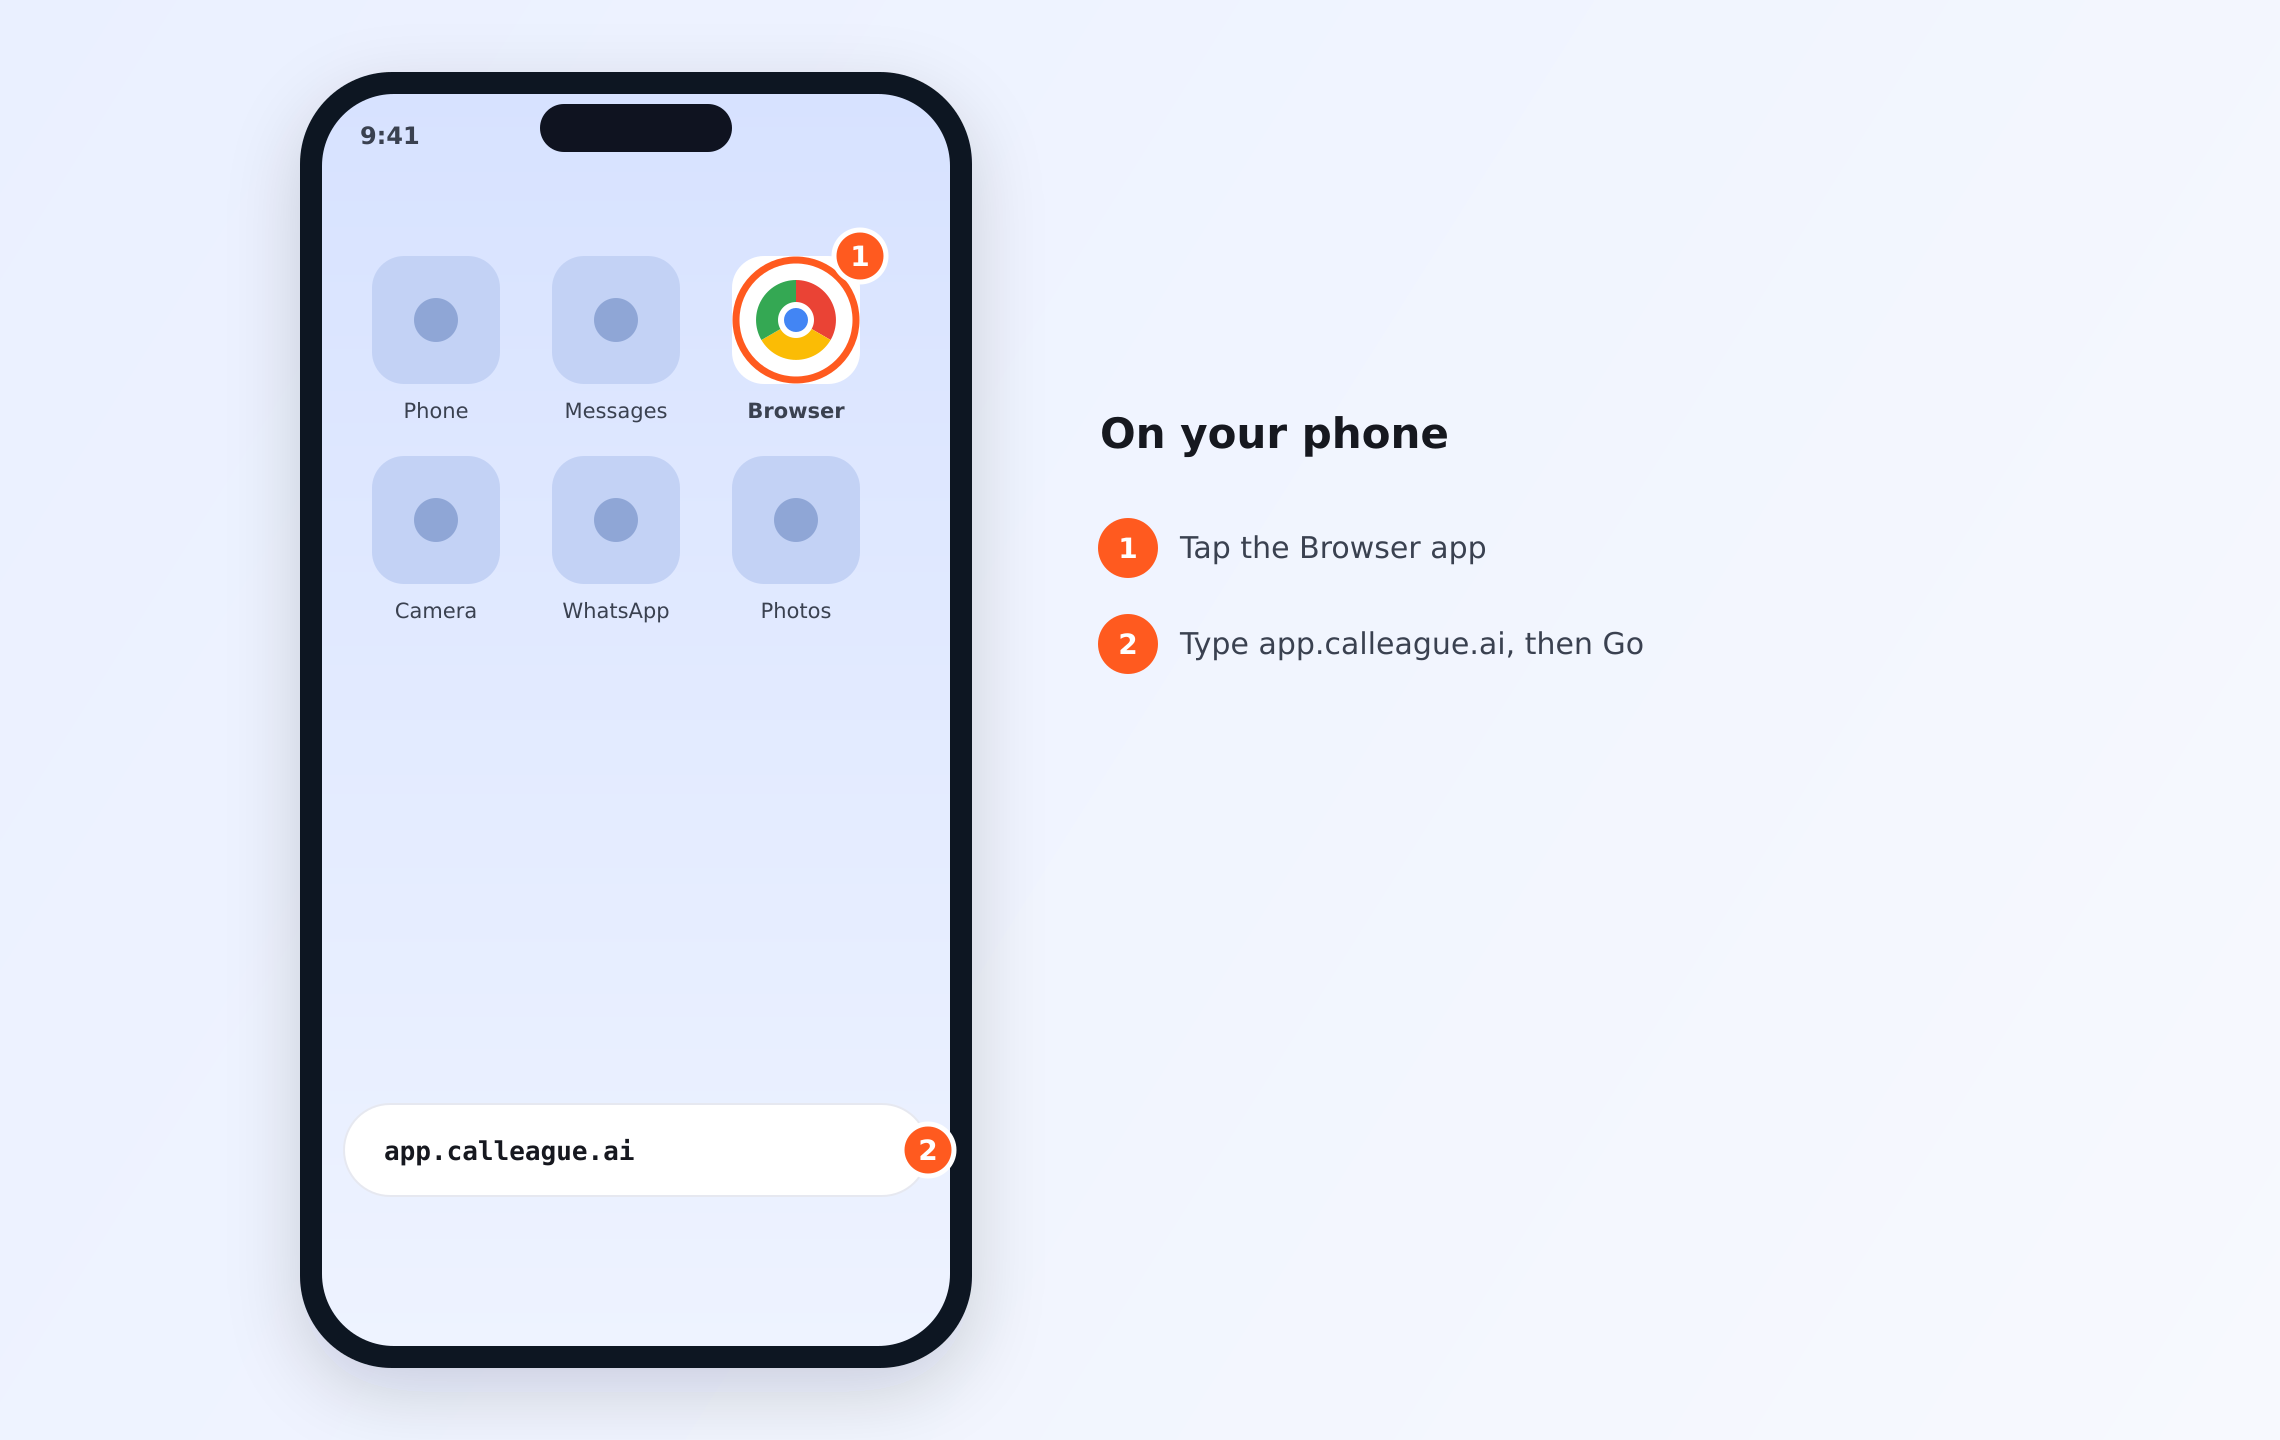
The first step on a phone: ① tap the Browser icon on your home screen, ② then type app.calleague.ai into the address bar and press Go. The sign-in screen then opens.
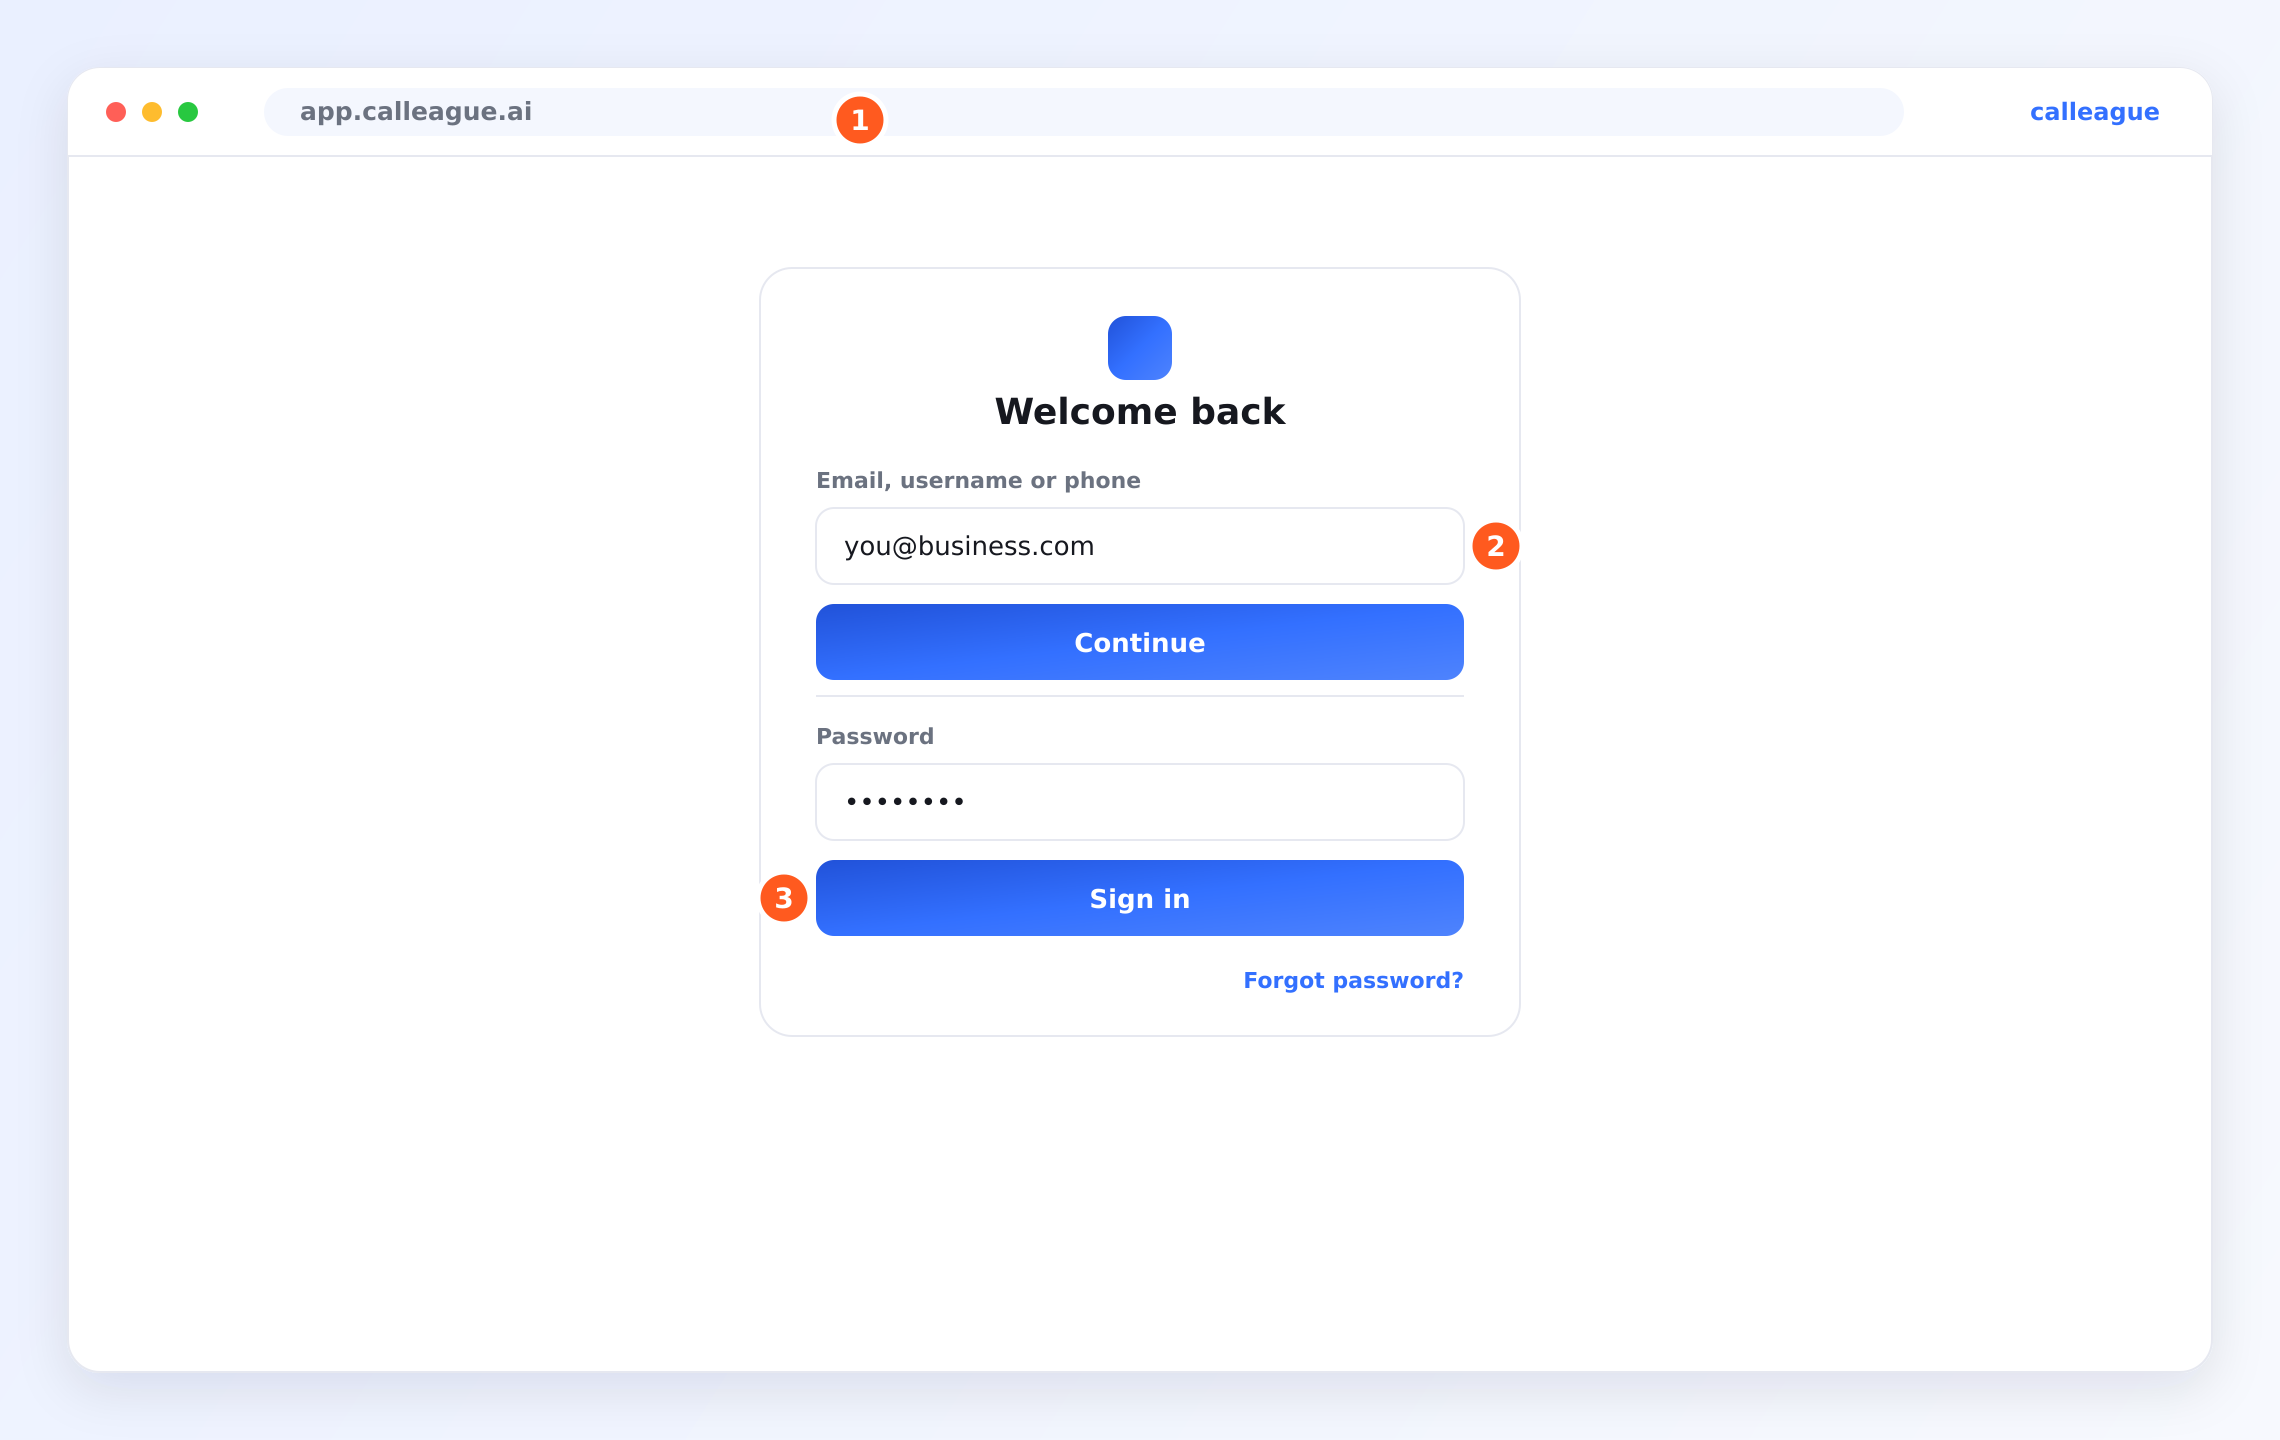
The sign-in screen looks like this image: ① at the top, the address bar shows app.calleague.ai; ② you type your email into the Email, username or phone field and tap Continue; ③ then, in the Password field, you type your password and tap Sign in. If you've forgotten your password, there's a Forgot your password? link at the bottom.
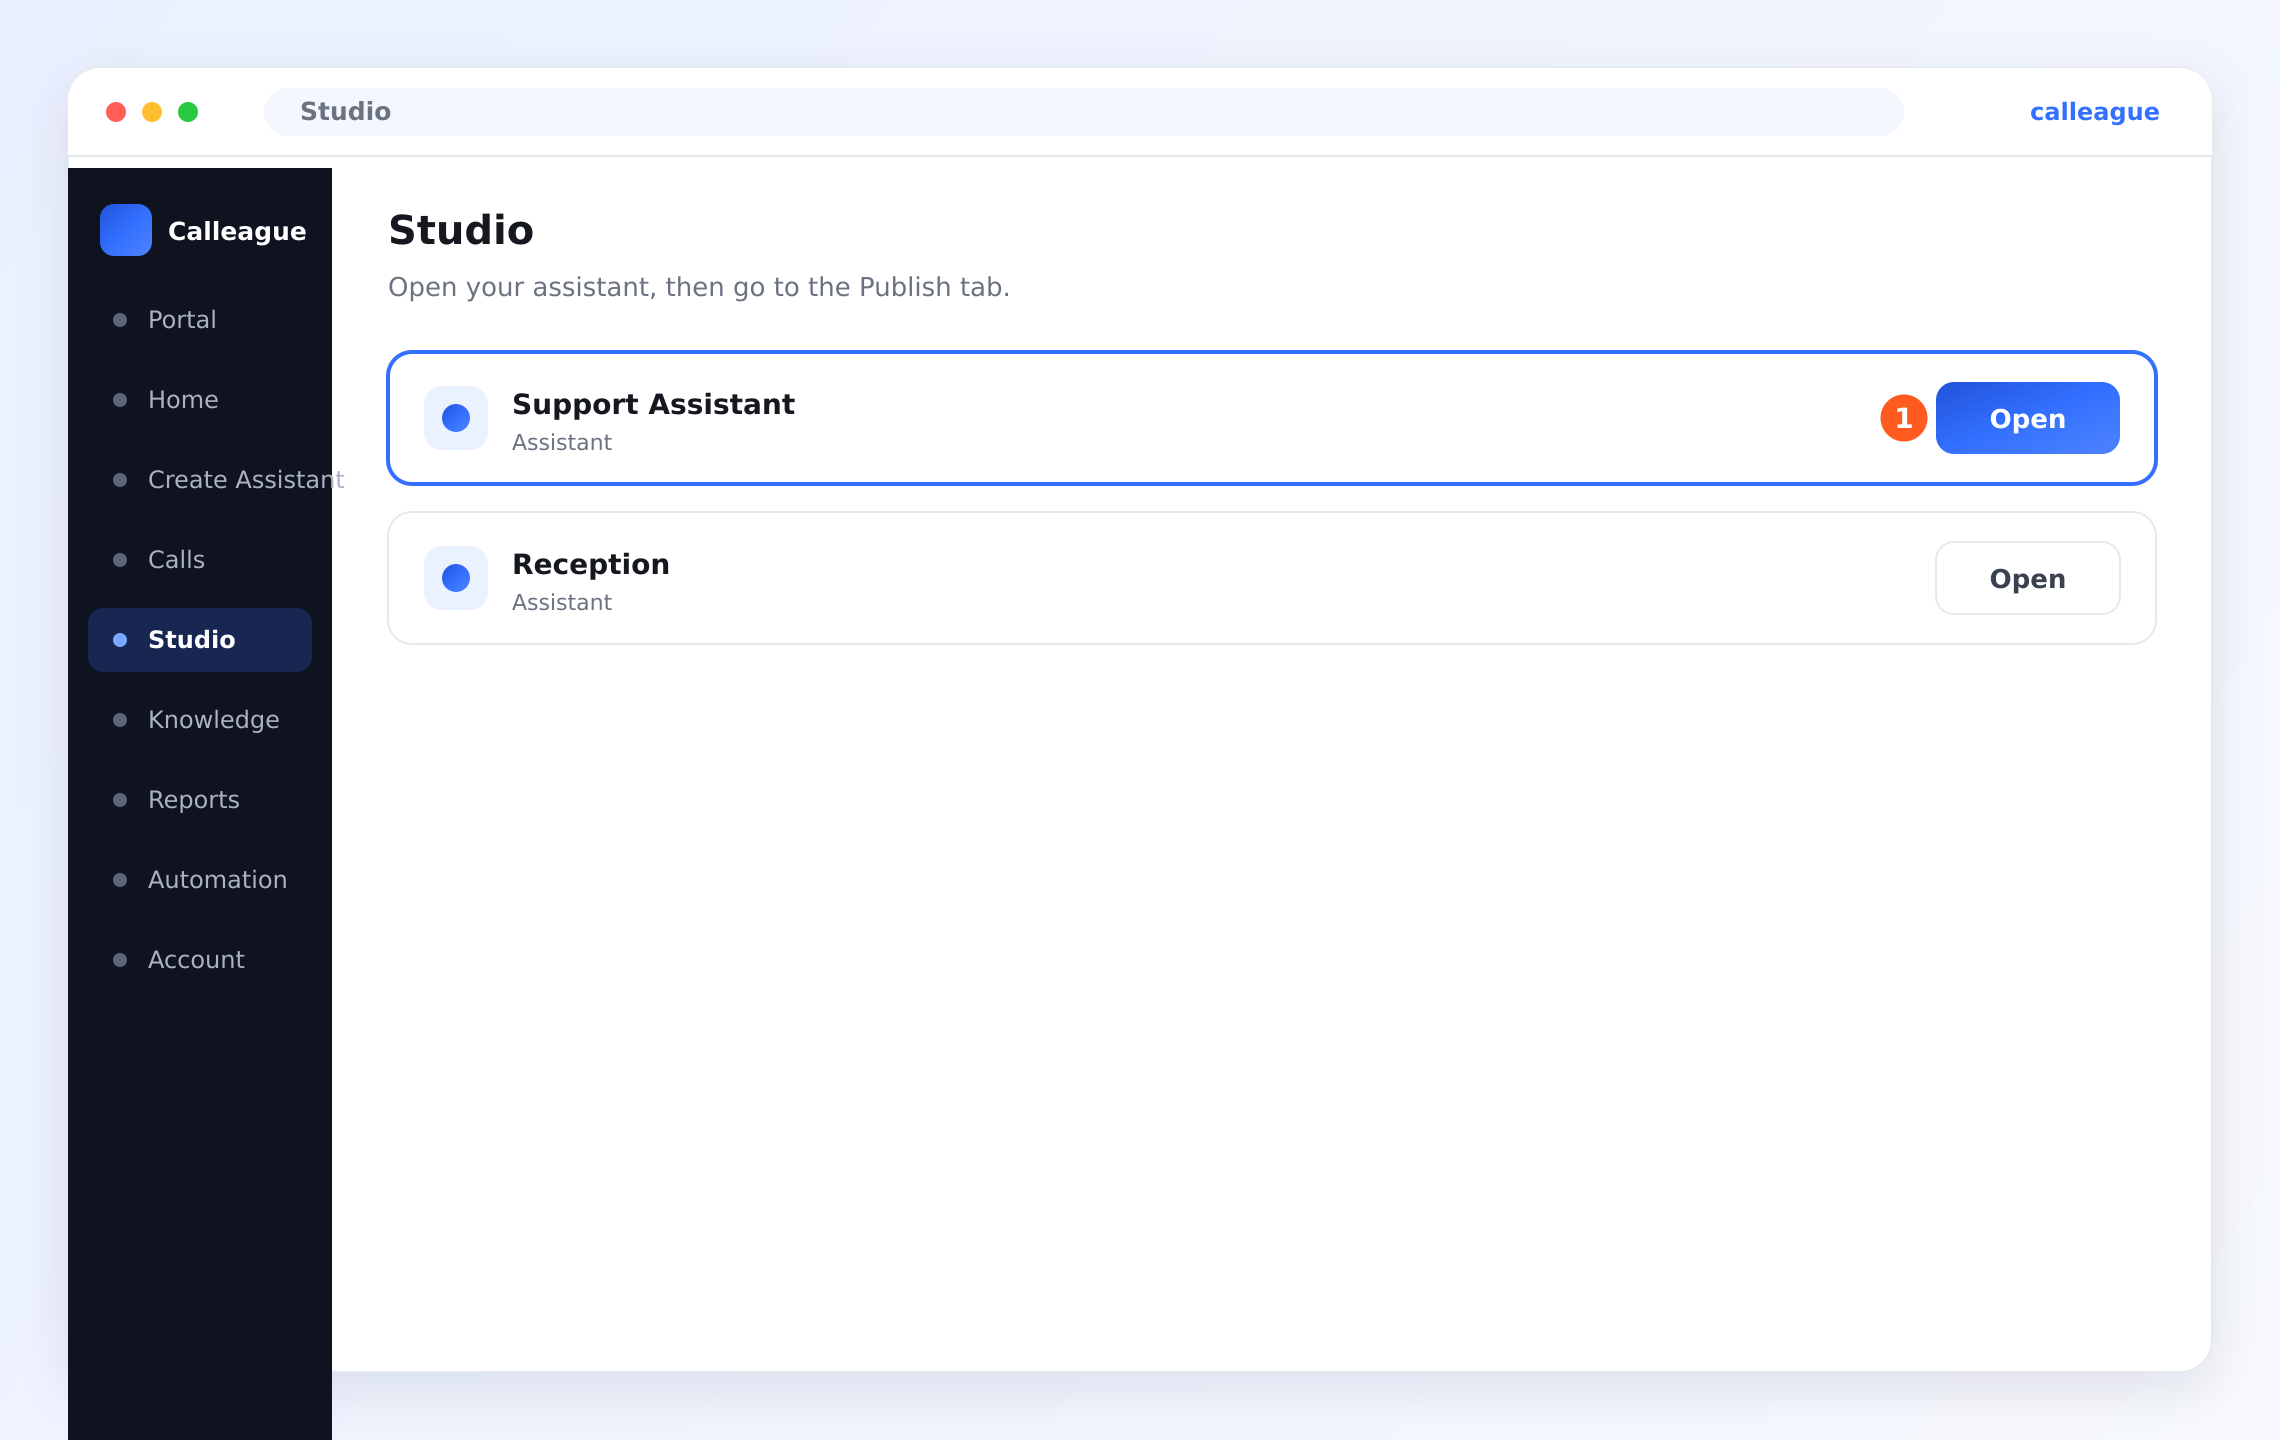
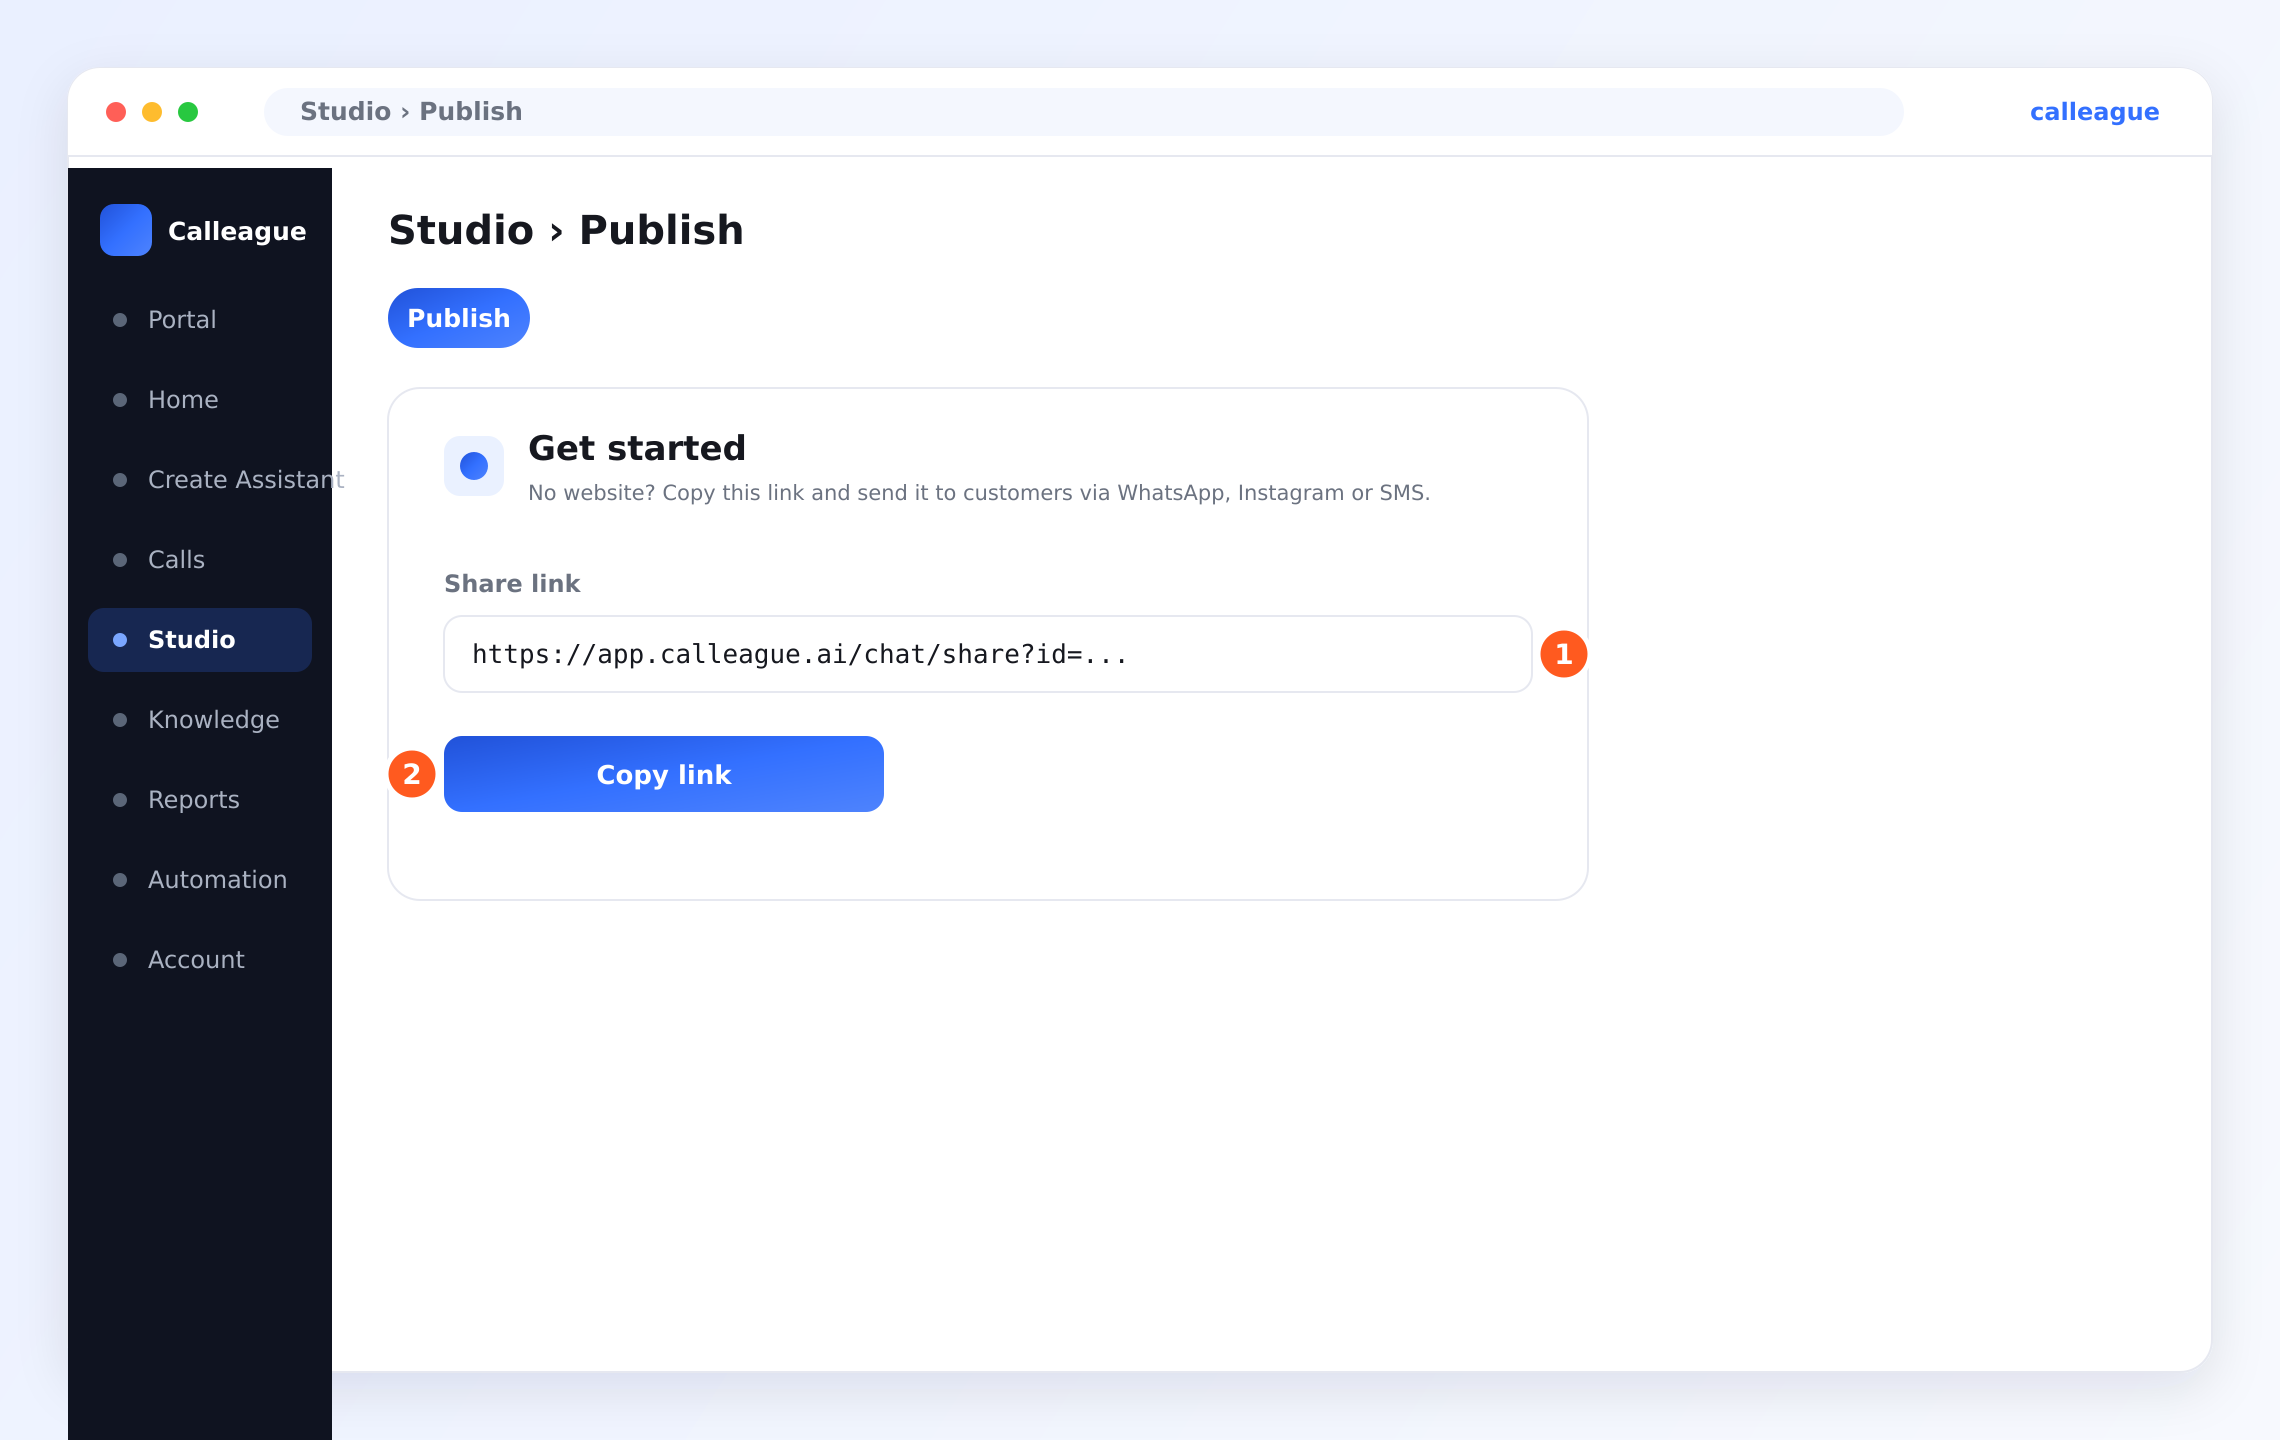
No website? No problem. You don't need a website at all. You have two easy options: (1) Upload a document or a photo — just add a PDF or photo of your menu, price list, or leaflet. (2) To reach customers, use your assistant's Share link: when you create your assistant, a ready-made chat link is generated automatically. To find it, in the left menu (on a phone, tap the ☰ three-horizontal-lines menu at the top-left) go to Studio, tap Open on your assistant's row, and once it opens switch to the Publish tab; in the Get started box, tap the Copy link button next to the Share link, and send the link to your customers over WhatsApp, Instagram, or SMS — no website required. On Instagram, you can put the link in your profile ("bio") link or send it in a DM/message. More here: Put it on your website.
What you'll do on this page
A quick look at the whole task before we start.
| Step | What you'll do | Time |
|---|---|---|
| 1 | Open the Knowledge base (left menu > Knowledge) | 30 sec |
| 2 | Connect a website (paste a link) | 1 min |
| 3 | Or upload a document or a photo | 1 min |
| 4 | Check your sources and their "Indexed" status | 30 sec |
| 5 | Update or remove a source whenever you like | 30 sec |
By the end, your assistant will answer from your information instead of guessing.
Add knowledge step by step
Open the Knowledge base
In the left menu (on a phone, the ☰ menu at the top-left), tap Knowledge. The Knowledge base screen opens.
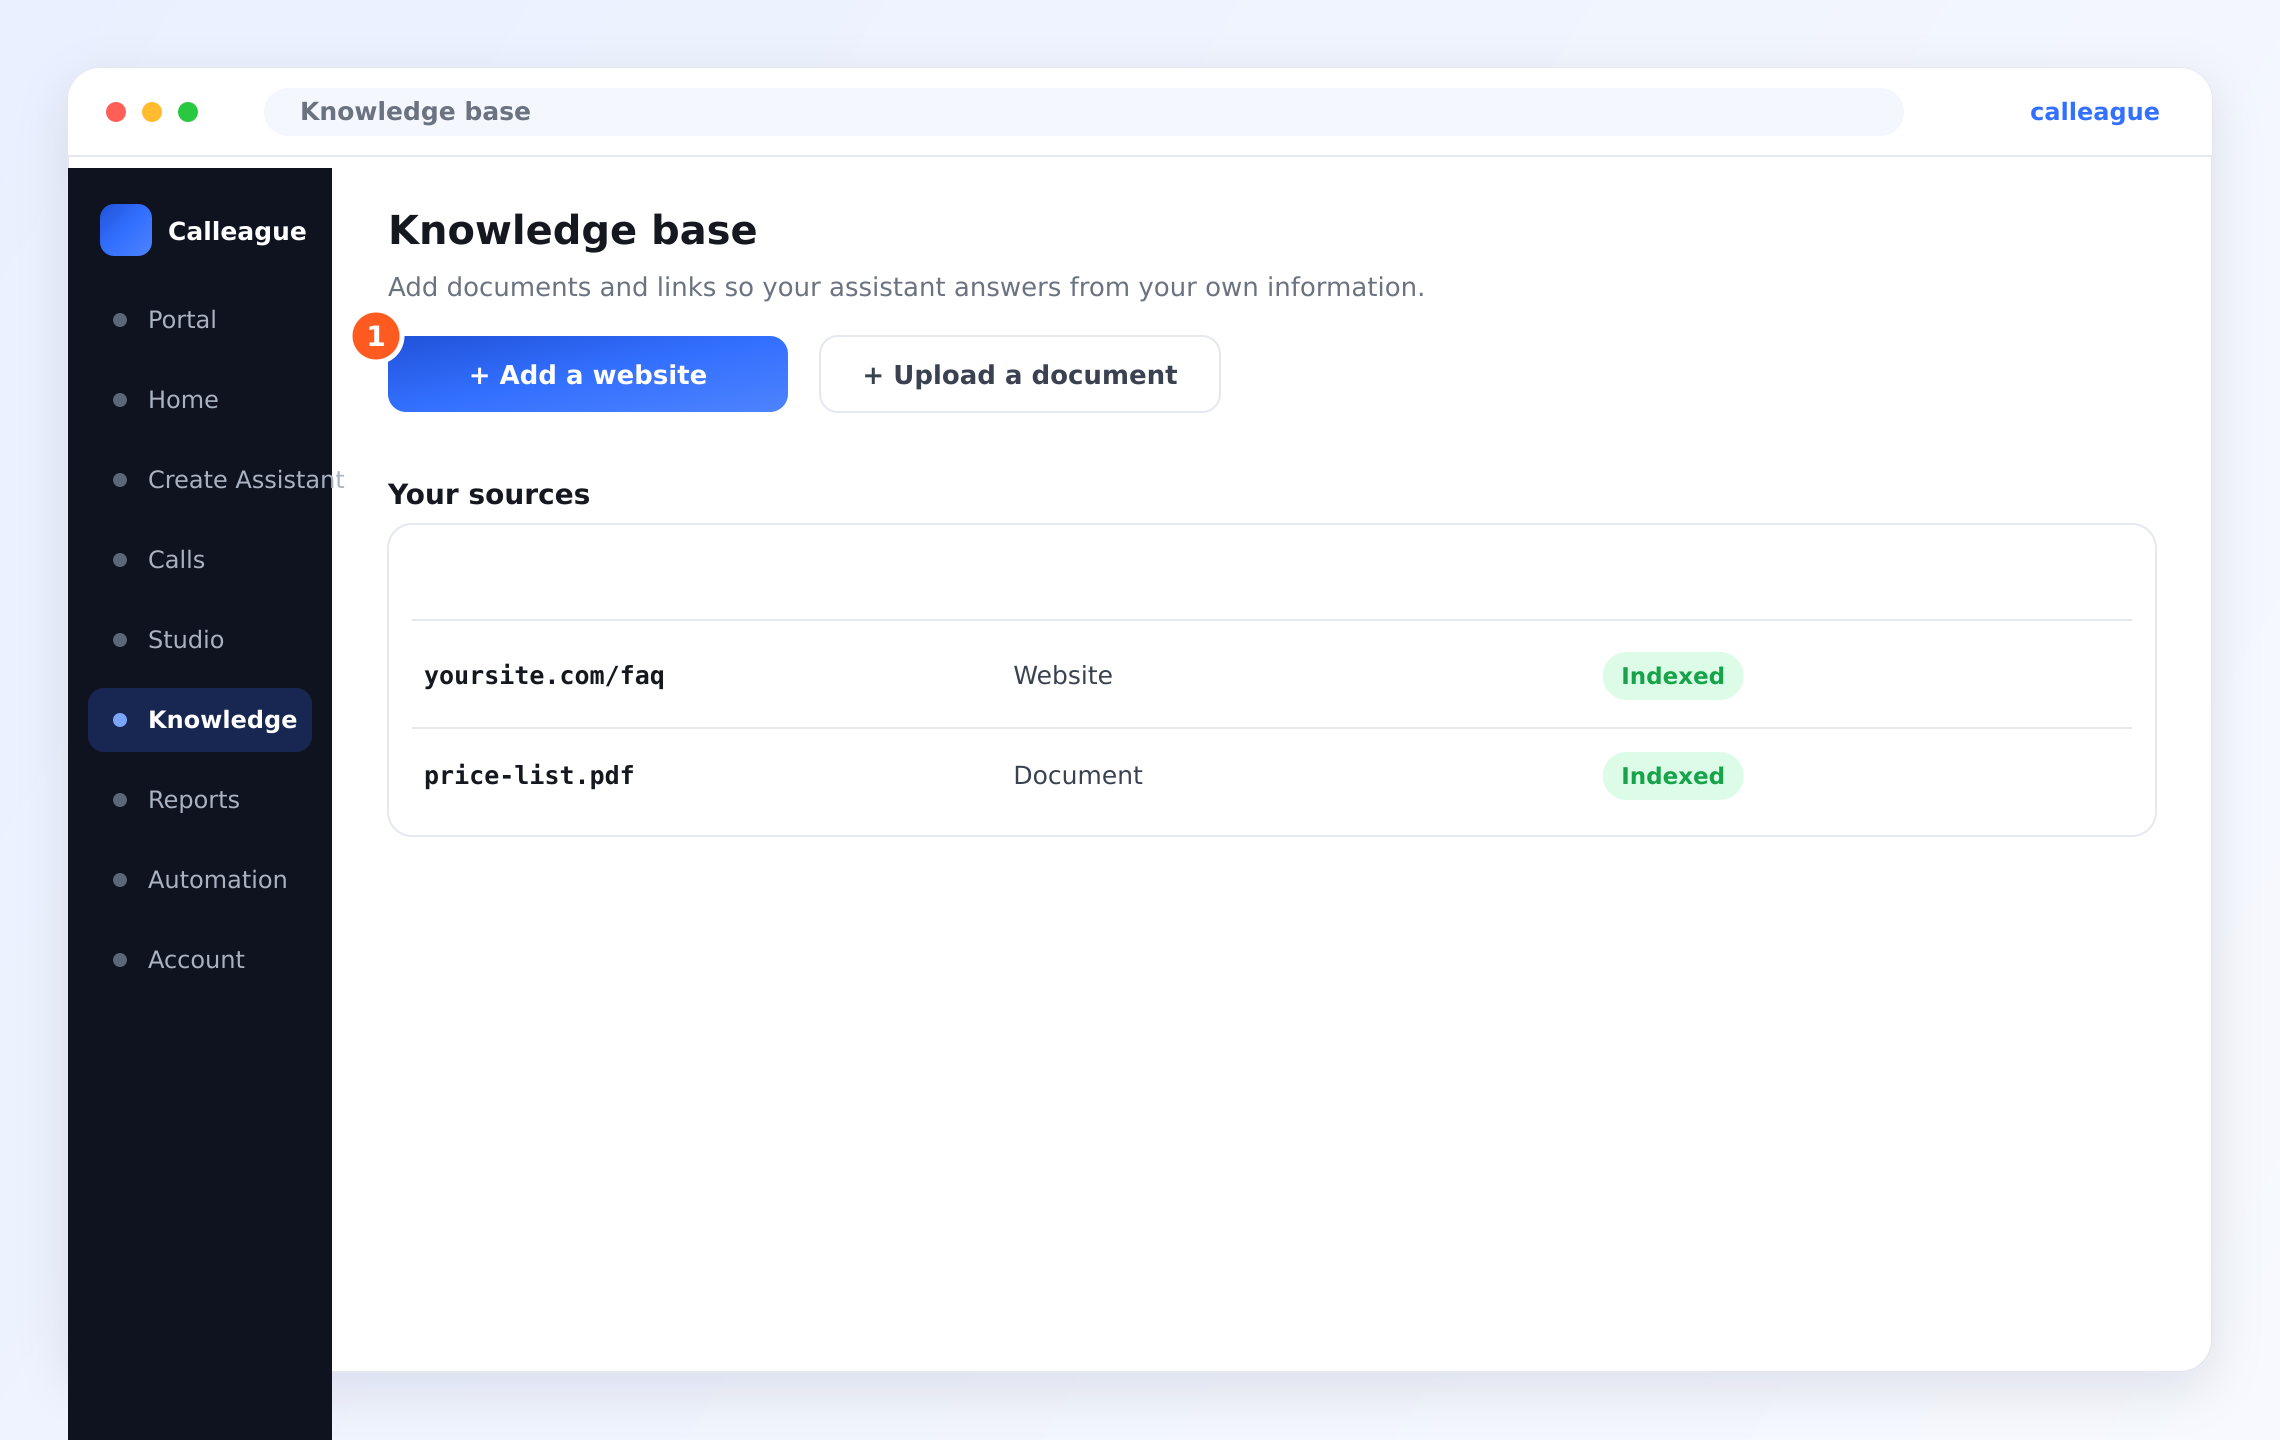
You'll see two buttons near the top: ① + Add a website and, right next to it, + Upload a document. Below them is a Your sources list — everything your assistant knows right now shows up here.
On a brand-new account this list looks empty; that's completely normal. It fills in as soon as you add your first piece of knowledge in the steps below.
Connect a website
If you have a web page with ready information — for example your FAQ or prices page — you can connect it. Tap ① + Add a website, paste that page's URL (web address, e.g. www.yourbusiness.com/faq) into the box, and tap Train.
Calleague starts reading the page. After a few seconds, the page appears in your Your sources list with a green Indexed badge. Indexed means your assistant has read that page and can now use the information on it.
If you're on a phone, here's how to grab the link: open that page in your browser, press and hold the text in the address bar at the top, and tap Copy. Then press and hold the box in Calleague and tap Paste. That's it.
Or upload a document or a photo
If you don't have a website, or you keep your information in a file, this is even easier. Tap + Upload a document and choose a file from your device. The two most common types: a PDF and a Word document — like a price list, a menu, or a one-page set of rules.
If your menu or price list is a photo, that's fine — you can upload the photo (JPG or PNG) just as it is. From your phone you can snap a picture of your menu and add it directly; there's nothing special to prepare. If you're not sure, send your file to info@arpanet.com.tr and we'll add it for you.
Your file appears in Your sources and turns to a green Indexed badge once Calleague has finished reading it.
Check your sources
Look at the Your sources list — here you might see, for example, 2 sources. Each row shows a source (like yoursite.com/faq or price-list.pdf), its type (Website or Document), and its status.
You'll see a green Indexed badge next to each one that's ready. That badge is your sign that the assistant is using that information.
Update or remove a source
Whenever your information changes — new prices, new hours — just add the up-to-date page or file the same way. An out-of-date source can be removed from the Your sources list; when you open its row, you'll find the remove option.
The list updates right away, and your assistant uses the new information on its very next conversation.
There's nothing to restart and no waiting. The moment a source shows Indexed, your assistant can answer from it.
What kinds of things to add
You can mix and match websites, documents, and photos however you like. Good things to put in your knowledge base:
| Add this | Why it helps |
|---|---|
| Your FAQ page | Answers the questions callers ask most |
| Your prices or menu | Lets the assistant quote accurately |
| Opening hours & address | "Are you open Saturday?" "Where are you?" |
| Services or product list | "Do you do teeth whitening?" "Do you deliver?" |
| Returns / cancellation rules | Handles tricky questions without a person |
Tips for good content
The clearer your information, the better your assistant answers. A little tidying up goes a long way.
- Add what's current. Add the page or file with the real, present-day details — not an old one.
- One topic per source is easier. A clear prices page and a separate hours page work better than one giant page where everything is mixed together.
- Plain text beats fancy layouts. A simple document with clear sentences reads better than a heavily designed flyer.
- Keep it current. When prices or hours change, add the new version and remove the old one.
- Less is more to start. Add your three or four most-asked-about topics first, listen to a few calls, then add what was missing.
If something looks different
| What you see | Why it happens | What to do |
|---|---|---|
| A source is stuck and never says Indexed | The page or file is still being read, or it was very large | Give it a moment and refresh; for very big files, split them into smaller parts |
| The website wouldn't add | The link had a typo, or the page needs a login to view | Check the link; use a page anyone can open without signing in, or upload a document instead |
| Your file or photo wasn't accepted | It isn't a supported type | Use a PDF, Word, JPG, or PNG |
| The assistant still doesn't know the answer | The detail isn't in any added source | Add the page or document that has it, and wait for Indexed |
| I can't see the Knowledge menu item | The menu may be closed on your phone, or your role doesn't include it | Tap the ☰ button at the top-left; if it's still missing, ask your account owner to adjust your role |
Frequently asked questions
Next steps
Your assistant now knows your business. Here's where to go next.
Create your first assistant
Build the helper that answers your callers, in plain words.
Put it on your website
Every way to share — including the Share link for those with no site.
Getting started
Back to the overview and the full setup journey.
Not sure what to add first? We're happy to help — write to us at info@arpanet.com.tr or reach us through calleague.ai.
Last Updated
Recordings & privacy on calls
Find your recordings inside each call, turn recording on or off, and keep callers informed the way KVKK and GDPR expect.
Connect your tools
Give your assistant your own information — and link the everyday apps you use — so it can look things up and get real work done on a call.