
Put it on your website
Add your assistant to your website with one line of code — or, if you have no website, share it with customers via a Share link. Step by step, no tech skills needed.
Once your assistant is ready, you can turn it into a friendly chat bubble in the corner of your website — a widget (the small chat window that appears in the corner of your site). The kind you've seen on other sites. A visitor clicks it, asks a question, and gets an instant answer — by typing or by voice. It takes one copy-and-paste, and you never need to understand the code.
You'll need this first: at least one assistant created. If you haven't yet, follow Create your first assistant first. If you don't have an account at all, start from the "Sign in" section on the Getting started page.
First: do you have a website?
Both situations are easy — your path is just a little different:
- If you HAVE a website — great. In the steps below we'll copy one line of code and add it to your site (or send it to whoever manages your site).
- If you DON'T have a website — no problem at all, most businesses don't. You can share your assistant without any website. See the green box below.
No website? No problem. There are three easy ways to get your assistant to your customers, none of which need a website:
- Share link (a ready-made chat link you send to your customers) — open your assistant from Studio and go to the Publish tab; it's already waiting in the Get started box. Hit Copy link and send it by WhatsApp, Instagram, or SMS; anyone who taps it chats with your assistant straight away. (Full step-by-step right below.)
- Open the app — on the assistant build wizard's last (4th) step, use the Open the app button to use your assistant directly inside the app (app.calleague.ai) and carry on the chat there.
- Phone — your assistant can also answer a phone number. See Connect a phone number.
No website? Get your Share link and send it
This is the fastest way, and it needs no website at all. Here's how:
Open the app
On your phone or computer, open an internet browser (like Chrome or Safari — that icon on your phone's home screen). Type app.calleague.ai in the address bar at the top and press Go / Search (on a computer, Enter). (calleague.ai is our marketing site; the place where you do the work is the app itself, app.calleague.ai.)
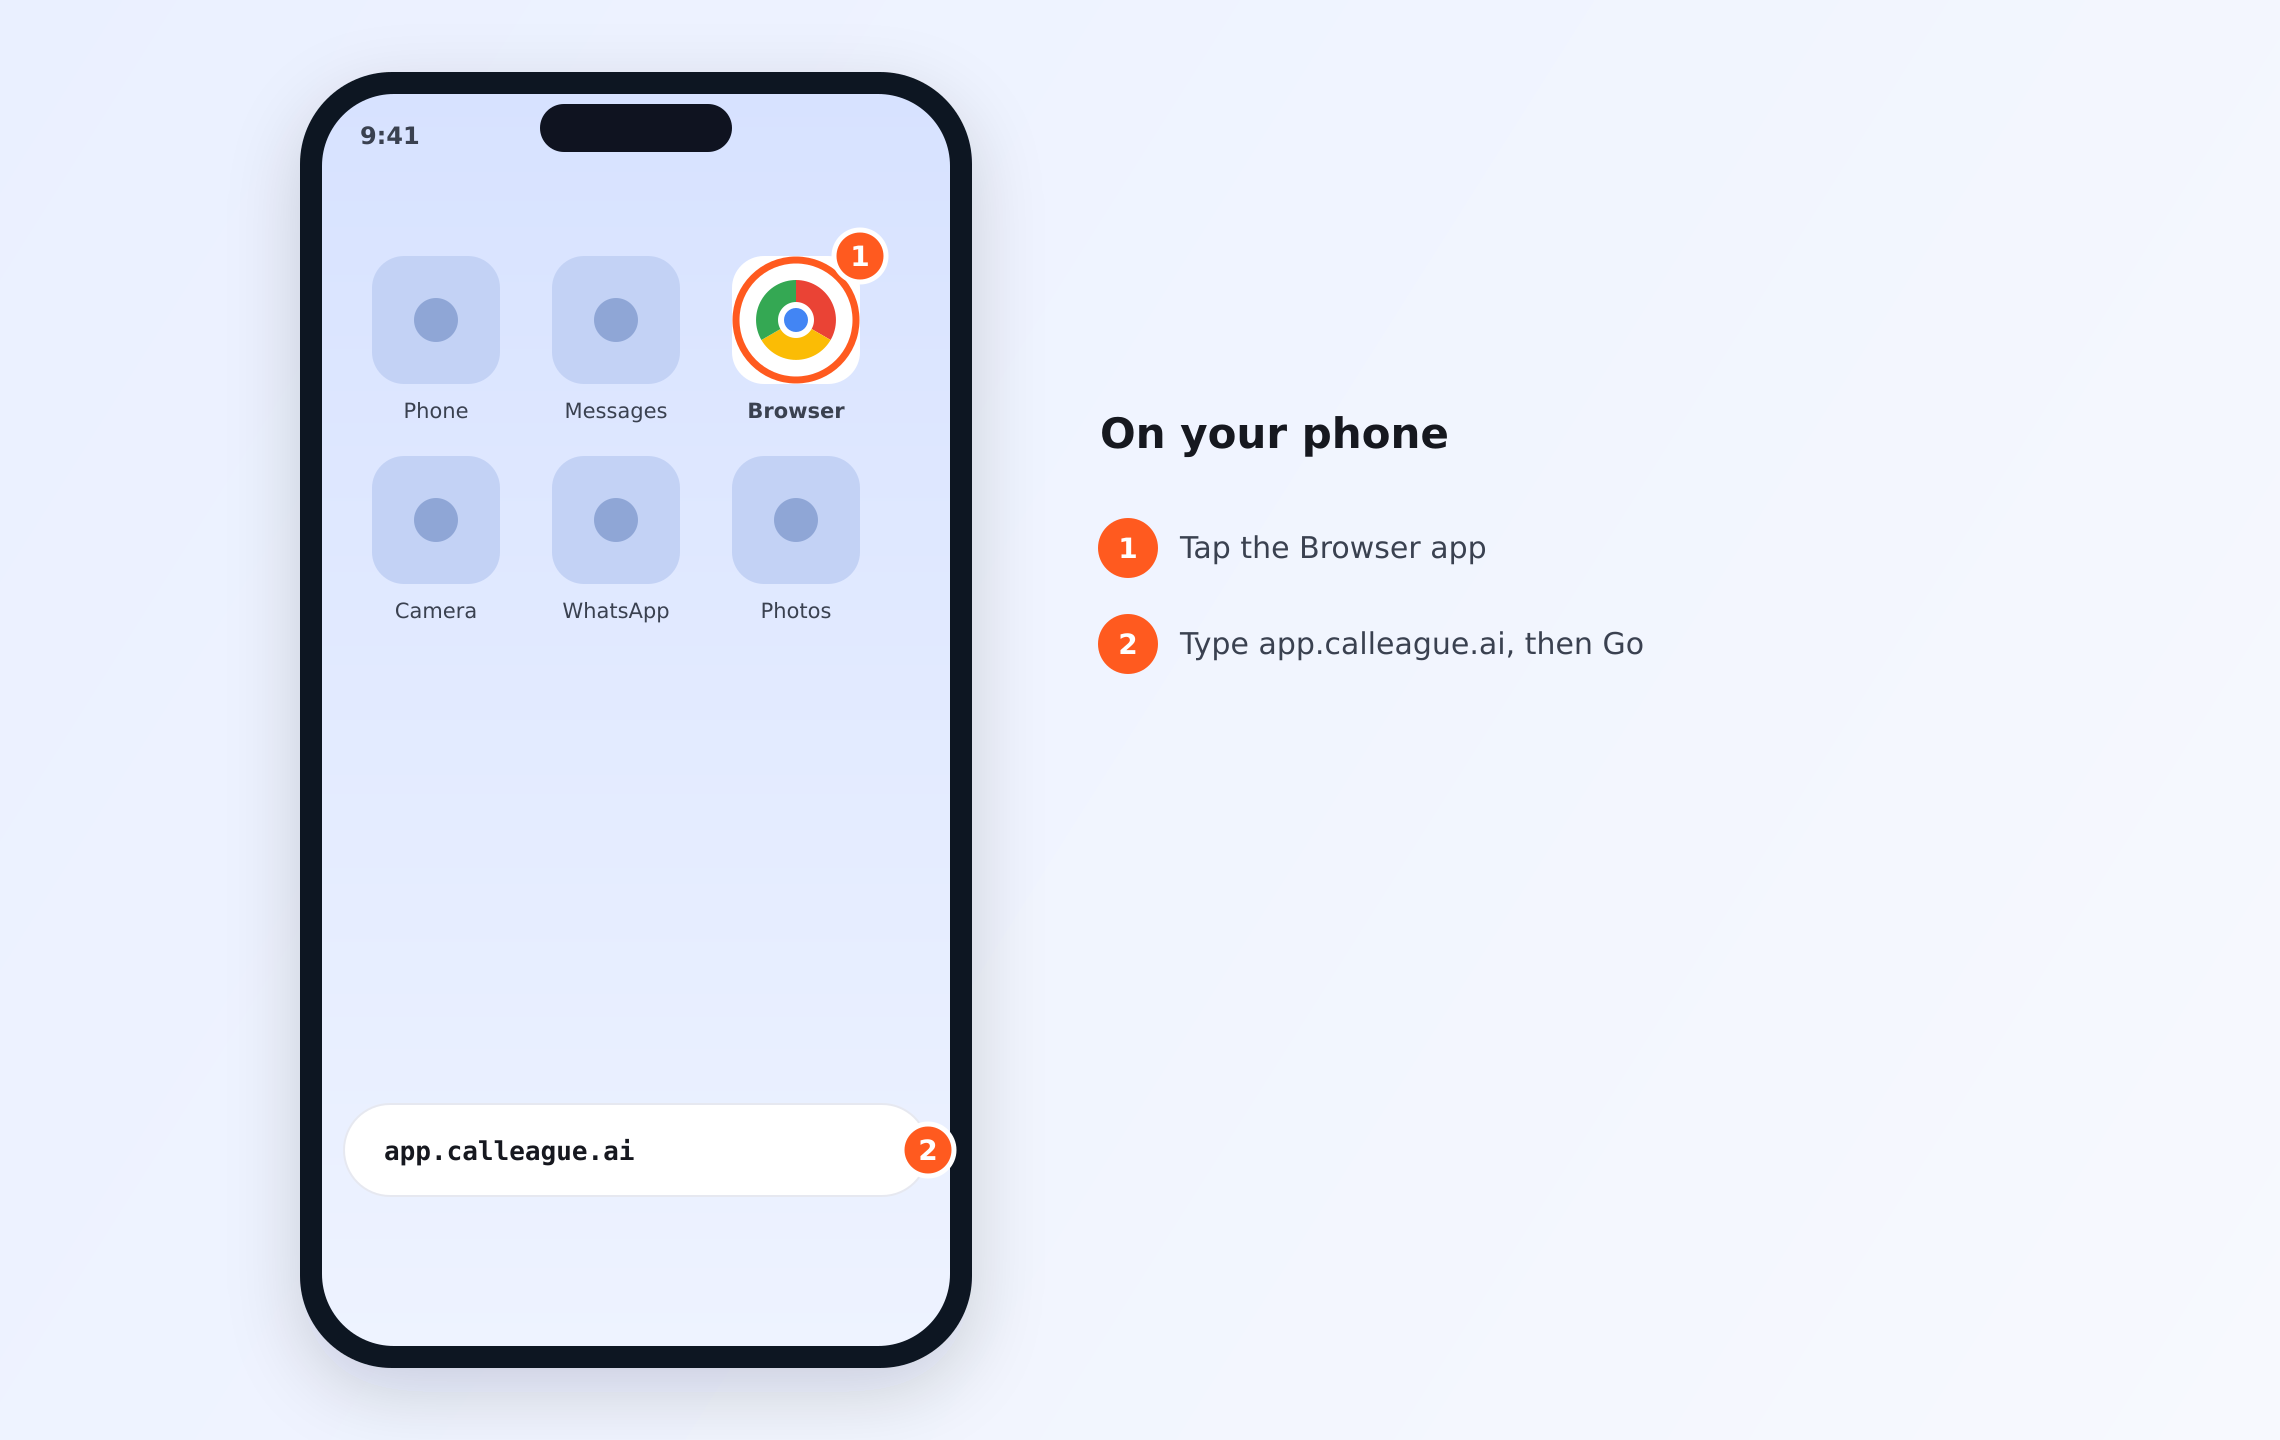
On your phone: tap the ① "Browser" app, type app.calleague.ai into the ② address bar and go.
Type your email and press Continue; then type your password into the Password field and press Sign in (the sign-in screen looks like this image). If you forgot your password, use the Forgot your password? link at the bottom.
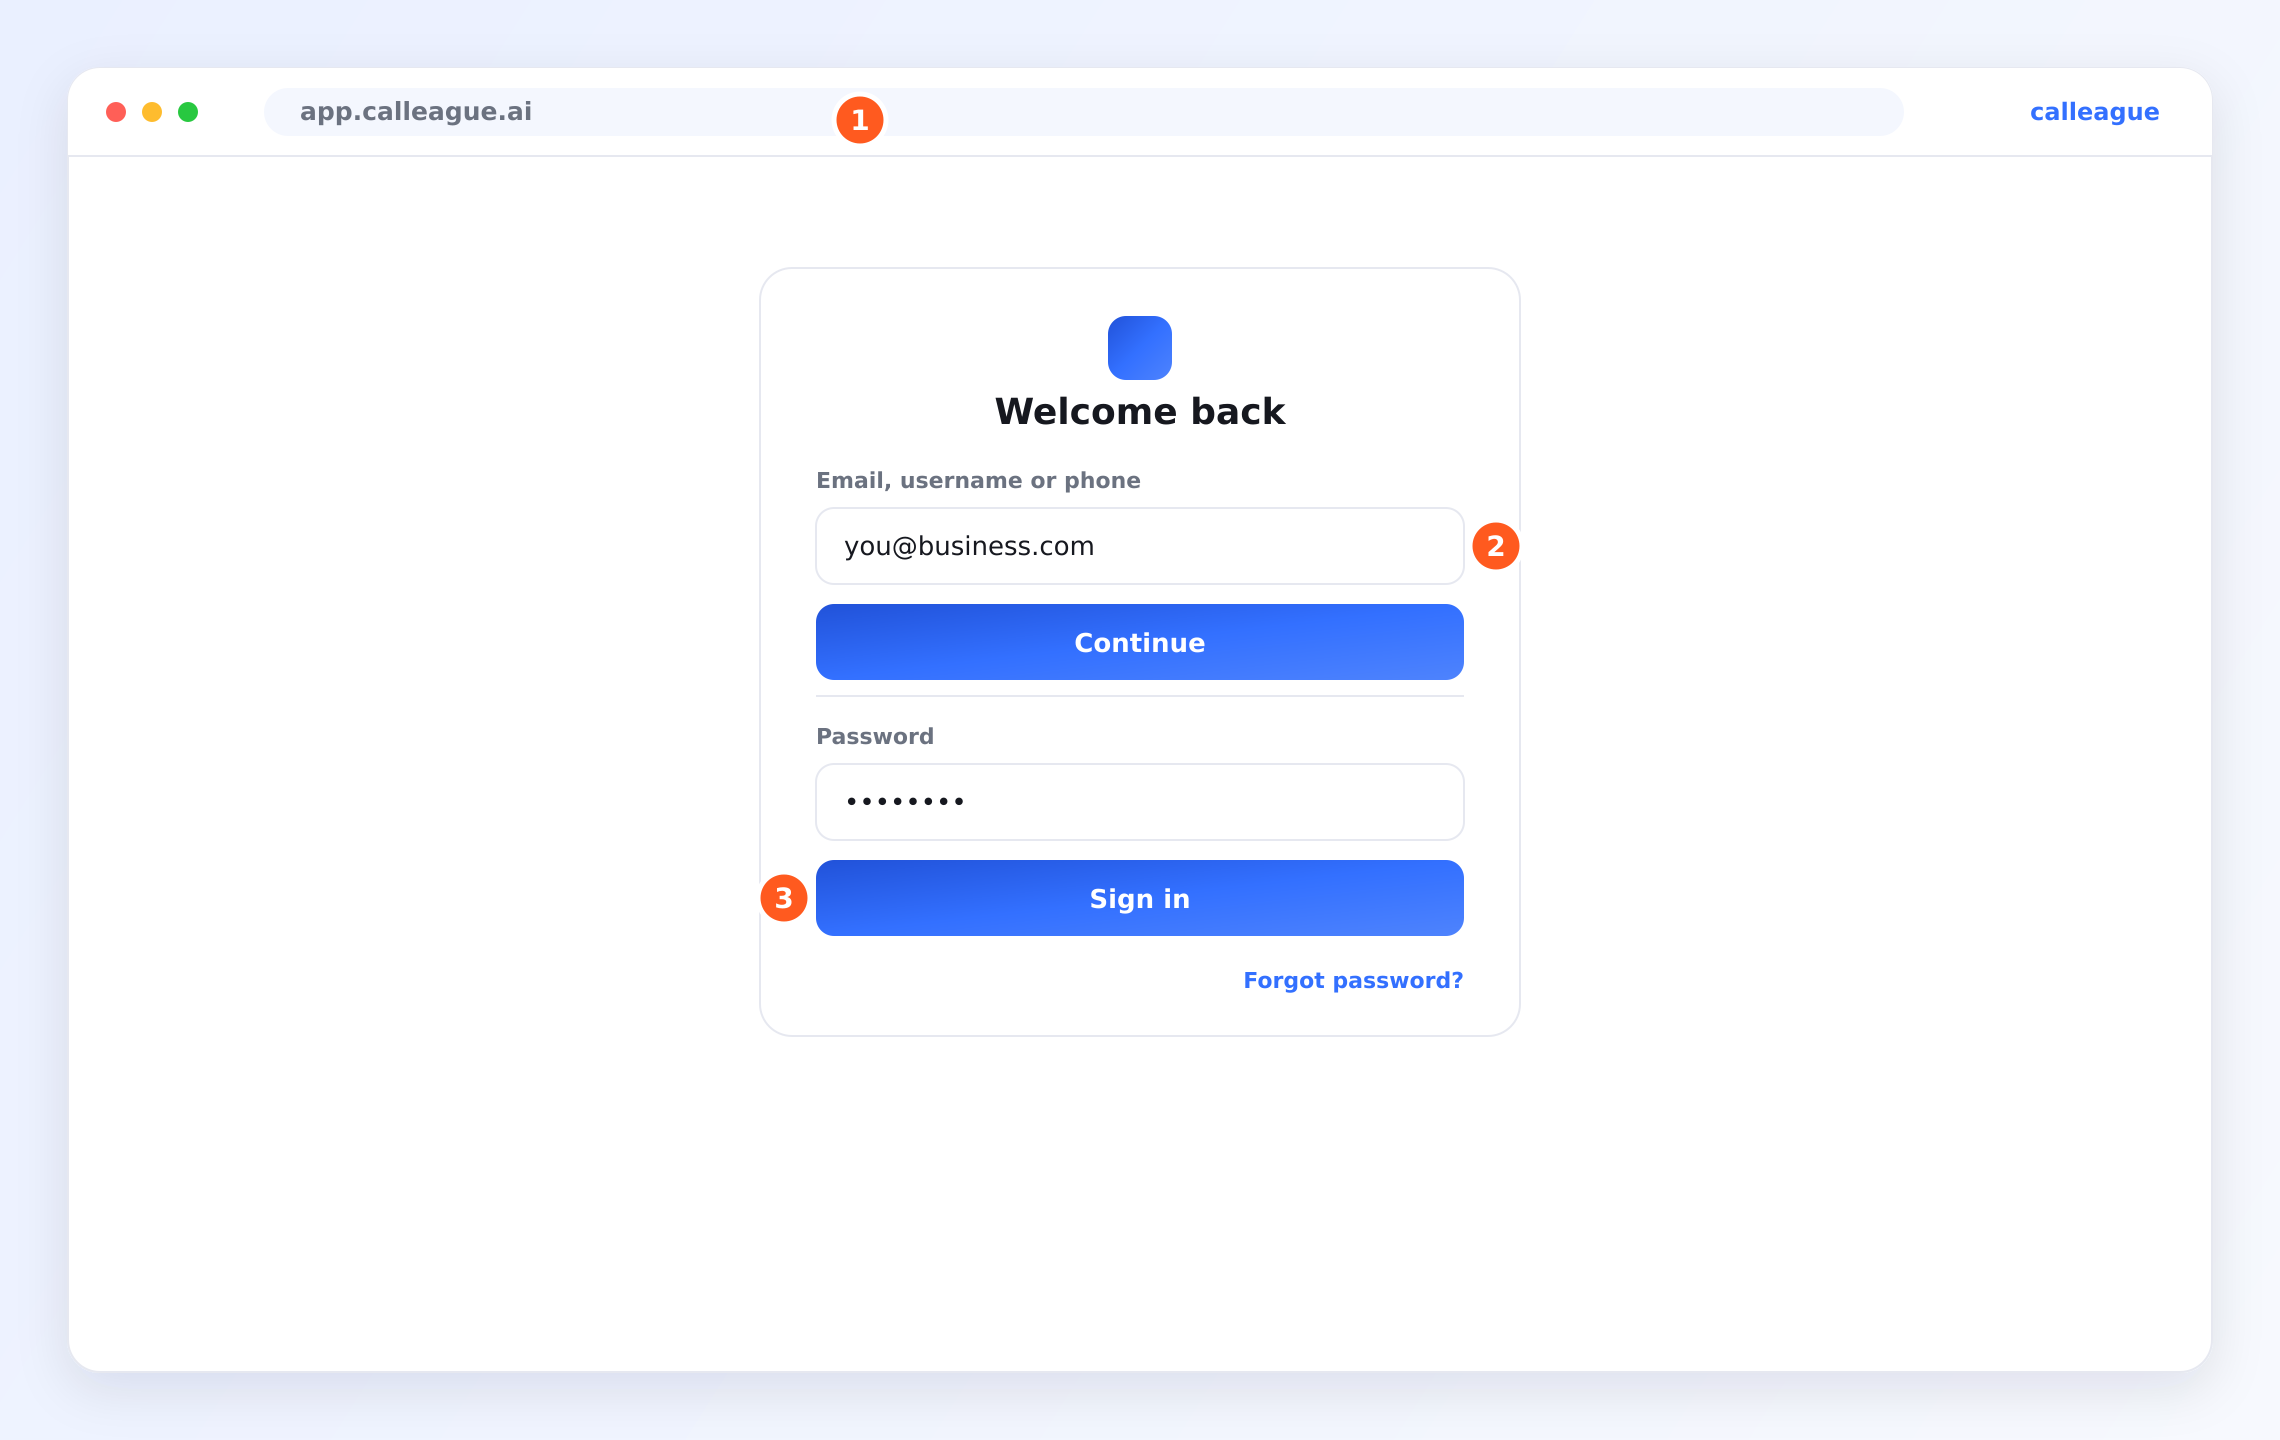
Find your Share link
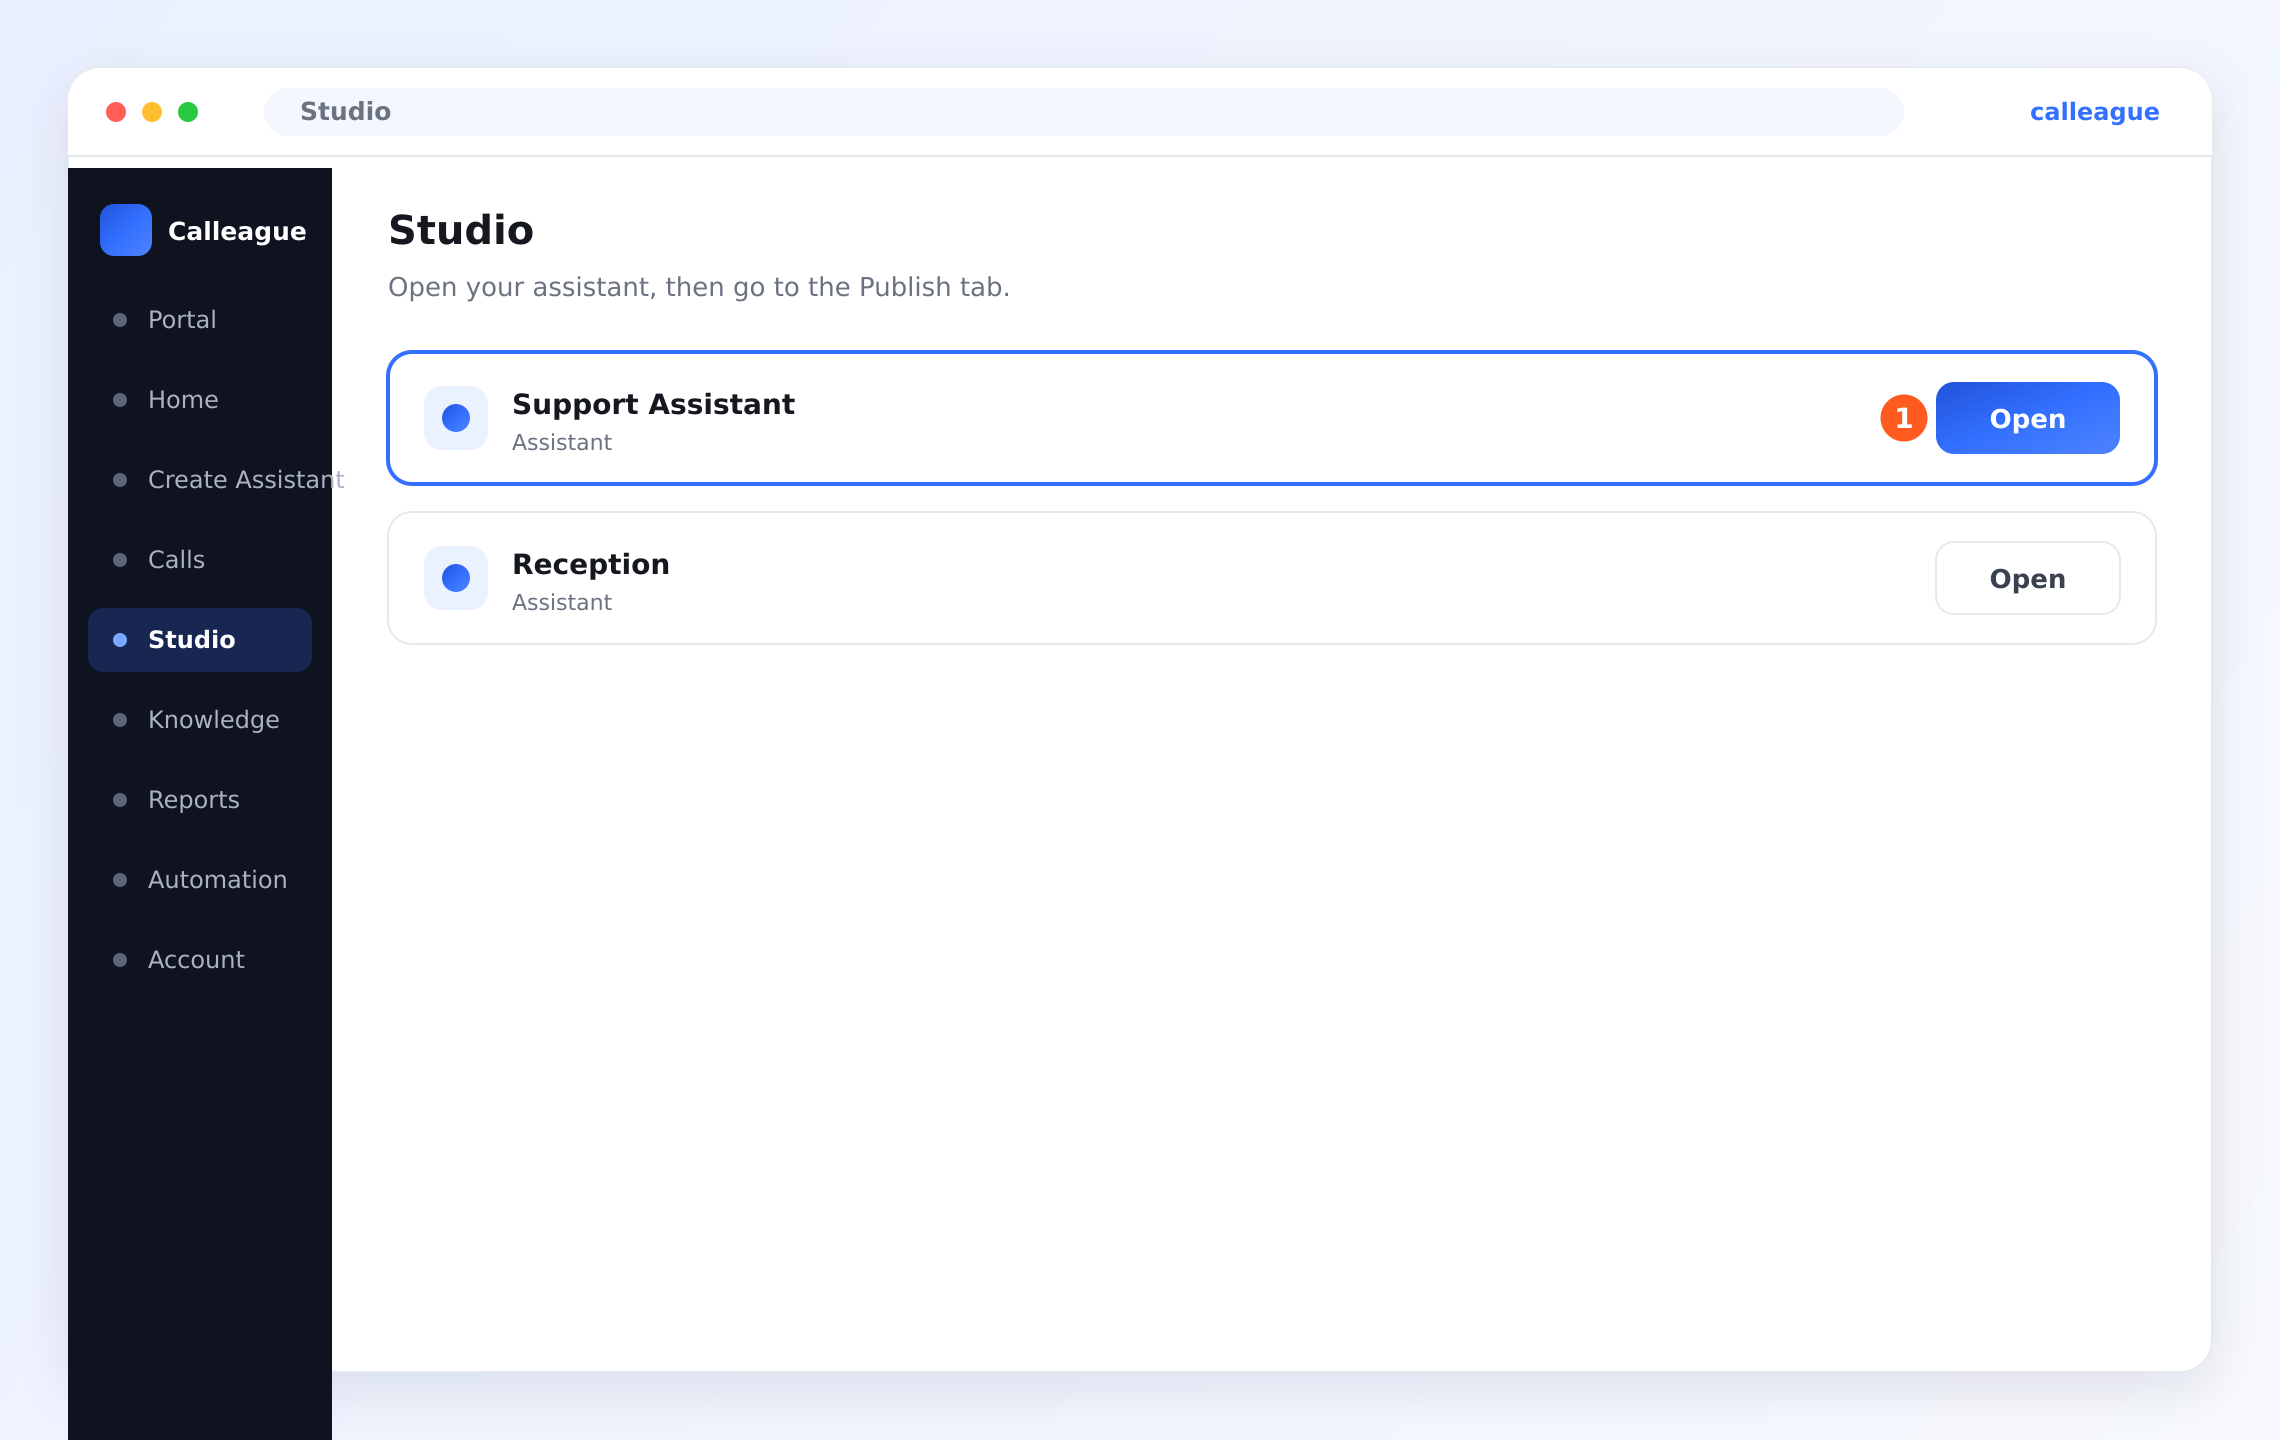
In the left menu (on a phone, tap the ☰ — three horizontal lines — menu at the top left) open Studio. In the assistant list that appears, click the ① "Open" button on your assistant's row.
Once your assistant opens, go to the Publish tab at the top; the ① "Share link" (your own ready-made chat link) is already waiting in the Get started box.
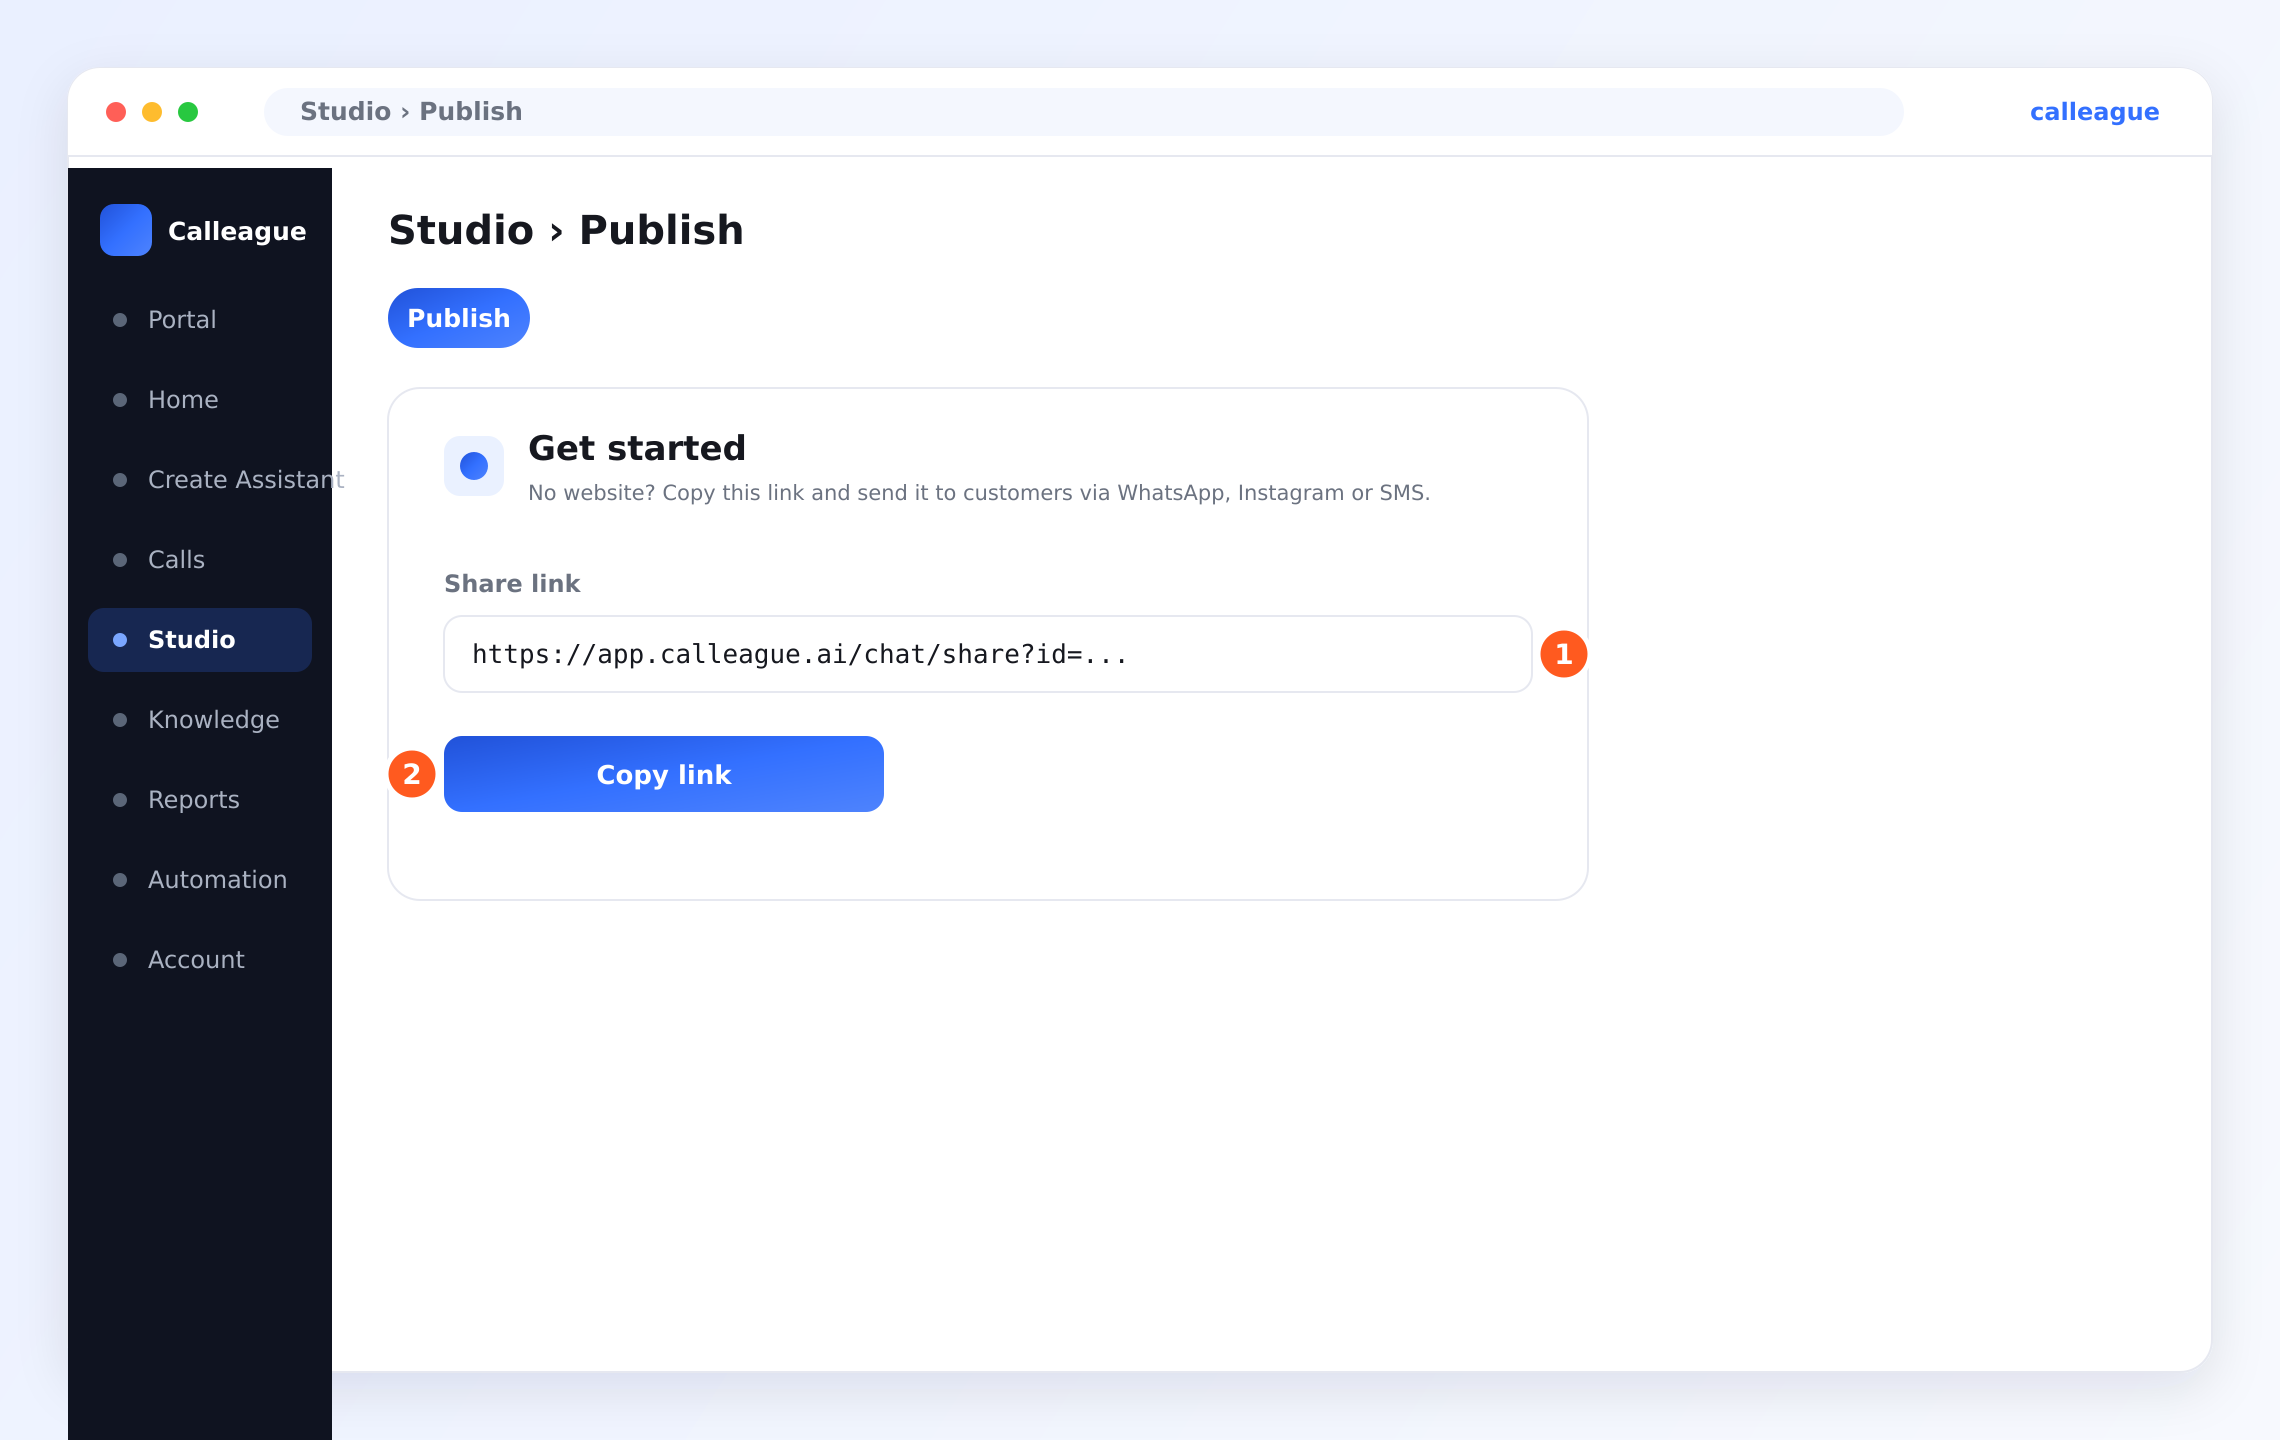
Copy the link and send it
Click the ② "Copy link" button. Then send this link to your customers — for example by WhatsApp: open WhatsApp → go into a chat → press and hold the message box and tap 'Paste' → Send. On Instagram you can put the link in your profile bio or send it in a DM/message. (You can do the same by SMS.) When your customer taps the link they chat with your assistant instantly — with no website needed.
The steps below are for people who have a website. If you don't, you're already set with one of the three ways above; you can skip the rest of this page.
What you'll do
- On the wizard's Website step, set how the widget looks.
- Click Copy snippet — the one line of code is copied to your clipboard.
- Add that line to your site; or send it to whoever manages your site.
Add the widget to your site
Open the Website step
This is step 4 — the last step — of the assistant build wizard (the screen that guides you step by step), titled Website. If you just finished the Preview step, you're already here.
To come back later: in the left menu (on a phone, the ☰ menu at the top left) click Create Assistant, open your assistant, and go to the Website step at the top.
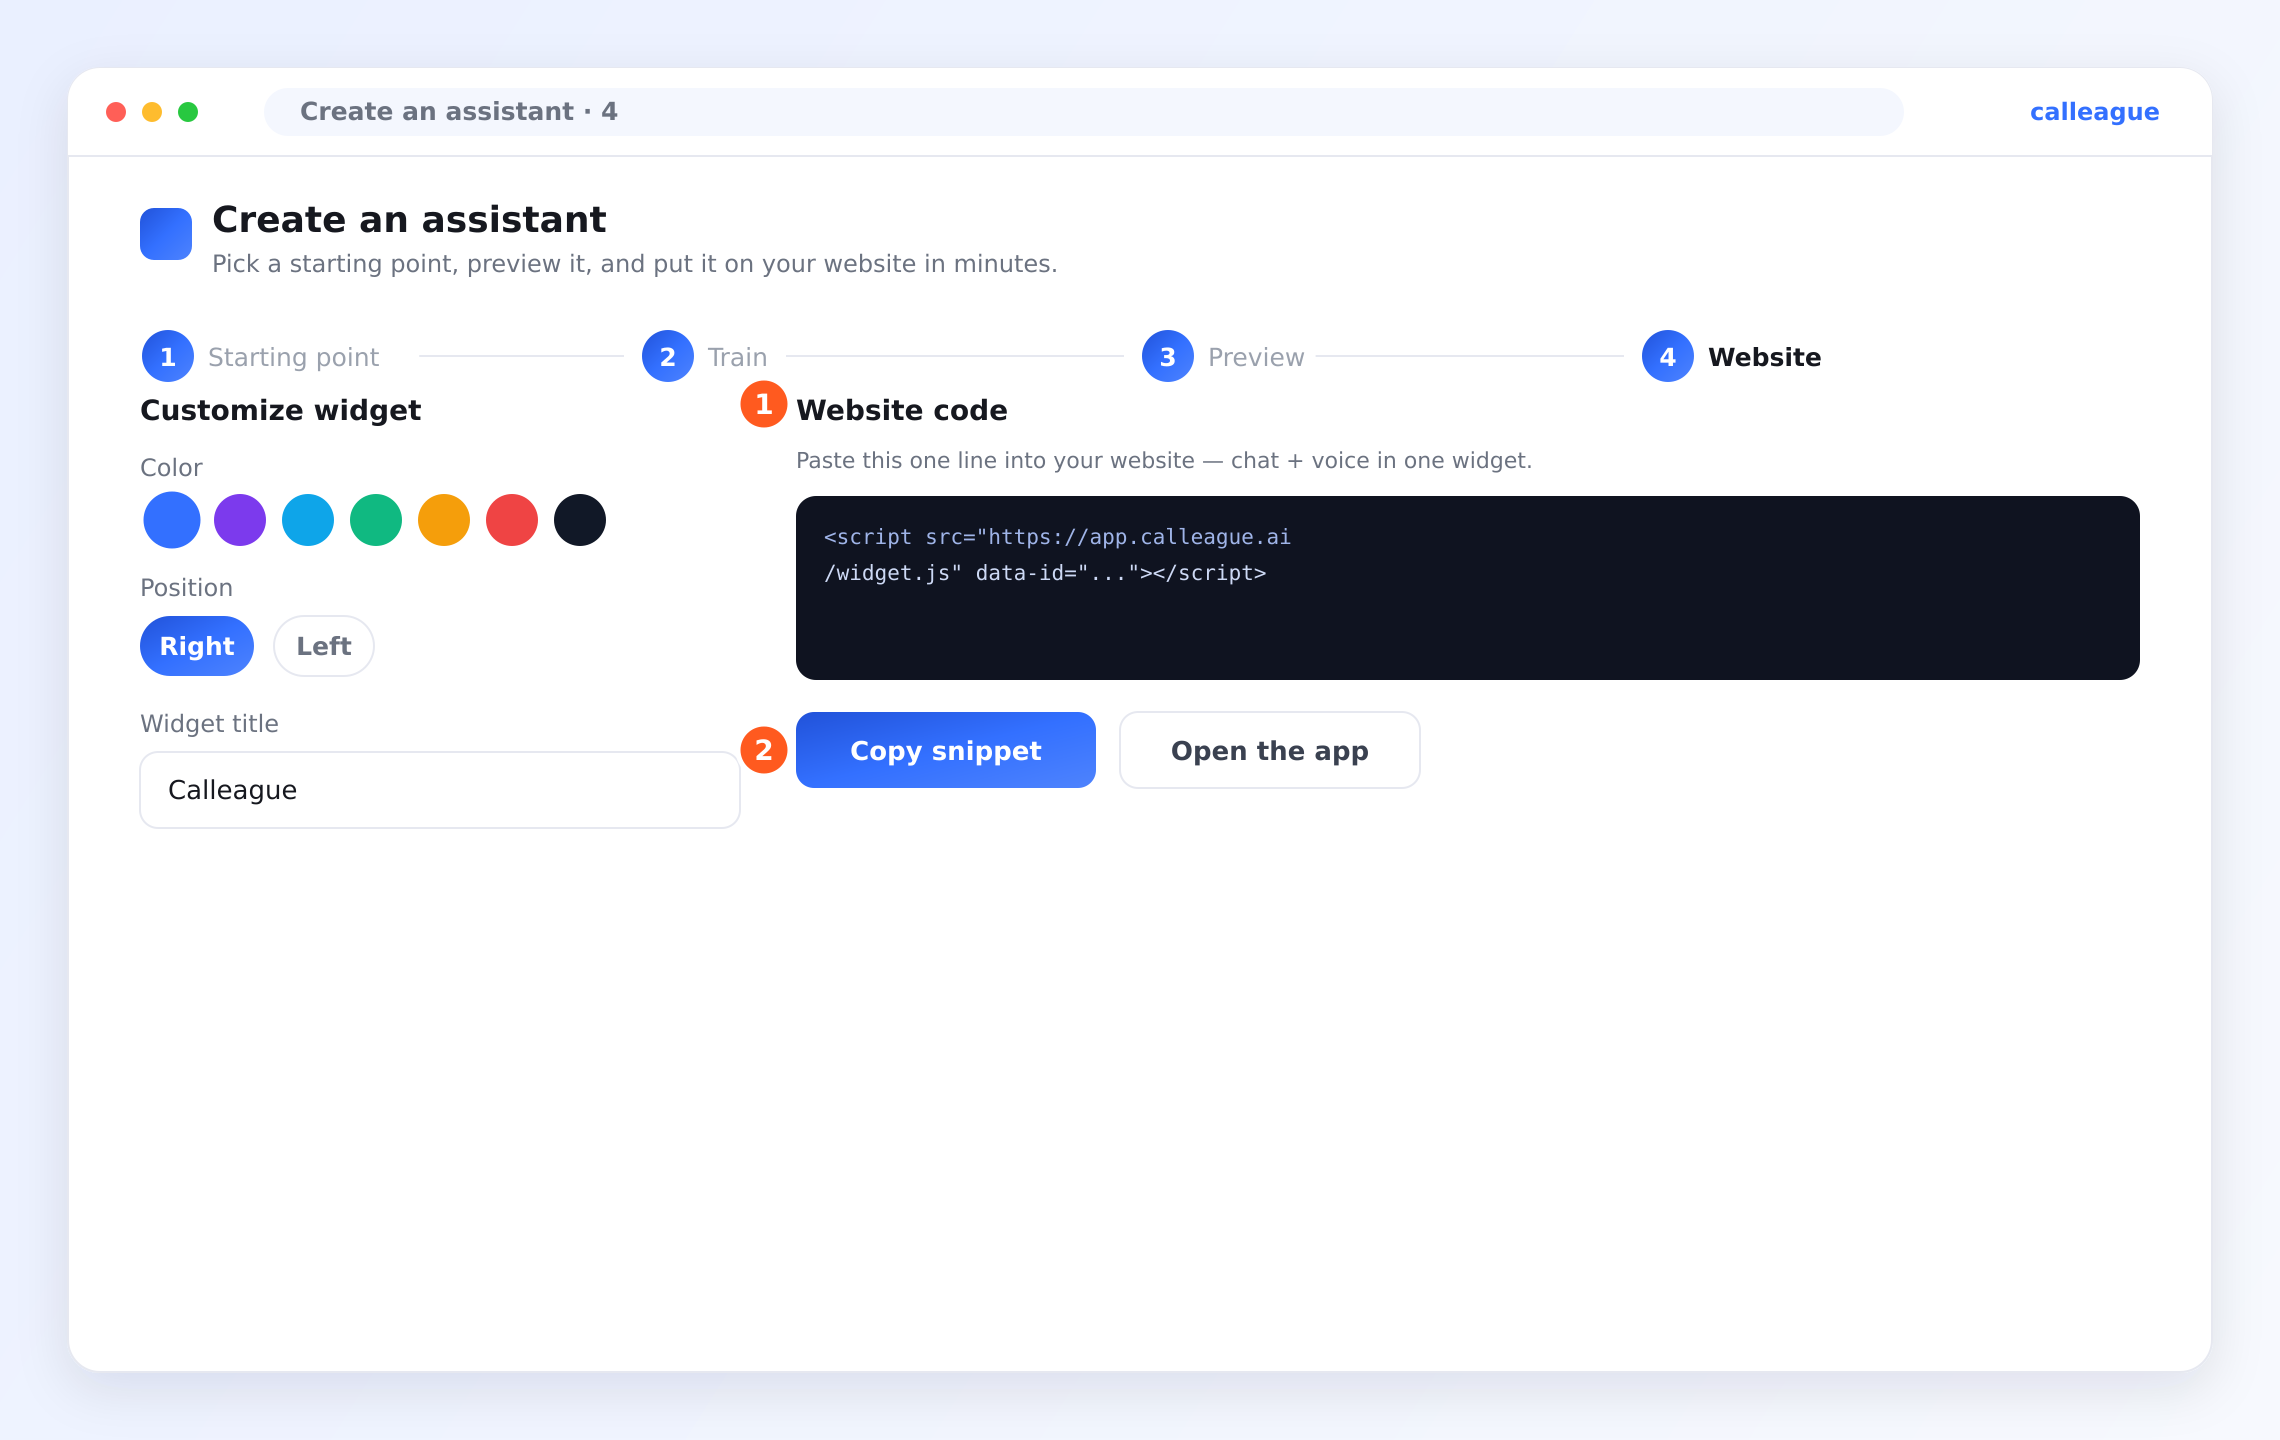
You'll see a Customize widget panel on the left and the ① "Website code" on the right (the single line of text to add to your site). Right next to the code you'll see this hint: "Paste this one line into your website — chat + voice, one widget."
If you haven't created any assistant yet, this screen looks empty or shows no code — that's normal. Create an assistant first.
Set how it looks
Under Customize widget, choose three things:
- Color — one that matches your brand.
- Position — which corner the bubble sits in: Right or Left.
- Widget title — the name visitors see at the top of the chat, like "Gül Çiçekçilik".
You'll see your choices reflected instantly in the code on the right. There's no wrong choice here; you can change everything later.
Copy the snippet
Click the ② "Copy snippet" button. That copies the single line of code (the ① "Website code" — a small piece of text added to the site) to your clipboard; it's now ready to paste.
You don't need to understand what this line means. All you have to do is click Copy snippet. We'll handle the rest in the next section.
Don't want to touch your website at all? Click Open the app instead and start using your assistant directly inside Calleague.
Add this line to your site
You've copied it — now that one line needs to go into your site. There are two ways; pick whichever is easier for you.
Easiest way: send it to whoever manages your site
If you didn't build your site yourself (most businesses have an agency or an acquaintance manage it), send this line to them — it's a routine, two-minute job for them. You can use the ready-made email below; paste the line you got from Copy snippet where the brackets are:
Hello,

I'd like to add a small helper to our website that chats with visitors.
Could you please add the single line of code below just before the
closing </body> tag, then publish the site?

[PASTE the line you got from "Copy snippet" here]

Thank you so much.
Adding it yourself?
If you manage your site yourself, open the section below — it explains exactly where to put the code.
Done! Once the line is on your site, your assistant goes live — ready to chat with visitors and answer their questions from your information.
What your visitors will see
A small bubble sits in the corner of your site, in the colour and position you chose. When a visitor clicks it, a chat window opens with your Widget title at the top. They can type a question and get an instant reply, or talk to your assistant by voice — all without leaving your page. It works on phones and computers alike.
If you want to change it later
You can change the colour, position, or title any time. Here's the exact path:
- In the left menu (on a phone, the ☰ menu at the top left) click Create Assistant.
- Open your assistant and go to the Website step at the top.
- Change the Color, Position, or Widget title, then click Copy snippet again.
- Replace the old line on your site with the new one (or send the new one to whoever manages your site).
If something looks different
| What you see | Why it happens | What to do |
|---|---|---|
| No code on the Website step | You haven't created an assistant yet | Create an assistant first |
| The bubble doesn't appear on the site | The line wasn't saved, or it's in the wrong place | Make sure it's added before </body> and that the site is published (or ask whoever manages your site) |
| It shows in the wrong corner | The Position was set the other way | Open the Website step, switch Right/Left, copy the code again |
| The colour or title is wrong | They were changed after you copied | Adjust them, click Copy snippet again, replace the old line |
| I don't have a website | That's fine | Use the Share link above, or connect a phone number |
Frequently asked questions
Next steps
Your website (or sharing method) is sorted. Now let's let your assistant answer the phone, then try a real conversation.
Connect a phone number
Let your assistant answer real phone calls.
Try your first conversation
Chat with it, call it, then read the transcript.
Teach it about your business
Add more websites and documents any time.
Need a hand placing the code or using the Share link? Write to us at info@arpanet.com.tr or reach us via calleague.ai — we'll walk you through it step by step.
Last Updated
Teach it about your business
Make your assistant answer from YOUR information. Add your website or documents (PDF, menu, price list) — during creation or later, with no technical skills needed.
Connect a phone number
Let your assistant answer real phone calls — open Voice Calls from your Account, add your number with Add your own number on the My Numbers tab, and connect it to your assistant with Assign to app.