
Getting started
Sign in to Calleague, get to know your Home screen, and get ready to build your first AI assistant — step by step, with no technical skills required.
Welcome! Calleague gives you a friendly assistant that chats with your customers and answers your phone calls. This assistant is an AI (artificial intelligence — a computer program that can talk and answer questions on its own, using the information you give it). It speaks in your words, in your language.
On this page we'll do three things together: see how to sign in, get to know the main screen you land on after signing in, and get ready to build your first assistant. There's no rush; we'll explain everything one piece at a time.
Everything here is point-and-click. You don't need any technical skills, and you can't break anything by exploring.
If you can send an email or browse a web page, you can use Calleague. At every step we'll tell you exactly which button to press.
What we'll do together in this guide
| Step | Page | What you'll do | Approx. time |
|---|---|---|---|
| 0 | This page | Sign in and get to know your Home screen | 3 min |
| 1 | Create your first assistant | Build it with a friendly 4-step screen | 5 min |
| 2 | Teach it about your business | Add your website or documents | A few minutes |
| 3 | Put it on your website | Give one line of code to your site (or to whoever made it) | A few minutes |
| 4 | Connect a phone number | Let it answer real phone calls | A few minutes |
By the end you'll have an assistant that greets your customers, answers their questions from your own information, and can pick up the phone when needed.
You don't need to understand the single line of code in step 3 (it's just a small piece of text added to your site). If you didn't build your site yourself, simply pass that line to whoever builds or manages it — they'll take care of the rest.
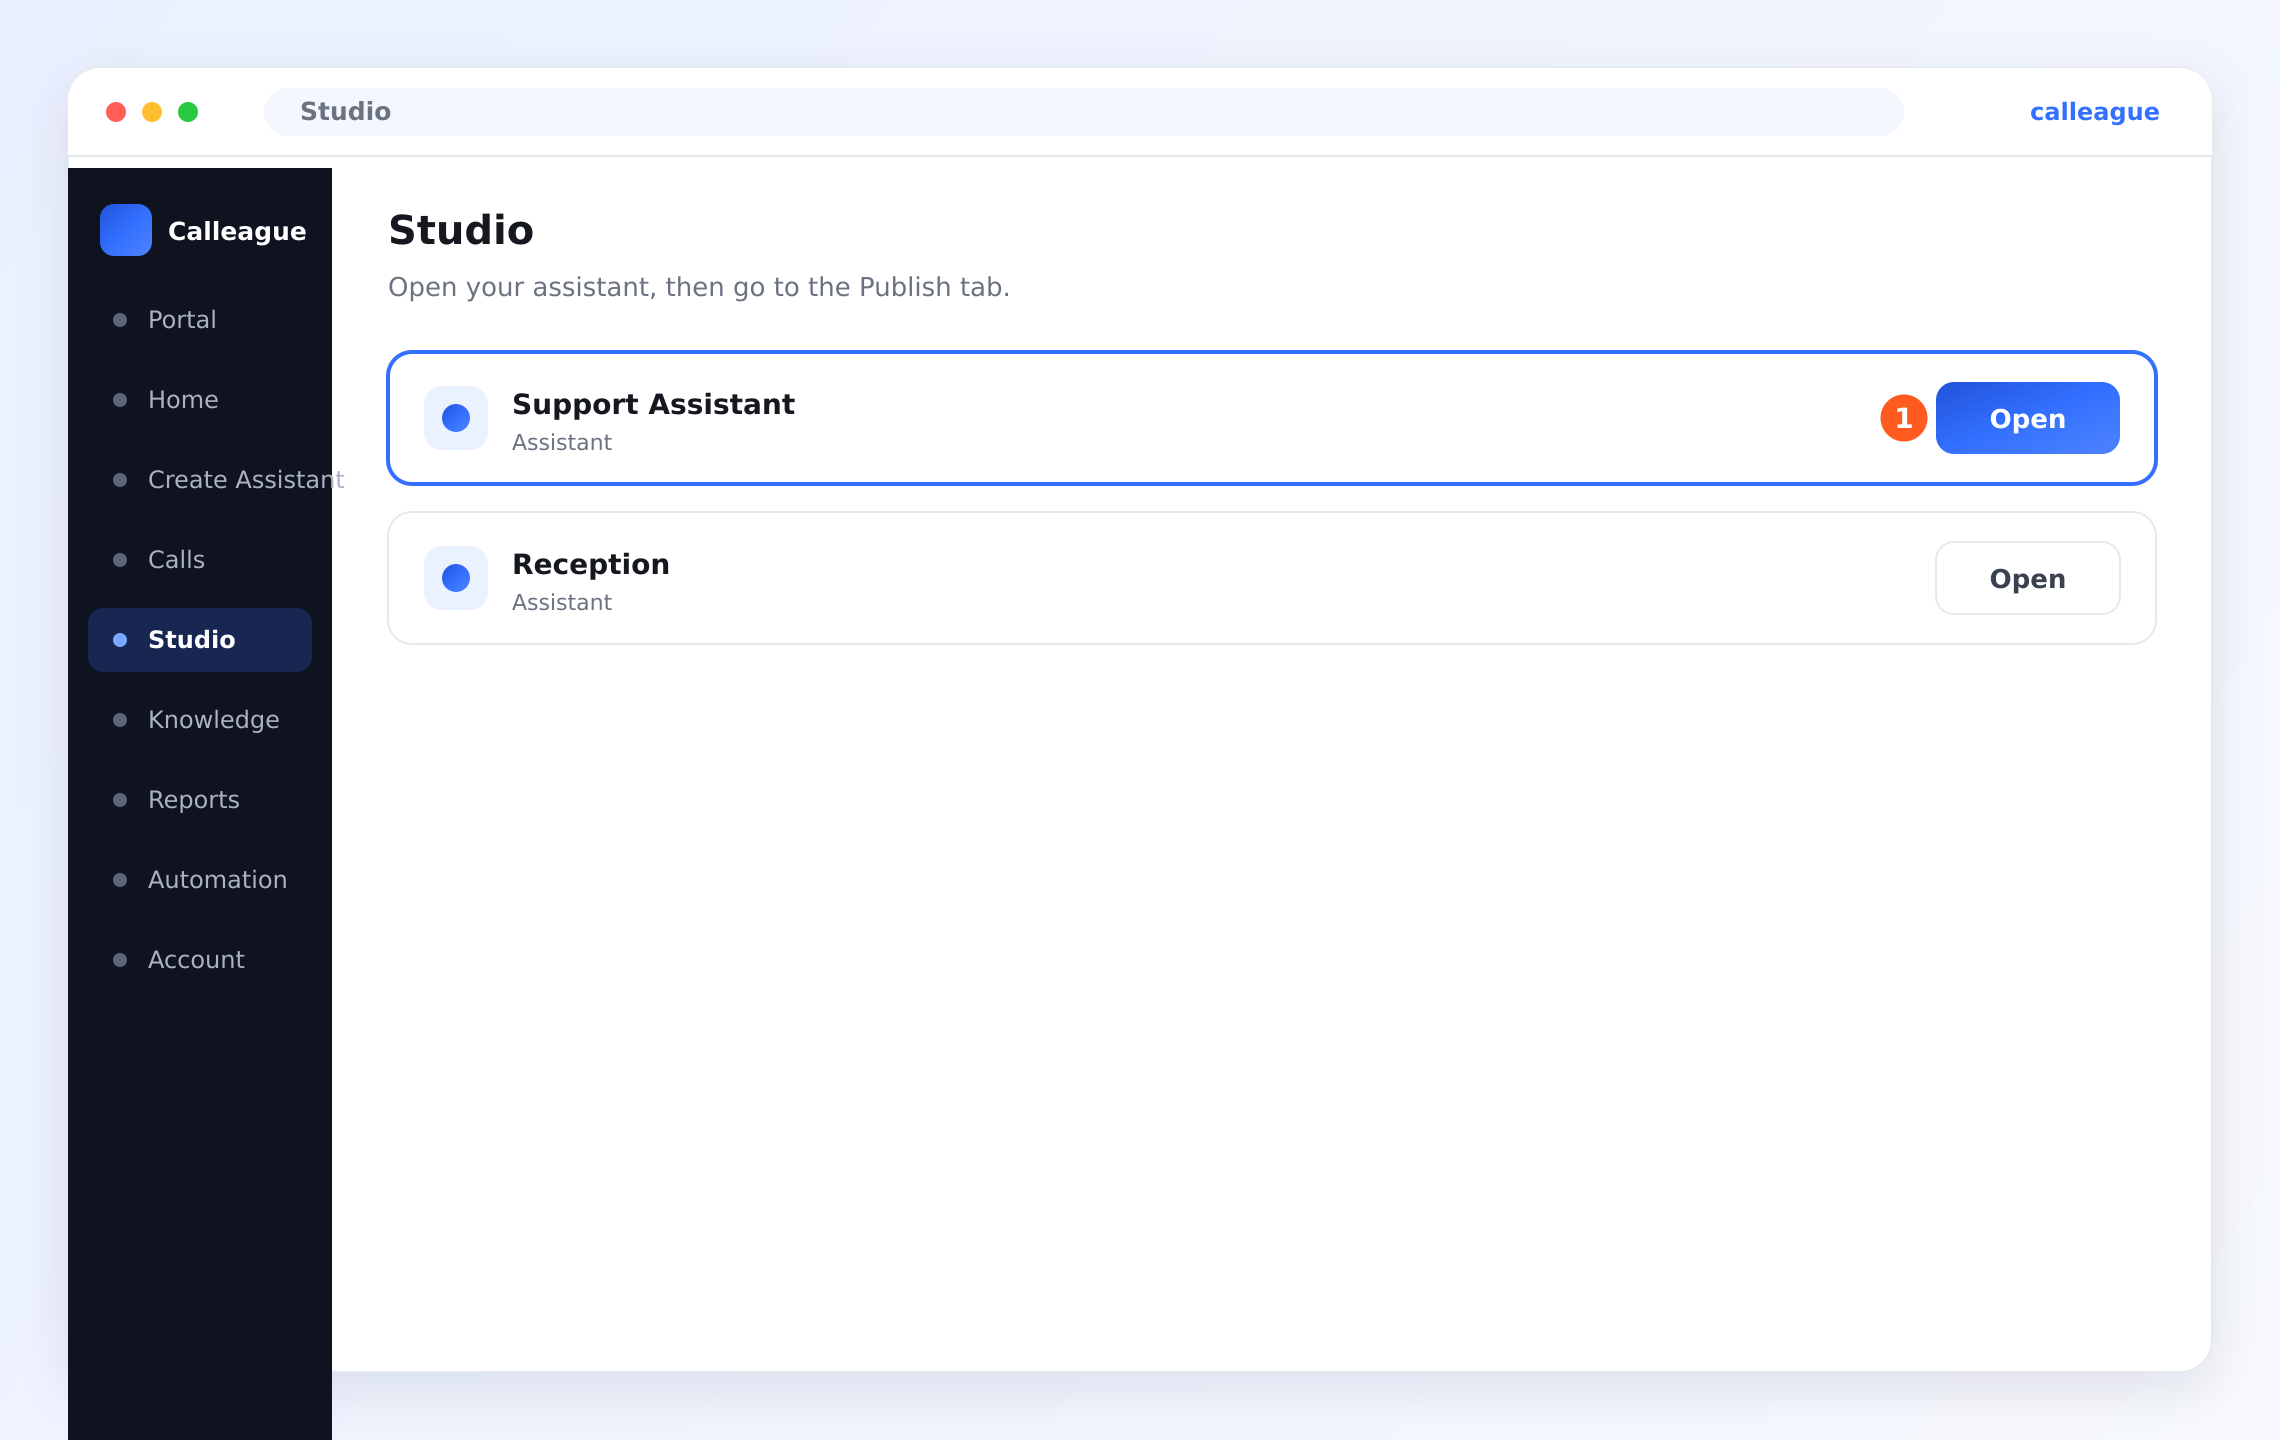
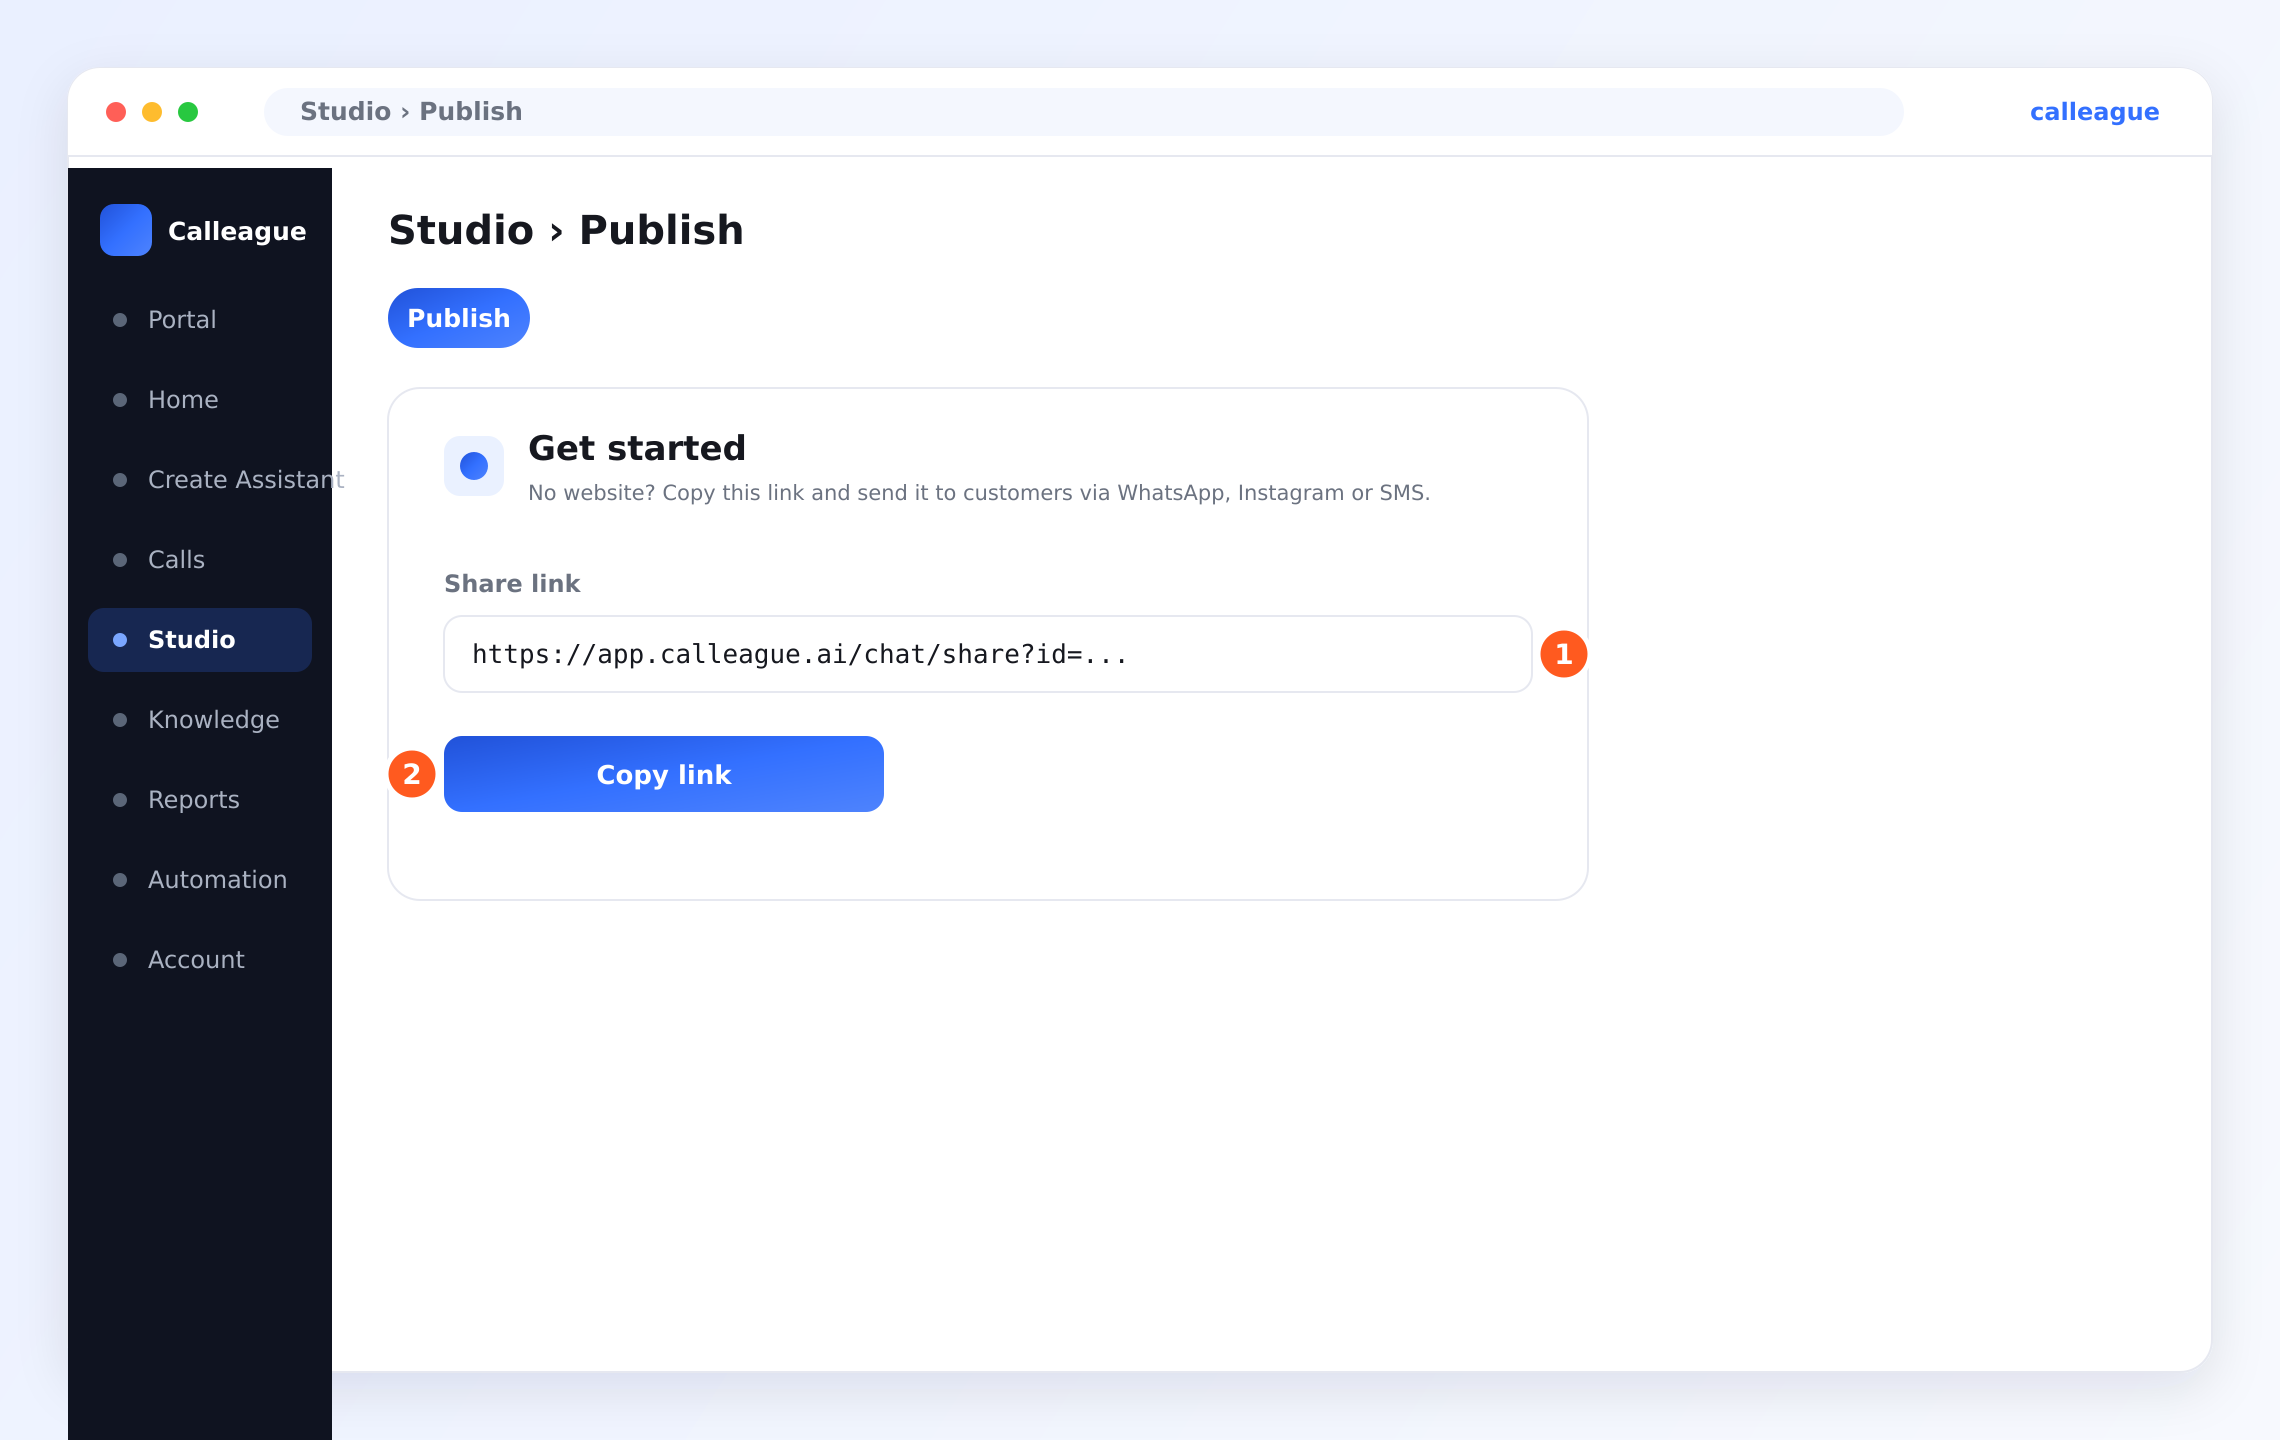
No website? No problem. You can use Calleague without a website. A Share link is created automatically for your assistant (a ready-made web link that opens a chat window when clicked). To find it: after you create your assistant, open Studio from the left menu (on a phone, tap the ☰ three-line menu at the top left), open your assistant, go to the Publish tab; in the Get started box, under the Share link, press the Copy link button. Then open WhatsApp → go to a chat → press and hold the message box and choose "Paste" → Send. If you use Instagram, you can put the same link in your profile ("bio") link or send it in a DM (direct message). When your customer taps the link, they start talking to your assistant — with no website needed at all. You can also connect a phone number so it answers calls too.
Step 0: Get your account and sign in
Calleague has no public "sign up" button; Calleague creates your account for you. So you first get an account, then sign in with the email and password you're given.
Get an account first
If you don't have an account yet, use the Try for free / contact section on calleague.ai, or write to us at info@arpanet.com.tr. You'll receive an email address and a password. You'll use these two to sign in.
Open app.calleague.ai
Open a web browser on your phone or computer (the program you use to go online — for example Chrome or Safari). In the address bar at the top, type app.calleague.ai and press Go / Search on the keyboard (Enter on a computer). The sign-in screen appears.
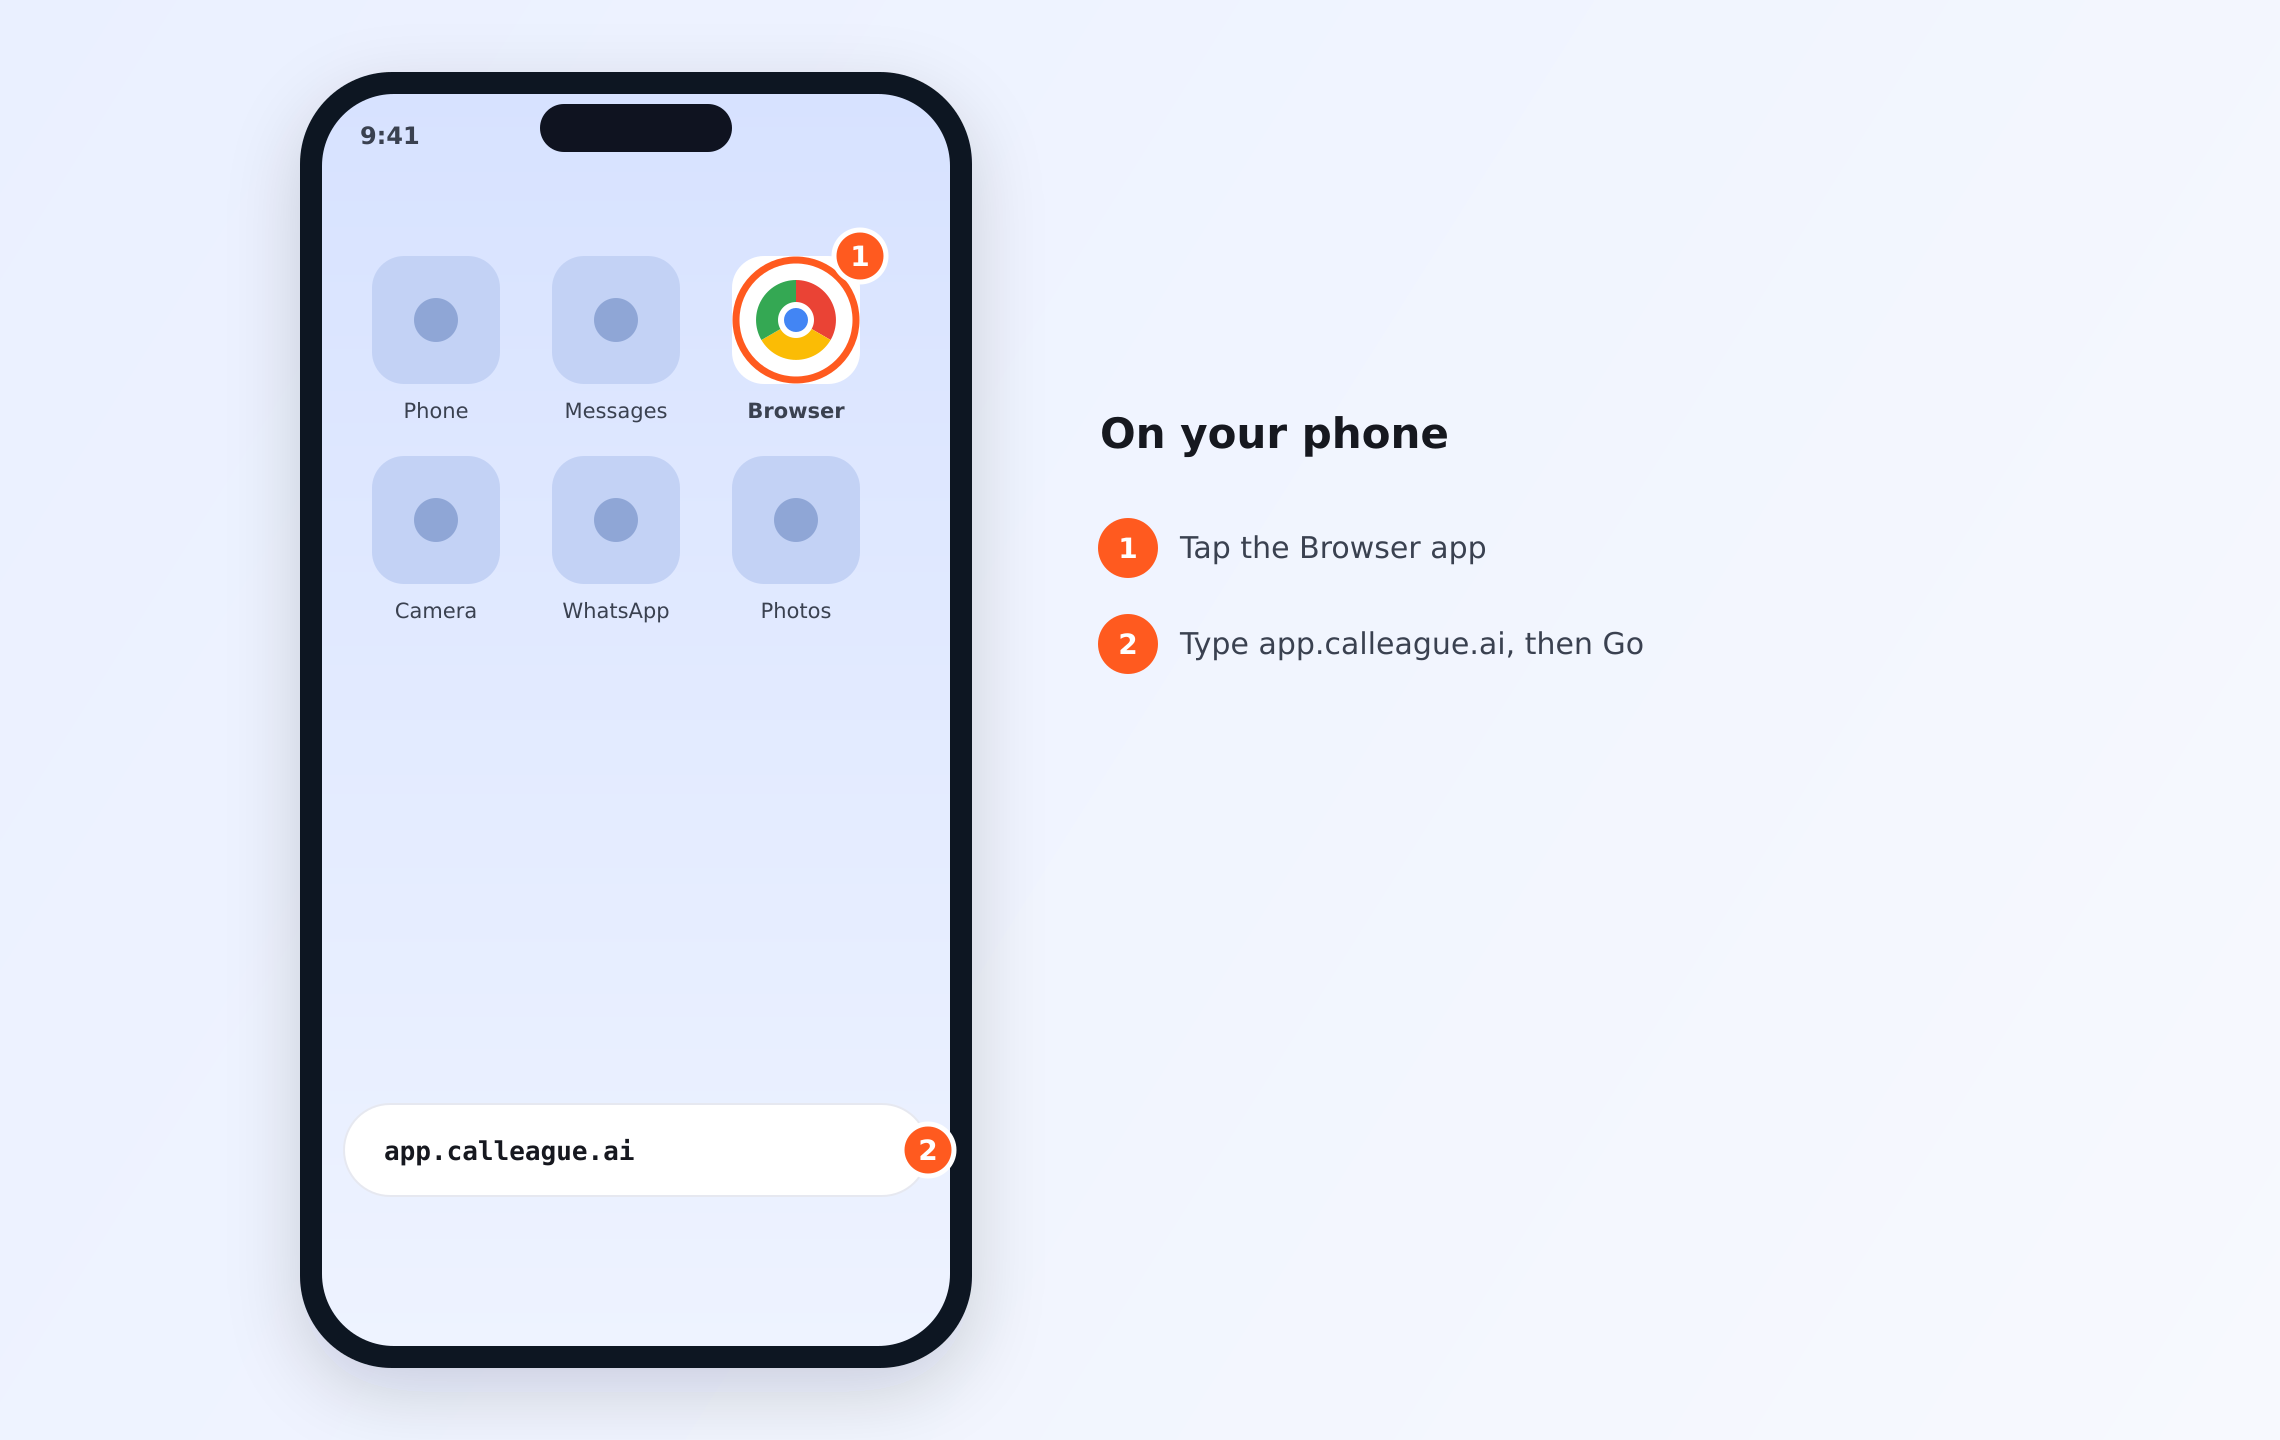
calleague.ai is our marketing site; the app itself — where you actually do your work — is app.calleague.ai (that's why it starts with "app."). Always use app.calleague.ai to sign in.
Enter your email and press "Continue"
In the "Email, username or phone" box, type the email you were given, then press the Continue button.
Enter your password and press "Sign in"
Now type your password in the "Password" box and press the Sign in button. If you've forgotten your password, click the Forgot your password? link on the same screen.
You'll see: after signing in, you land straight on your Home screen.
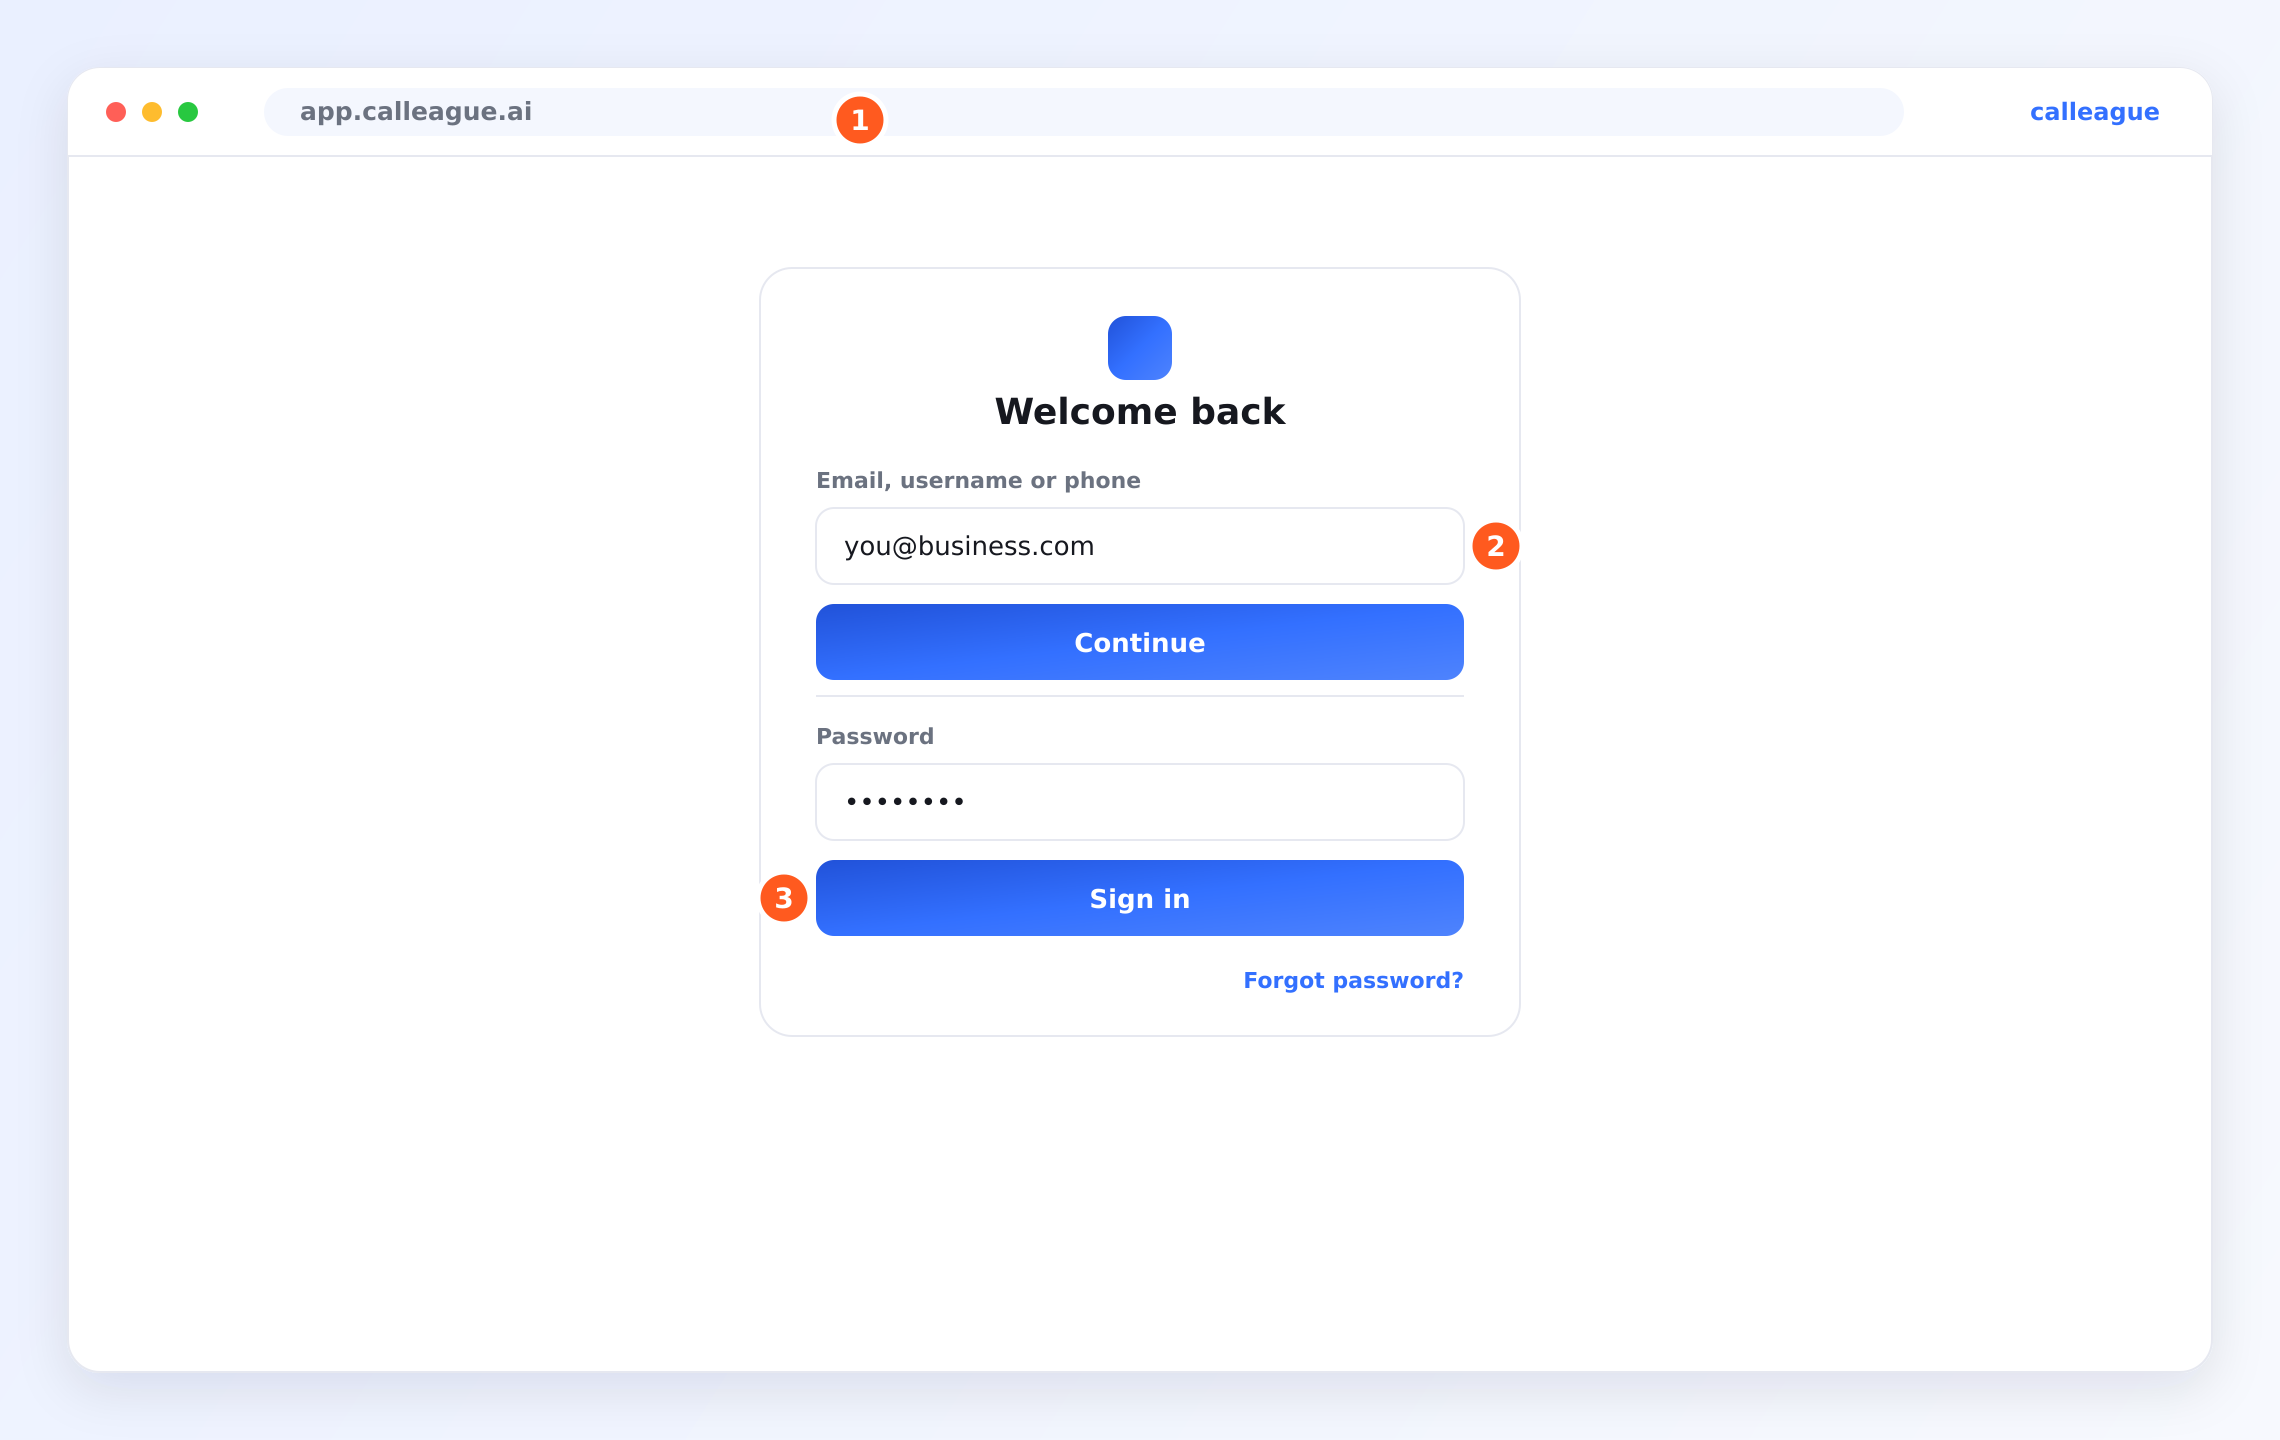
You won't be asked for any separate "verification code" when signing in — just your email and password are enough. Signing in is two steps, but the screen shows both fields together: first type your email and press Continue; then type your password in the Password field and press Sign in (the sign-in screen looks like this image). In it you'll see ① the address bar, ② the email field + Continue button, and ③ the password field + Sign in button.
Get to know your Home screen
The first screen you see after signing in is called Home (the main screen you land on after signing in — also called a dashboard). This is your home base.
Look around Home
At the top you'll see a greeting with your name, four big cards in the middle, and a short checklist at the bottom.
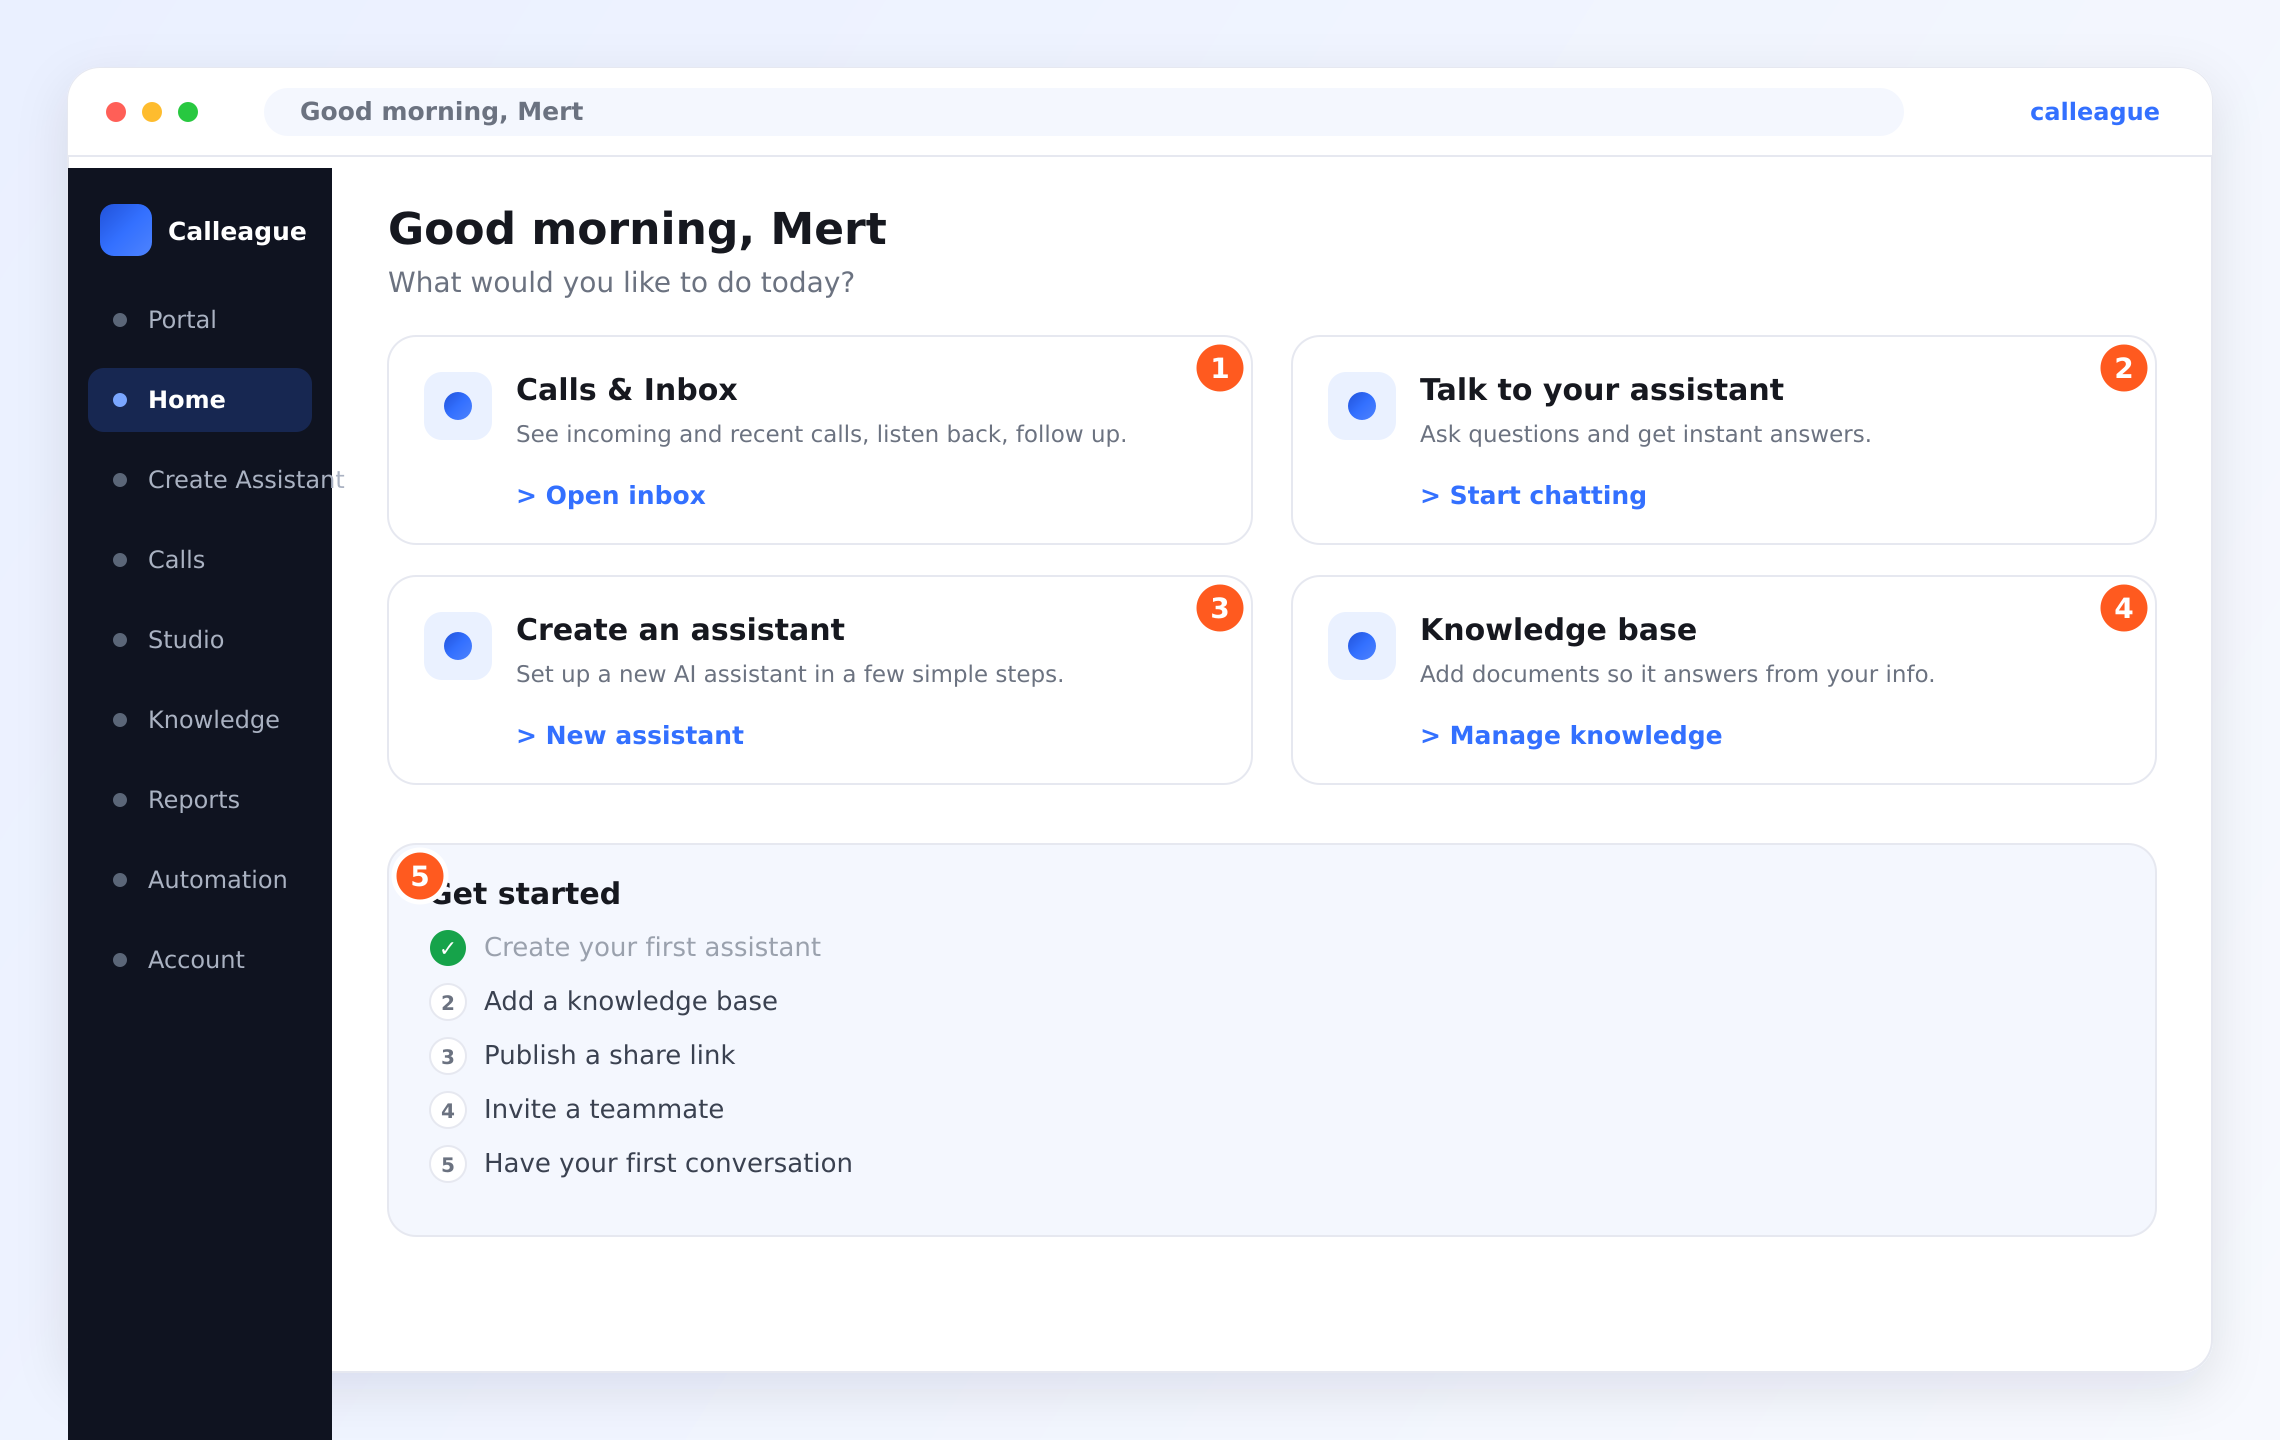
You'll see four cards, each with one clear button:
- ① "Calls & Inbox" — the Open inbox button takes you to your list of phone calls.
- ② "Talk to your assistant" — the Start chatting button lets you chat with your assistant right away.
- ③ "Create an assistant" — the New assistant button opens the assistant-building screen. This is the one we'll use next.
- ④ "Knowledge base" — the Manage knowledge button is where you teach the assistant about your business.
Notice the "Get started" checklist
At the bottom of Home (marked ⑤ in the picture) there's a short checklist that ticks itself off as you go:
- Create your first assistant
- Add a knowledge base
- Publish a share link
- Invite a teammate
- Have your first conversation
Treat it like a friendly to-do list. The items here may not be in exactly the same order as the roadmap at the top of this page; both get you to the same place — the app simply also reminds you to publish a Share link and invite a teammate.
Find your way around the left menu
Down the left side you'll always see the same menu (on a phone, tap the ☰ (three horizontal lines = menu) icon at the top left): Portal, Home, Create Assistant, Calls, Studio, Knowledge, Reports, Automation, and Account. You'll use Create Assistant, Calls, Studio, Knowledge, and Account the most. (Portal is the chat screen where you can talk to and test your assistant yourself; Calls is your inbox; Studio is where you edit your assistants and grab a share link from the Publish tab; Knowledge is the Knowledge base where you teach the assistant about your business; Automation is for ready-made rules that run on their own — you don't need it when you're just starting out.)
You'll see the page you're on highlighted in color in the menu, so you always know where you are.
On a brand-new account these screens and lists may look empty — that's completely normal. They fill up once you create your first assistant and your first calls start coming in.
Take your time clicking around. Nothing reaches your customers until you publish your assistant or connect a real phone number — so explore freely.
A real-world example
Imagine a small dental clinic. The phone rings all day with "Are you open Saturday?" and "Can I book a cleaning?" — and some calls come in after hours when no one can pick up.
With Calleague you build one assistant called "Reception" and teach it your opening hours and prices. If you have a website, you add a small chat bubble (a widget) that opens in the corner of your site; if you don't have a website, you send your assistant's Share link to customers over WhatsApp. Then you connect your phone number. Now customers get a friendly, correct answer day or night, and every conversation is waiting for you in your inbox. The same idea fits a flower shop taking orders, a shop answering "where's my delivery?", or a busy office routing callers to the right person.
If something looks different
| What you see | Why it happens | What to do |
|---|---|---|
| Can't sign in | Wrong email or password | Use the Forgot your password? link on the sign-in screen; if it still won't work, write to us |
| No password box after "Continue" | The email was wrong or incomplete | Make sure you typed the email fully and correctly, then try again |
| Your Home looks empty | Brand-new account with nothing set up yet | That's normal — start with New assistant on the ③ "Create an assistant" card |
| The greeting shows a different name | It greets you by your own account name | That's expected — the example screens here say "Mert" |
| I have no account / can't find "sign up" | Calleague has no sign-up button; your account is given to you | Request an account via Try for free on calleague.ai or at info@arpanet.com.tr |
Frequently asked questions
Next steps
You're signed in and you know your way around. Let's build your assistant.
Create your first assistant
A friendly 4-step wizard that guides you all the way.
Teach it about your business
Add your website or documents so it answers from your info.
Put it on your website
Copy one line of code to add the chat widget.
Connect a phone number
Let your assistant answer real phone calls.
Stuck or have a question? We're happy to help — write to us at info@arpanet.com.tr. Calleague is made by Arpanet Bilişim Teknolojileri A.Ş. in Ankara.
Last Updated
What you can use it for
How your AI assistant helps your business every day — by chat on your website, by a share link, and by phone. Real examples and a step-by-step setup for clinics, shops, restaurants, support and lead capture.
Create your first assistant
Build your assistant with the 4-step wizard — name it, add your information, test it, and get it to your customers. Even if you don't have a website.