
What you can use it for
How your AI assistant helps your business every day — by chat on your website, by a share link, and by phone. Real examples and a step-by-step setup for clinics, shops, restaurants, support and lead capture.
Calleague isn't a vague "AI tool" — it's a helper that does specific, useful jobs for real businesses. We call this helper an assistant: it talks to your customers for you, answers their questions from your information, and logs every conversation for you. This page walks through the most common jobs, what the assistant actually does, and what you get out of it. At the end you'll set up your own assistant with the real button names, step by step. Find the one closest to your business.
Before you start. To use Calleague you need an account. There is no public "sign up" button in Calleague — Calleague creates your account for you. To get one, use the Try for free button on calleague.ai or write to info@arpanet.com.tr; you'll be given an email and password.
First step — open an internet browser on your phone or computer (such as Chrome or Safari), type app.calleague.ai into the address bar at the top, and press "Go" / "Search" (Enter on a computer):
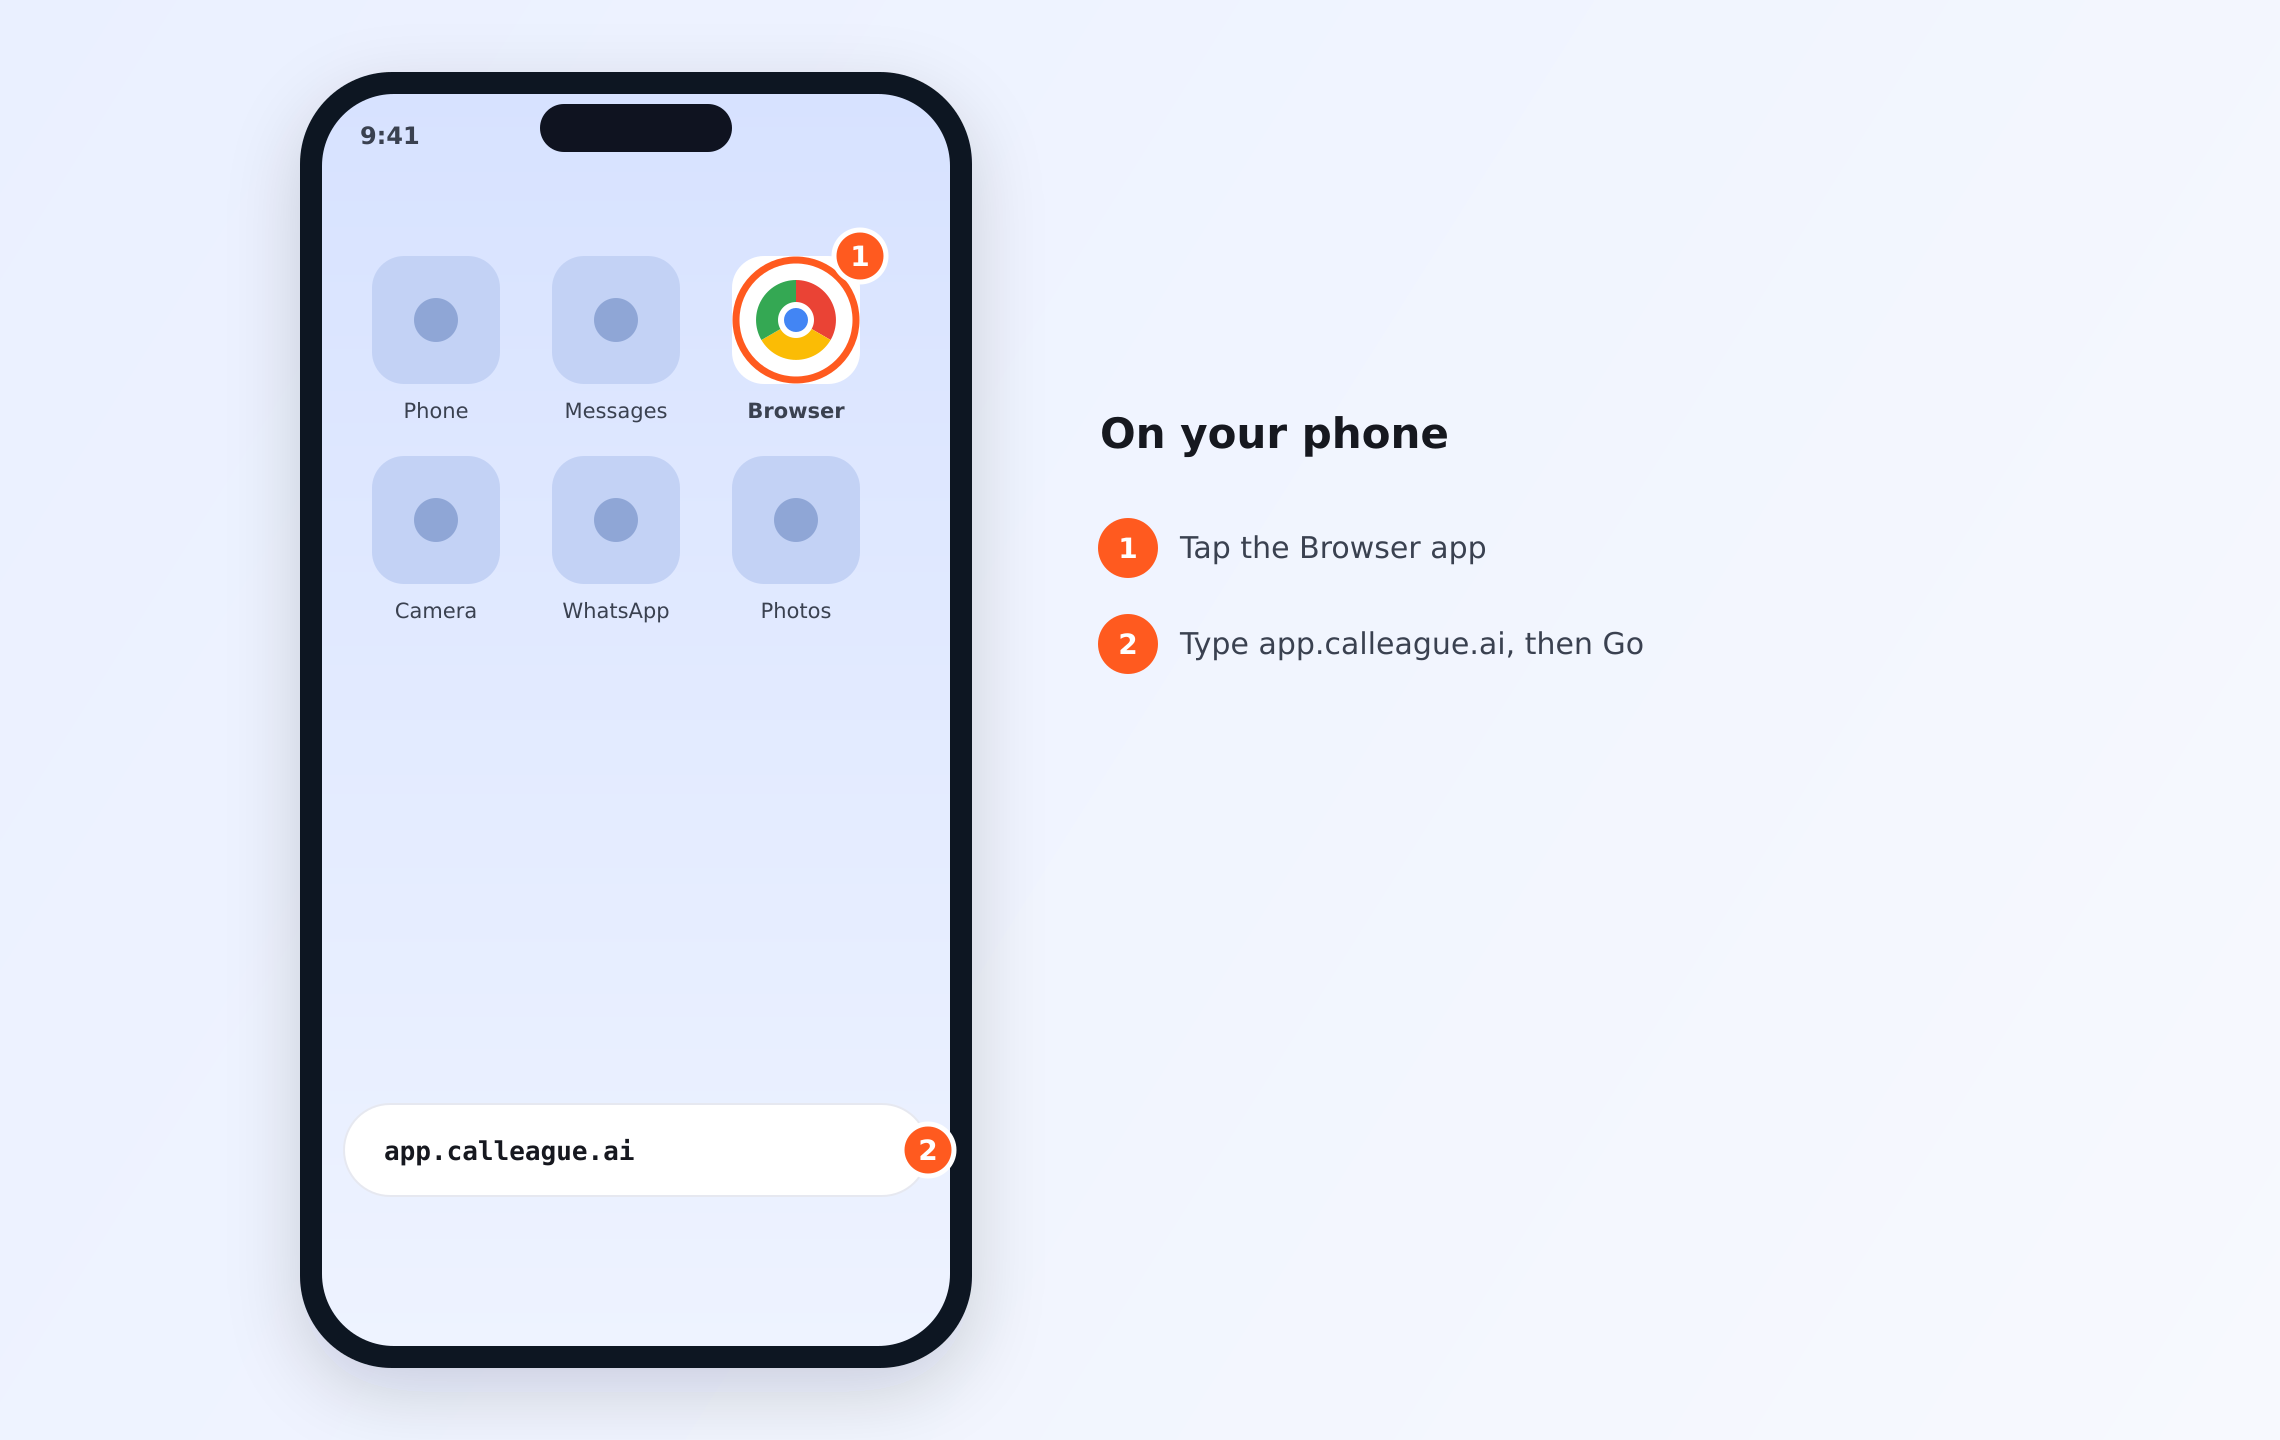
- ① Browser — tap the internet browser icon on your phone.
- ② Address bar — type app.calleague.ai at the top and press "Go".
Sign in on the screen that opens: type your email, press "Continue"; then type your password in the "Password" field and press "Sign in" (the sign-in screen looks like this image).
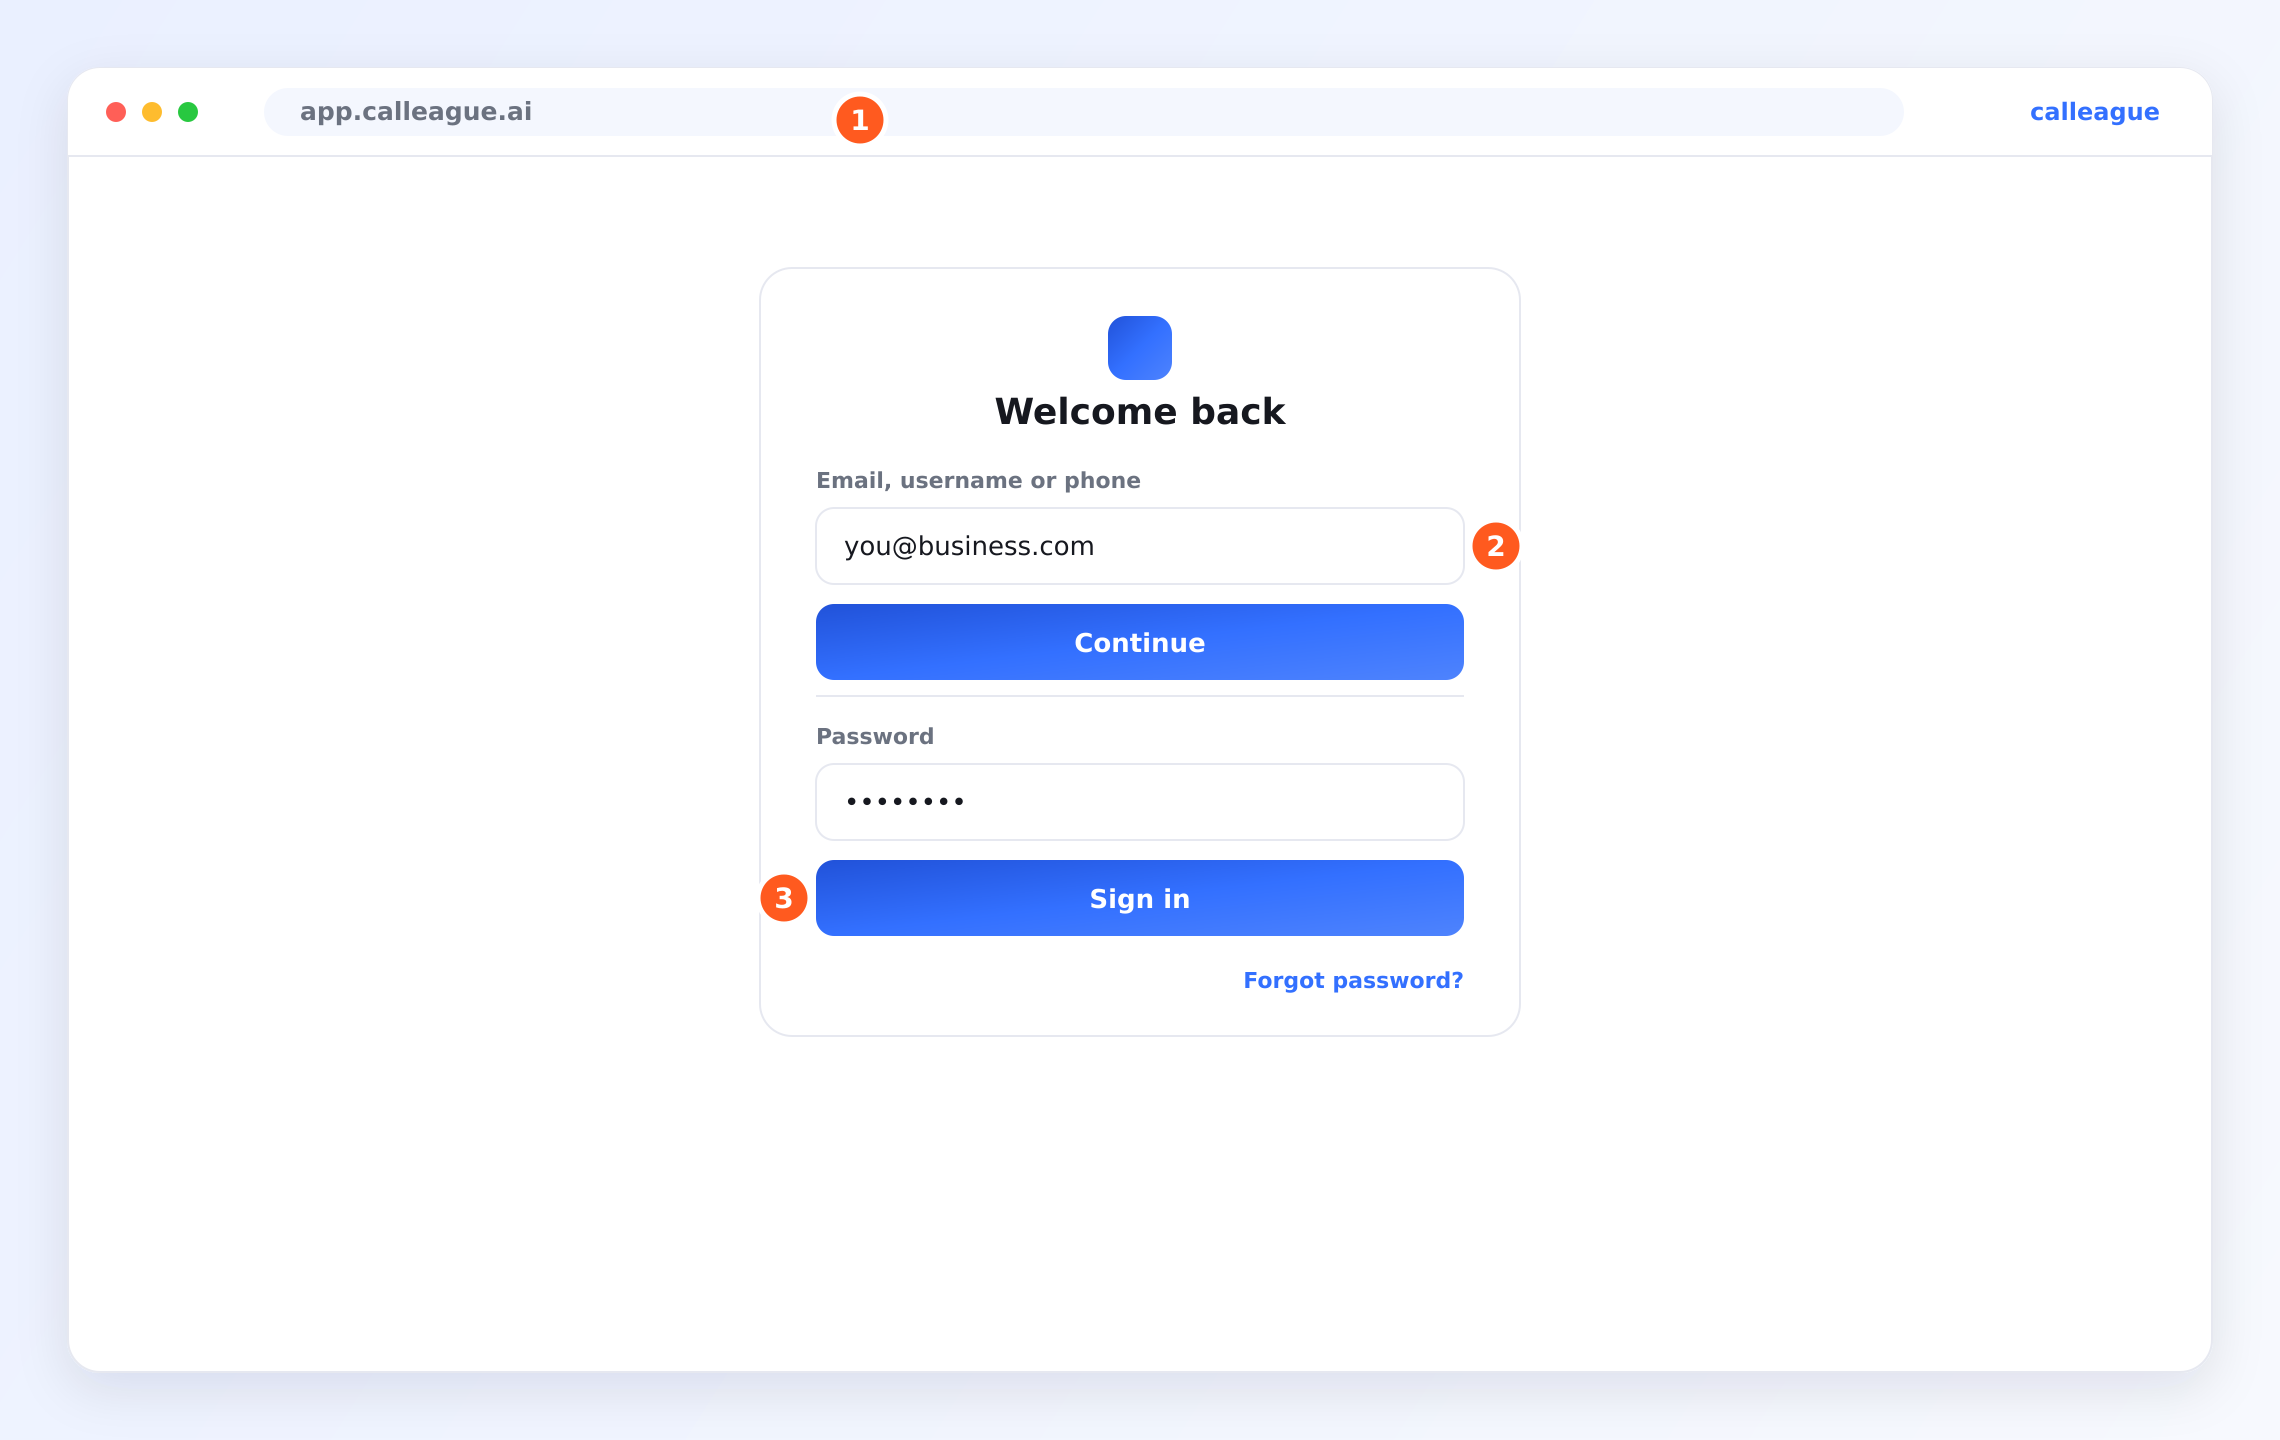
(calleague.ai is our marketing site; app.calleague.ai is the app itself — this is where you do the work.) The full sign-in steps, with screenshots: Getting started.
No website? No problem. Everything on this page works without a website. Your assistant gives you a ready share link (a link you send to customers that opens a chat when they tap it) — open Studio from the left menu (on a phone, tap the three horizontal lines ☰ at the top left), open your assistant, go to the Publish tab, and in the Get started box copy the Share link with Copy link, then send it over WhatsApp, Instagram, or SMS. And the assistant works by phone too. So chat, share link, and phone are all ready for you.
A quick overview
| Your business | What the assistant does | What you get |
|---|---|---|
| Clinic / practice | Books, moves and confirms appointments | Fewer missed bookings and no-shows |
| Shop / e-commerce | Answers order, stock and delivery questions | Less time on repetitive questions |
| Restaurant / salon | Takes reservations and bookings | Tables and chairs stay full |
| Support team | Answers common questions, day and night | Happy customers, even after hours |
| Any business | Captures new customer details | No lead slips away |
1. A clinic — booking appointments
Imagine a dental clinic. The front desk is busy with patients, and the phone keeps ringing.
- What the assistant does: A caller says, "I'd like a check-up next week." The assistant offers an open slot, books it, and confirms the details out loud. A visitor can do exactly the same by typing in the chat bubble on your website or in your share link.
- The benefit: Every booking call is answered — even during the morning rush — so the clinic fills its calendar instead of losing patients to a busy line.
The day before, your assistant can place a friendly reminder call, cutting down on no-shows without anyone lifting a finger.
2. A shop — answering order questions
Picture a small online shop that sells homeware.
- What the assistant does: Customers ask "Where's my order?", "Do you have this in blue?", or "How long is delivery?" The assistant answers instantly from the shop's own information, on the chat and on the phone.
- The benefit: The owner stops answering the same five questions all day and gets time back for the work that actually grows the shop.
3. After-hours support — never going quiet
Think of a software company whose customers are spread across time zones.
- What the assistant does: When your teammates log off, the assistant keeps answering common questions and, for anything it can't solve, it takes a clear message or captures the customer's details to follow up.
- The benefit: Customers feel looked after at midnight as much as at midday — and your teammates start the morning with tidy notes instead of a wall of missed messages.
After every conversation you get a call detail screen; all your conversations collect in Calls — your inbox — in the left menu (on a phone, tap the three horizontal lines ☰ at the top left). In the picture below you'll see the three marked things:
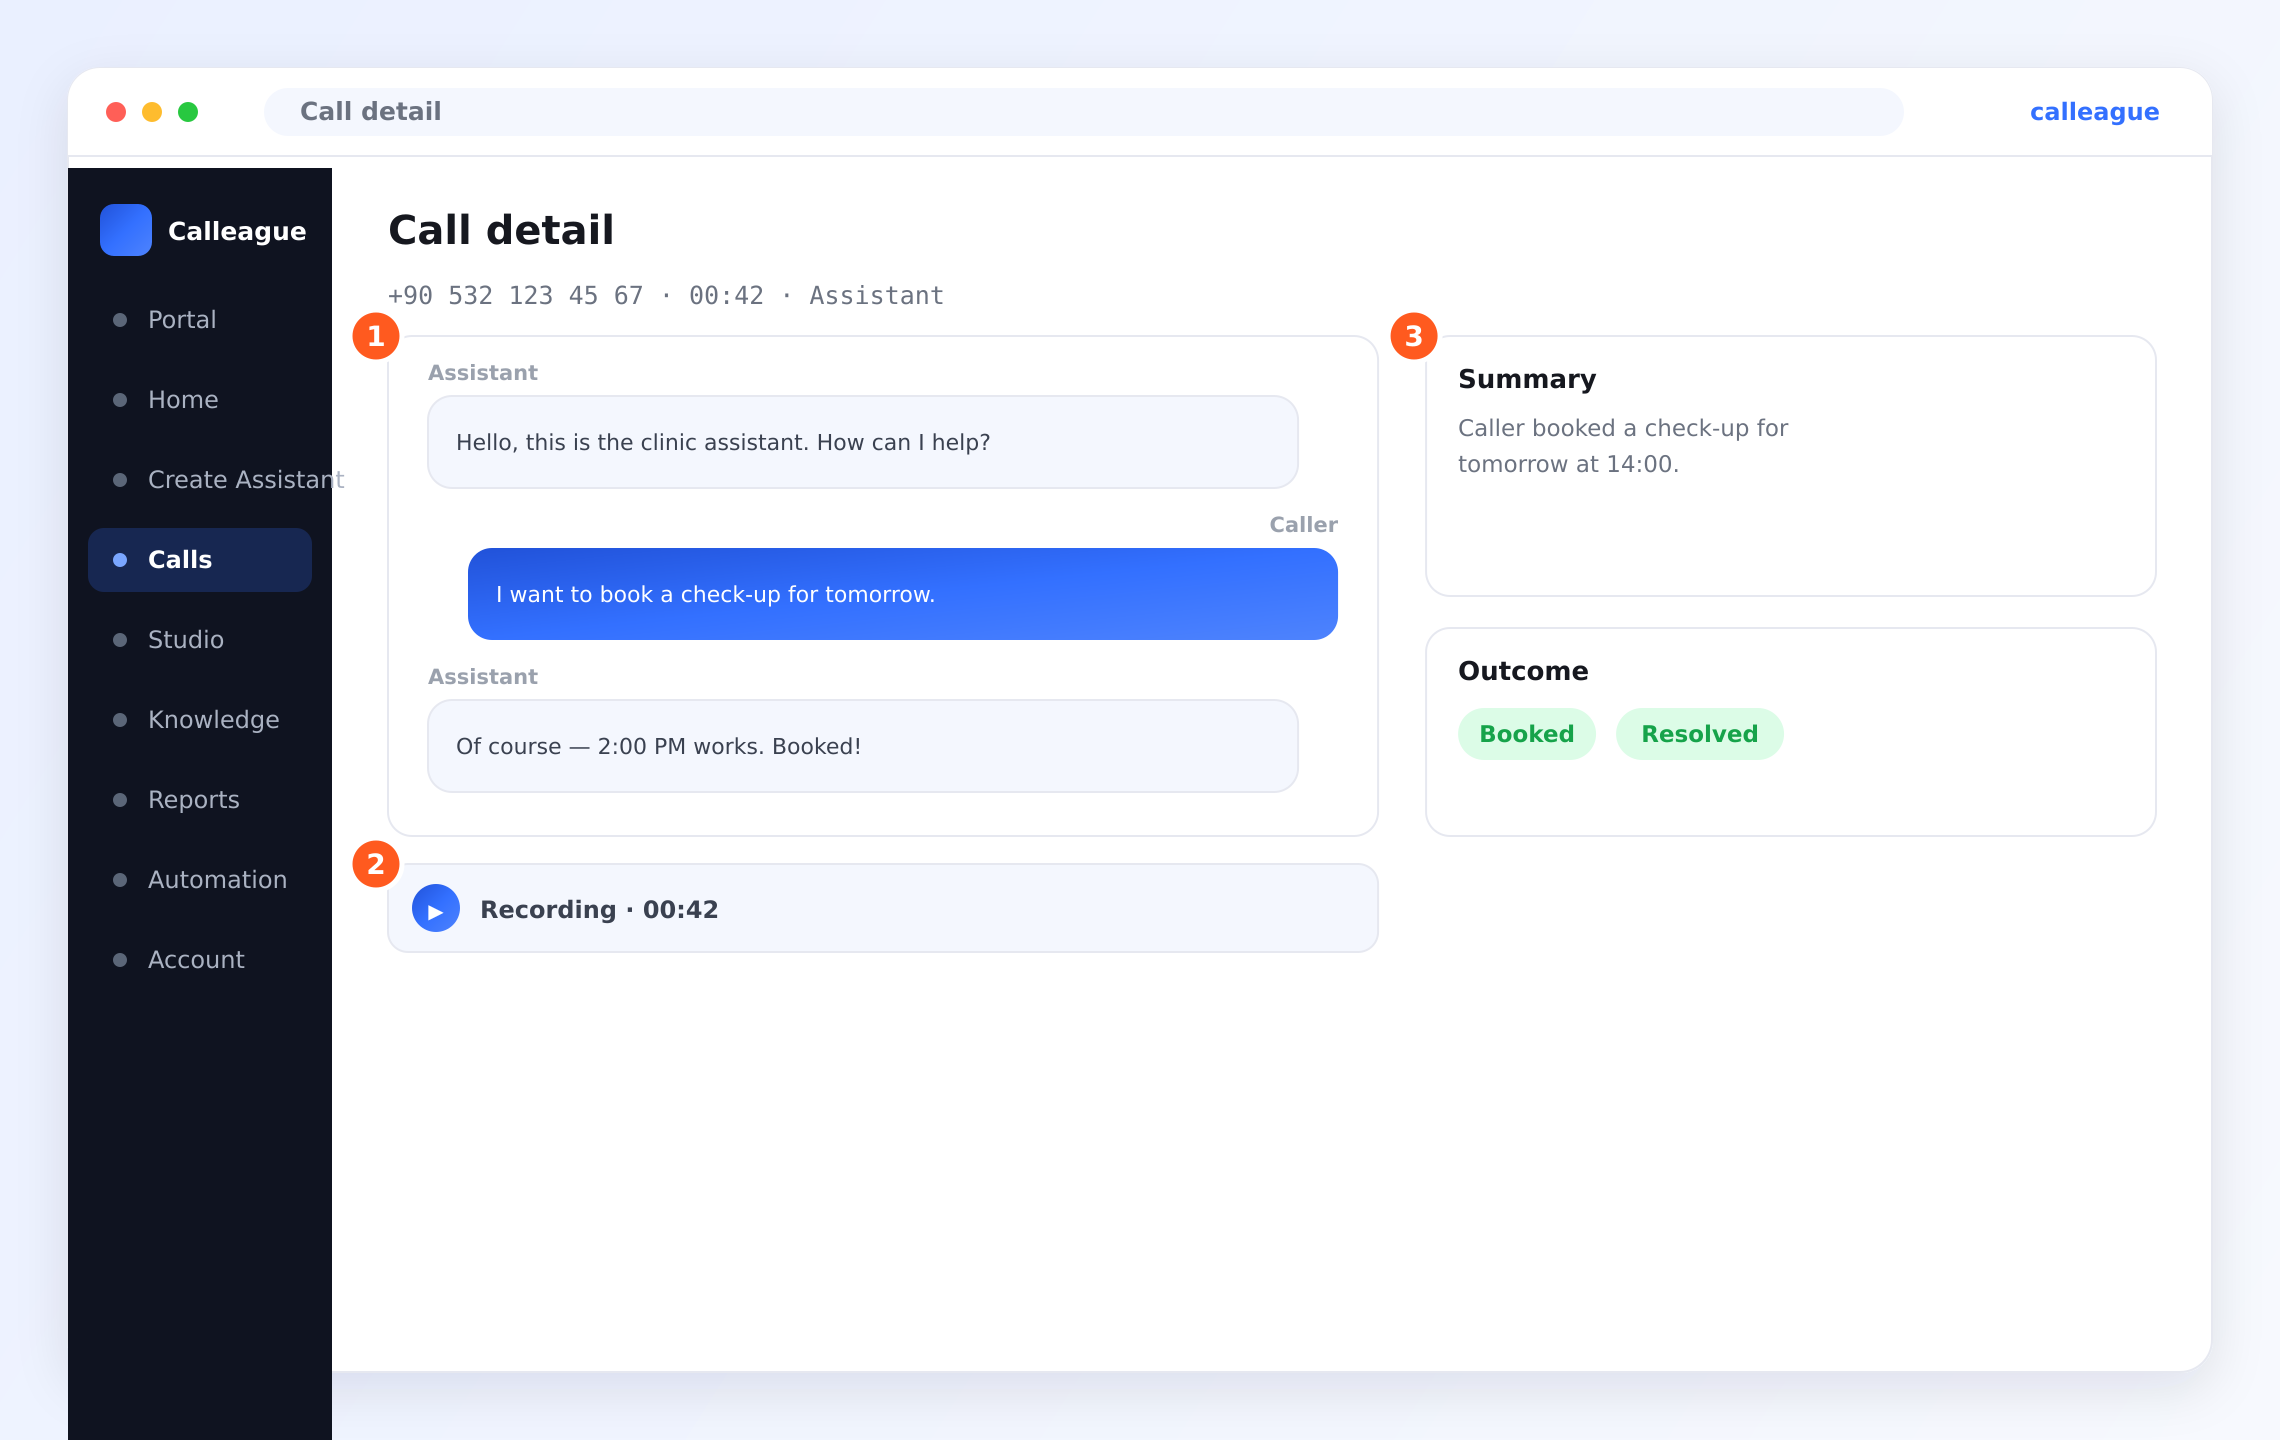
- ① The transcript — the conversation written out (the transcript), with Caller and Assistant lines so you can tell who said what.
- ② The recording — a small audio player; press play to listen, no need to download it to your computer.
- ③ Summary and outcome — a short few-sentence summary and an outcome label the assistant adds automatically (for example Booked, Resolved, or Unresolved).
That way you can see at a glance what happened without reading every word.
4. Capturing new customers (leads)
Imagine an estate agency where every enquiry is a potential sale.
- What the assistant does: A new visitor asks about a listing. The assistant answers their questions, then politely collects their name and number and notes what they're looking for.
- The benefit: No interested customer slips away because the line was busy or it was 9pm — every enquiry is captured and ready for your teammates to follow up.
5. Restaurants & salons — taking reservations
A restaurant on a Friday night, or a hair salon on a Saturday morning.
- What the assistant does: It takes reservations and bookings over chat and phone at the same time, even while staff are run off their feet with guests in front of them.
- The benefit: Tables and chairs stay full, and front-of-house staff can focus on the people who are actually there.
Set up your own assistant in minutes
Whichever example fits you, the path is the same. After you sign in (as in the Before you start box above), follow these steps. The orange ① ② ③ markers in each picture point to the exact thing to click.
Click "Create Assistant" in the left menu
When you sign in, you land on the Home dashboard (the main screen that opens after you sign in). In the menu on the left (on a phone, tap the three horizontal lines ☰ at the top left — this opens the menu), click Create Assistant.
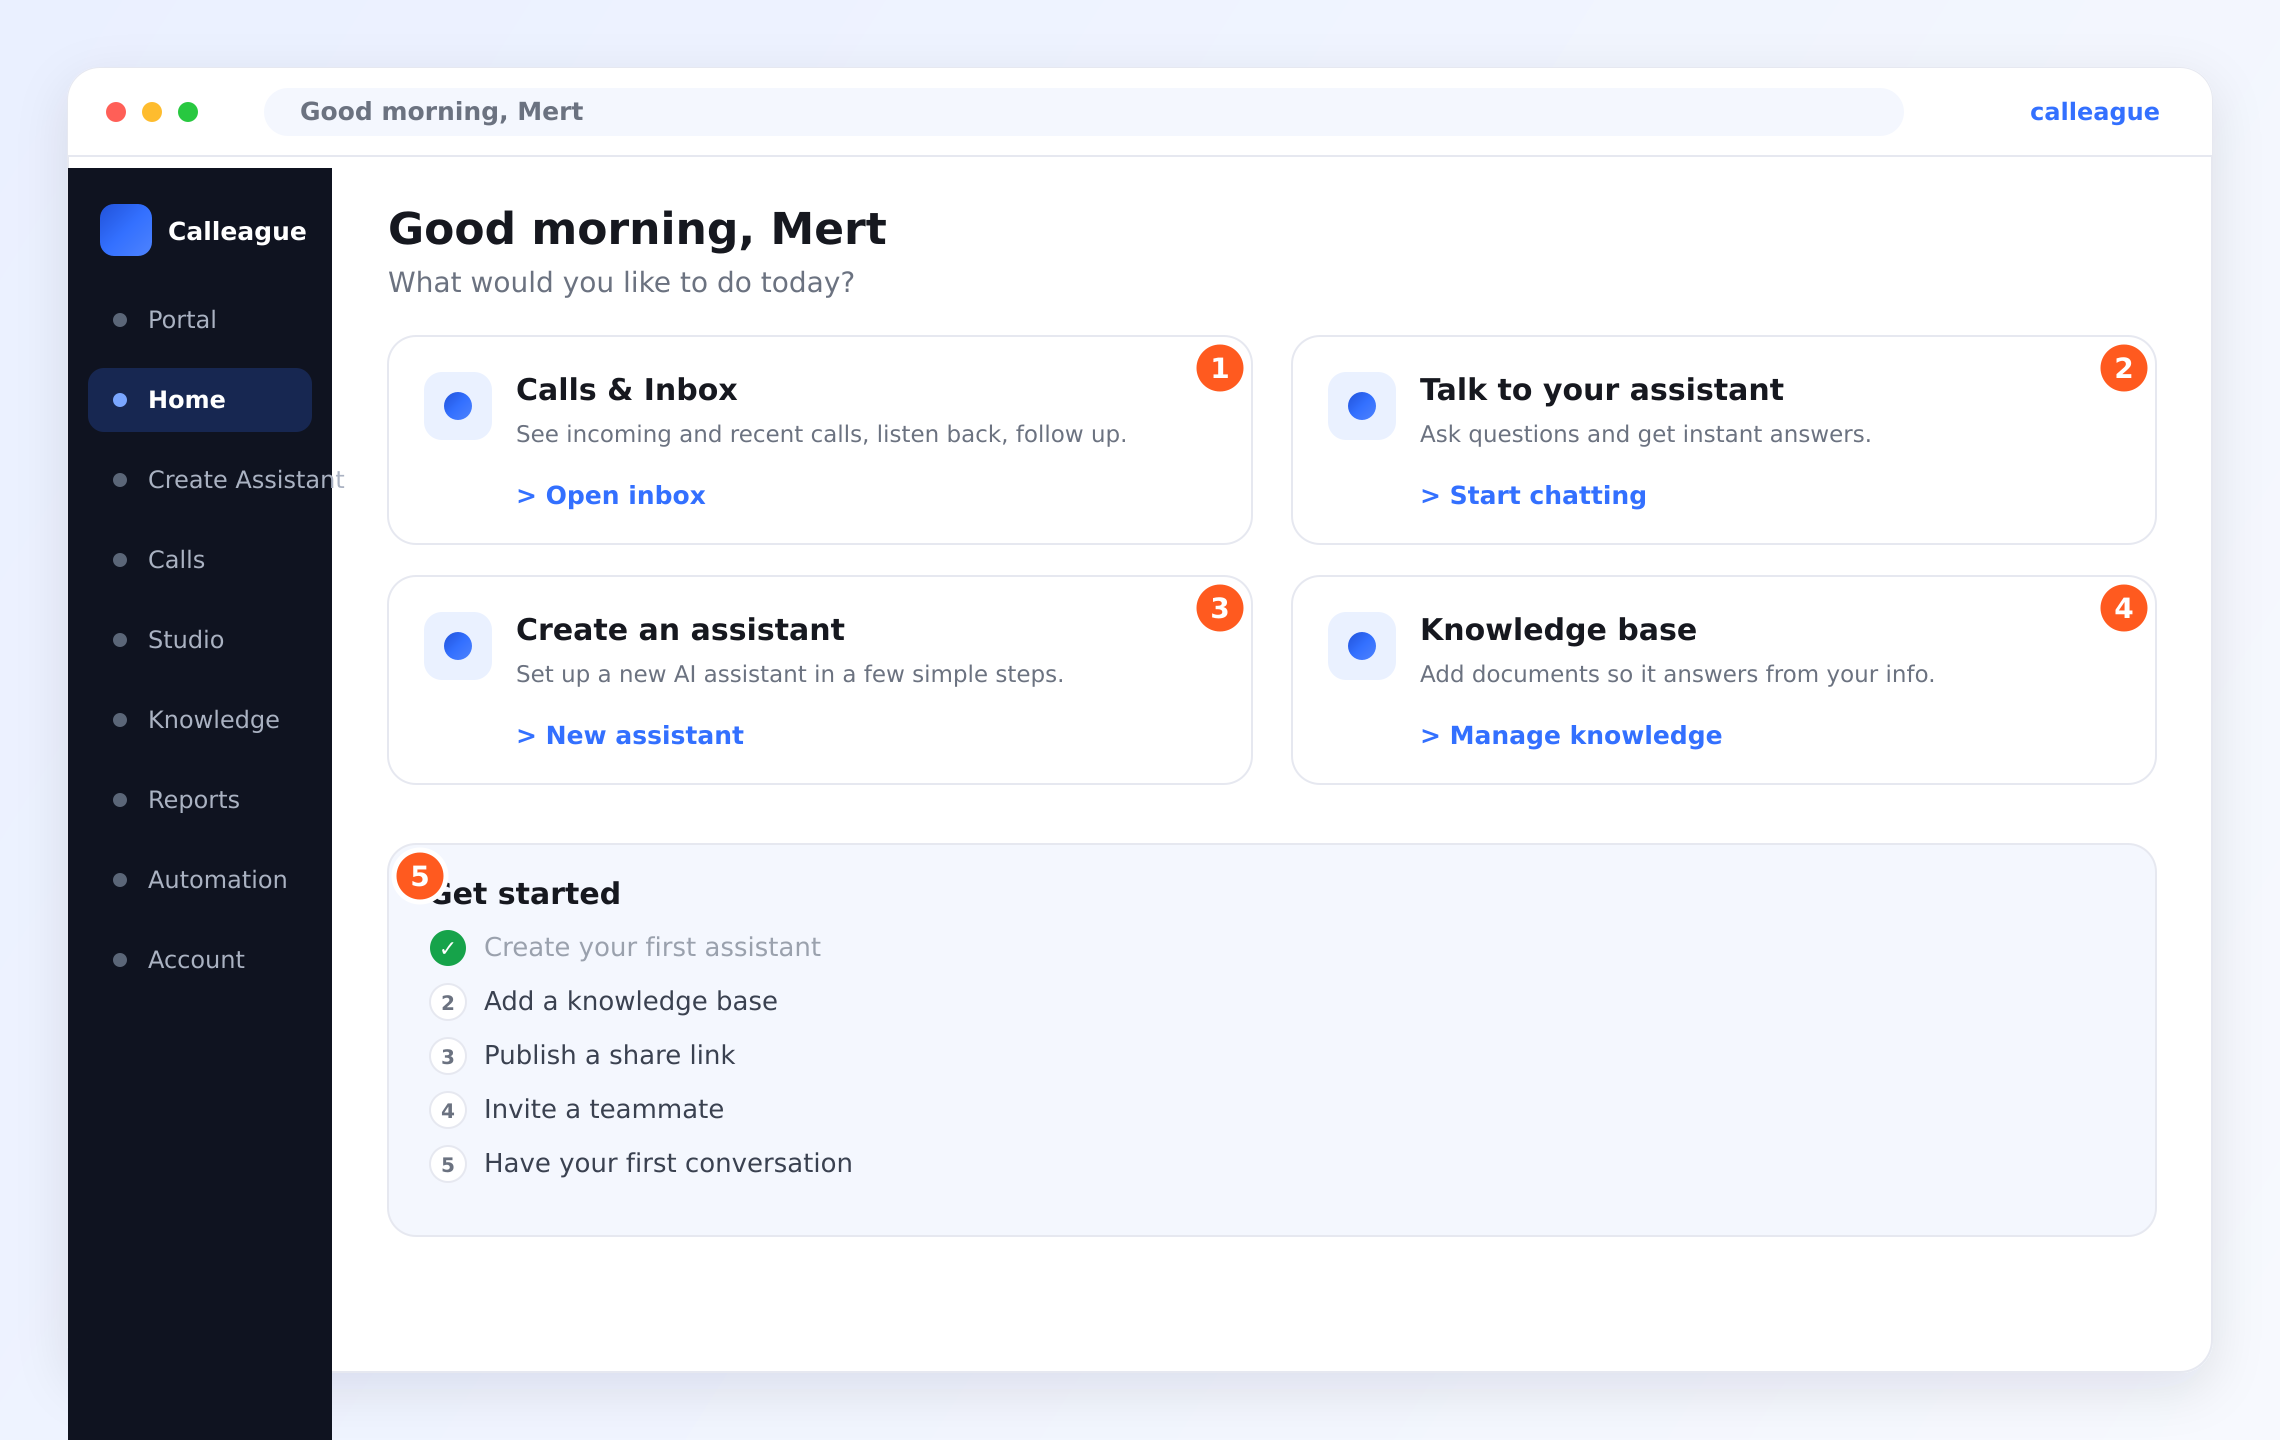
You'll see a screen that guides you step by step — a wizard — open up. On a brand-new account these screens look empty; that's normal, they fill up as you add things.
Name your assistant and pick a starting point
The first step of the wizard is Starting point.
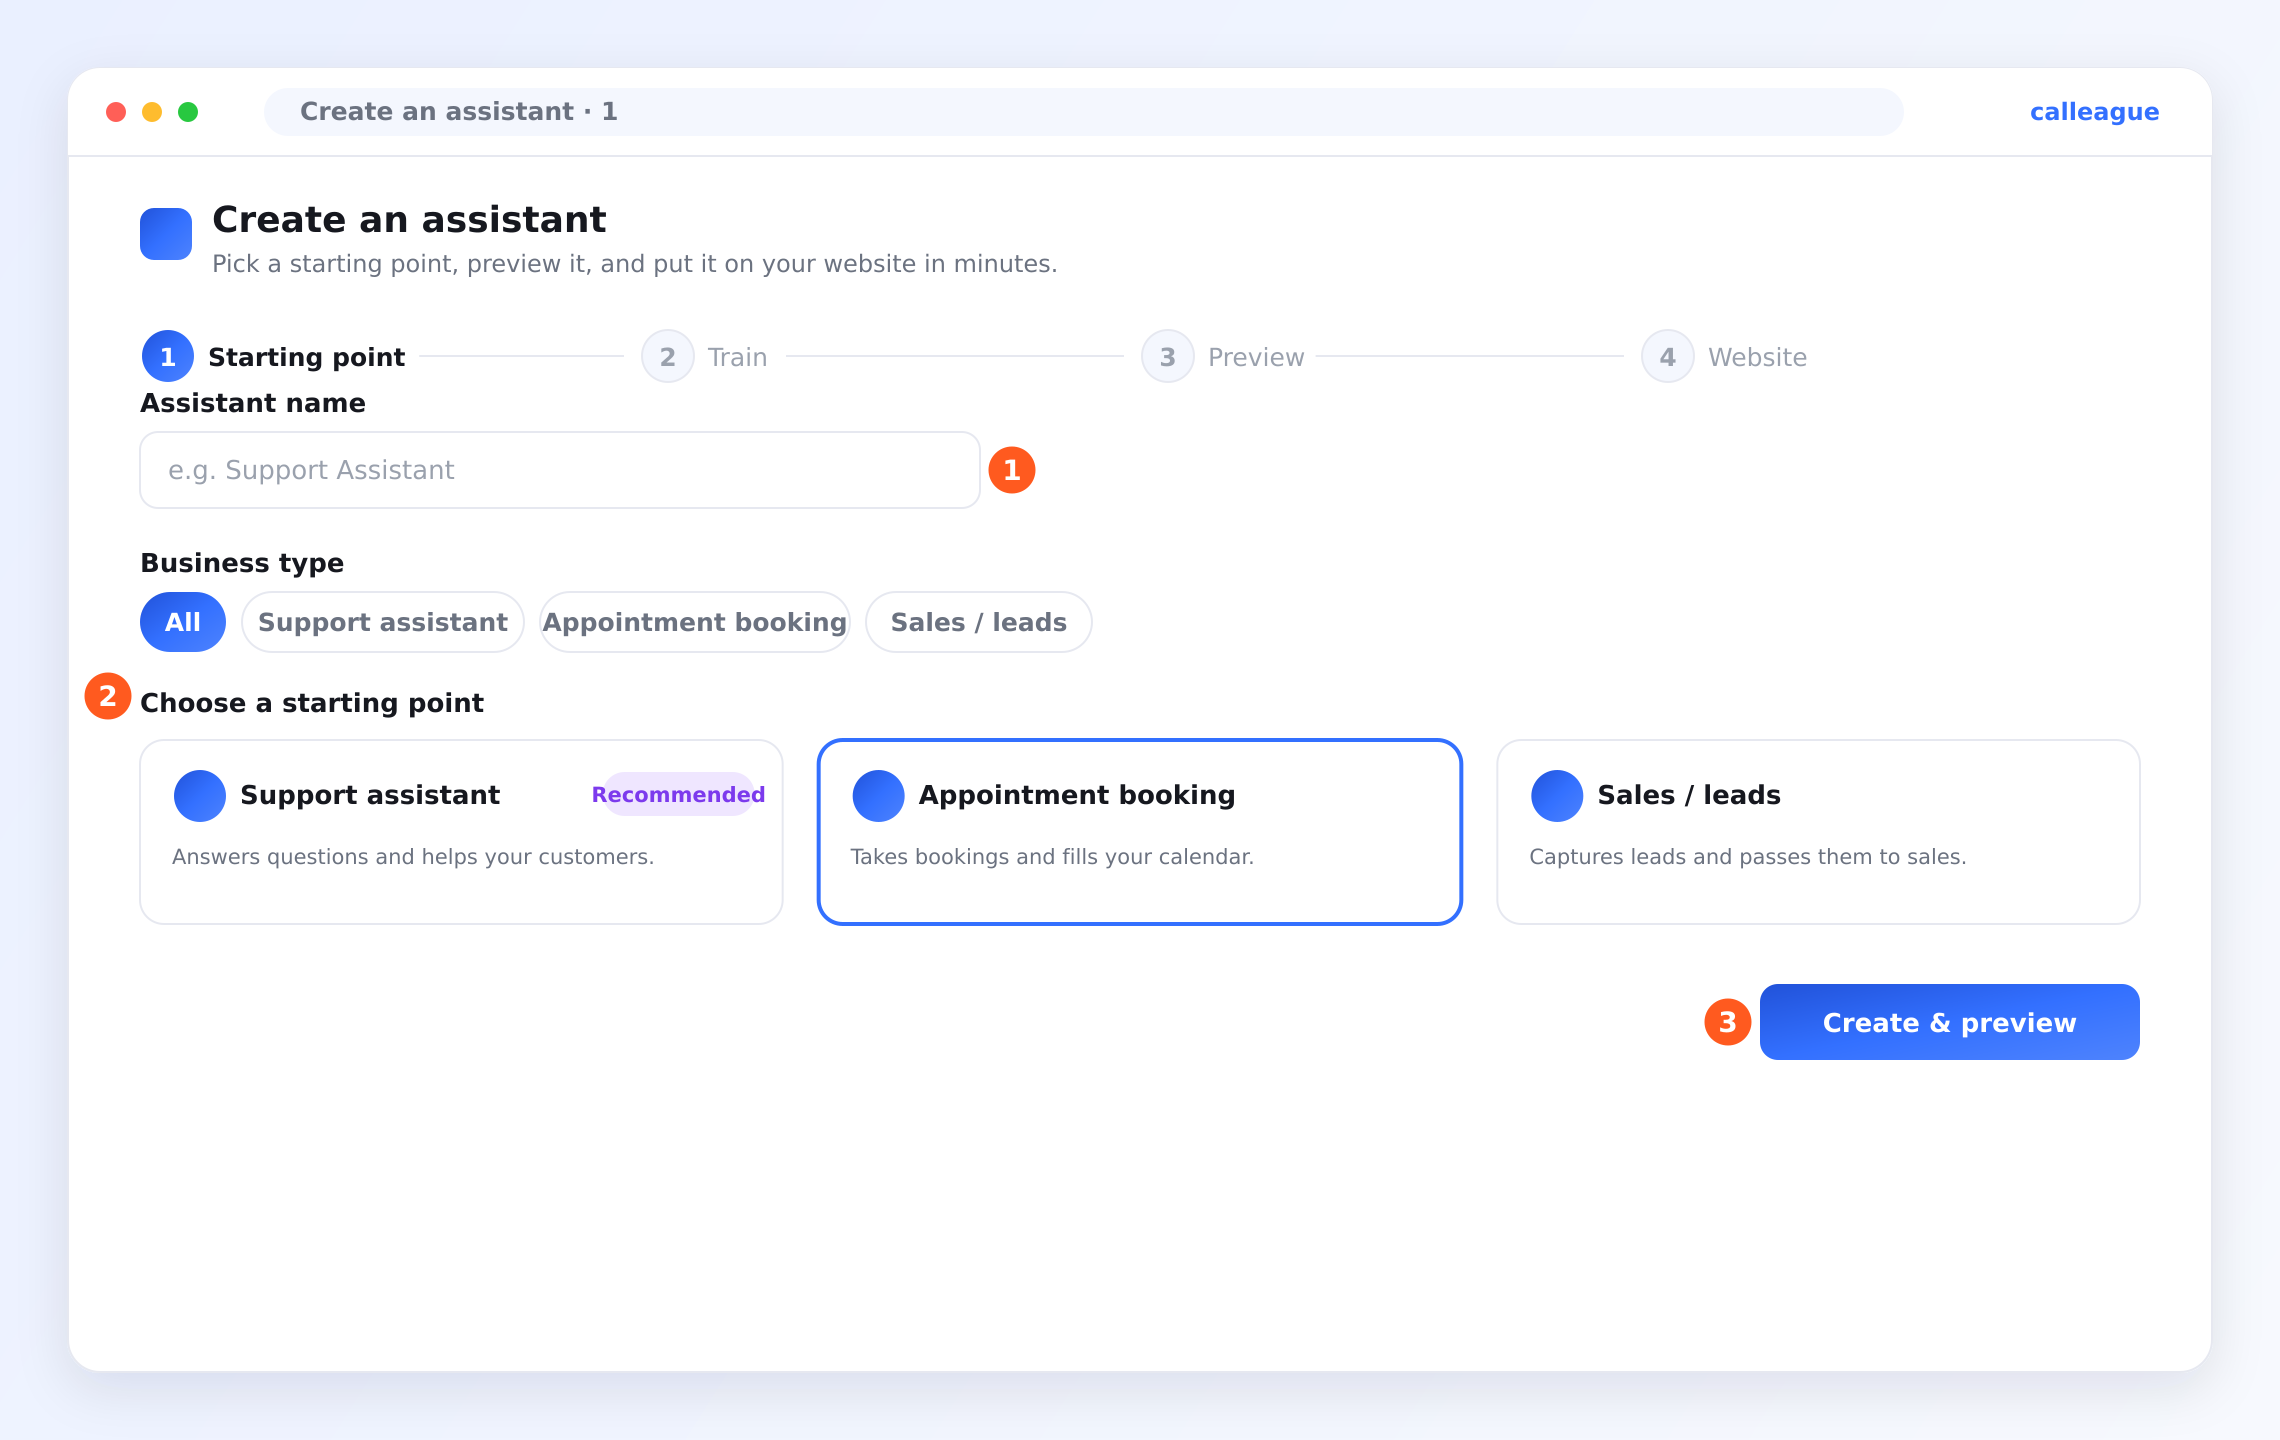
In the ① "Assistant name" field, type a simple name (for example "Reception"). Then, under ② "Choose a starting point", pick the starting point closest to your work — there are three ready cards here: Support assistant, Appointment booking, and Sales / customer (for example, "Appointment booking" for a business that takes bookings). Don't worry if your exact industry isn't listed — pick the nearest one, then customize it with your own information. When you're ready, click the ③ "Create & preview" button.
Teach it about your business
So the assistant answers from your information, you teach it about your business. On the wizard's Train step you either paste a URL (a web address, e.g. www.yoursite.com) or add a document with Upload a document. When you see the green Indexed message (the assistant has read it, so now it knows), click Continue. No rush — you can click Skip for now and add it later.
You can add more websites and documents any time from the Knowledge section in the left menu (on a phone, tap the three horizontal lines ☰ at the top left) — the page that opens is titled Knowledge base:
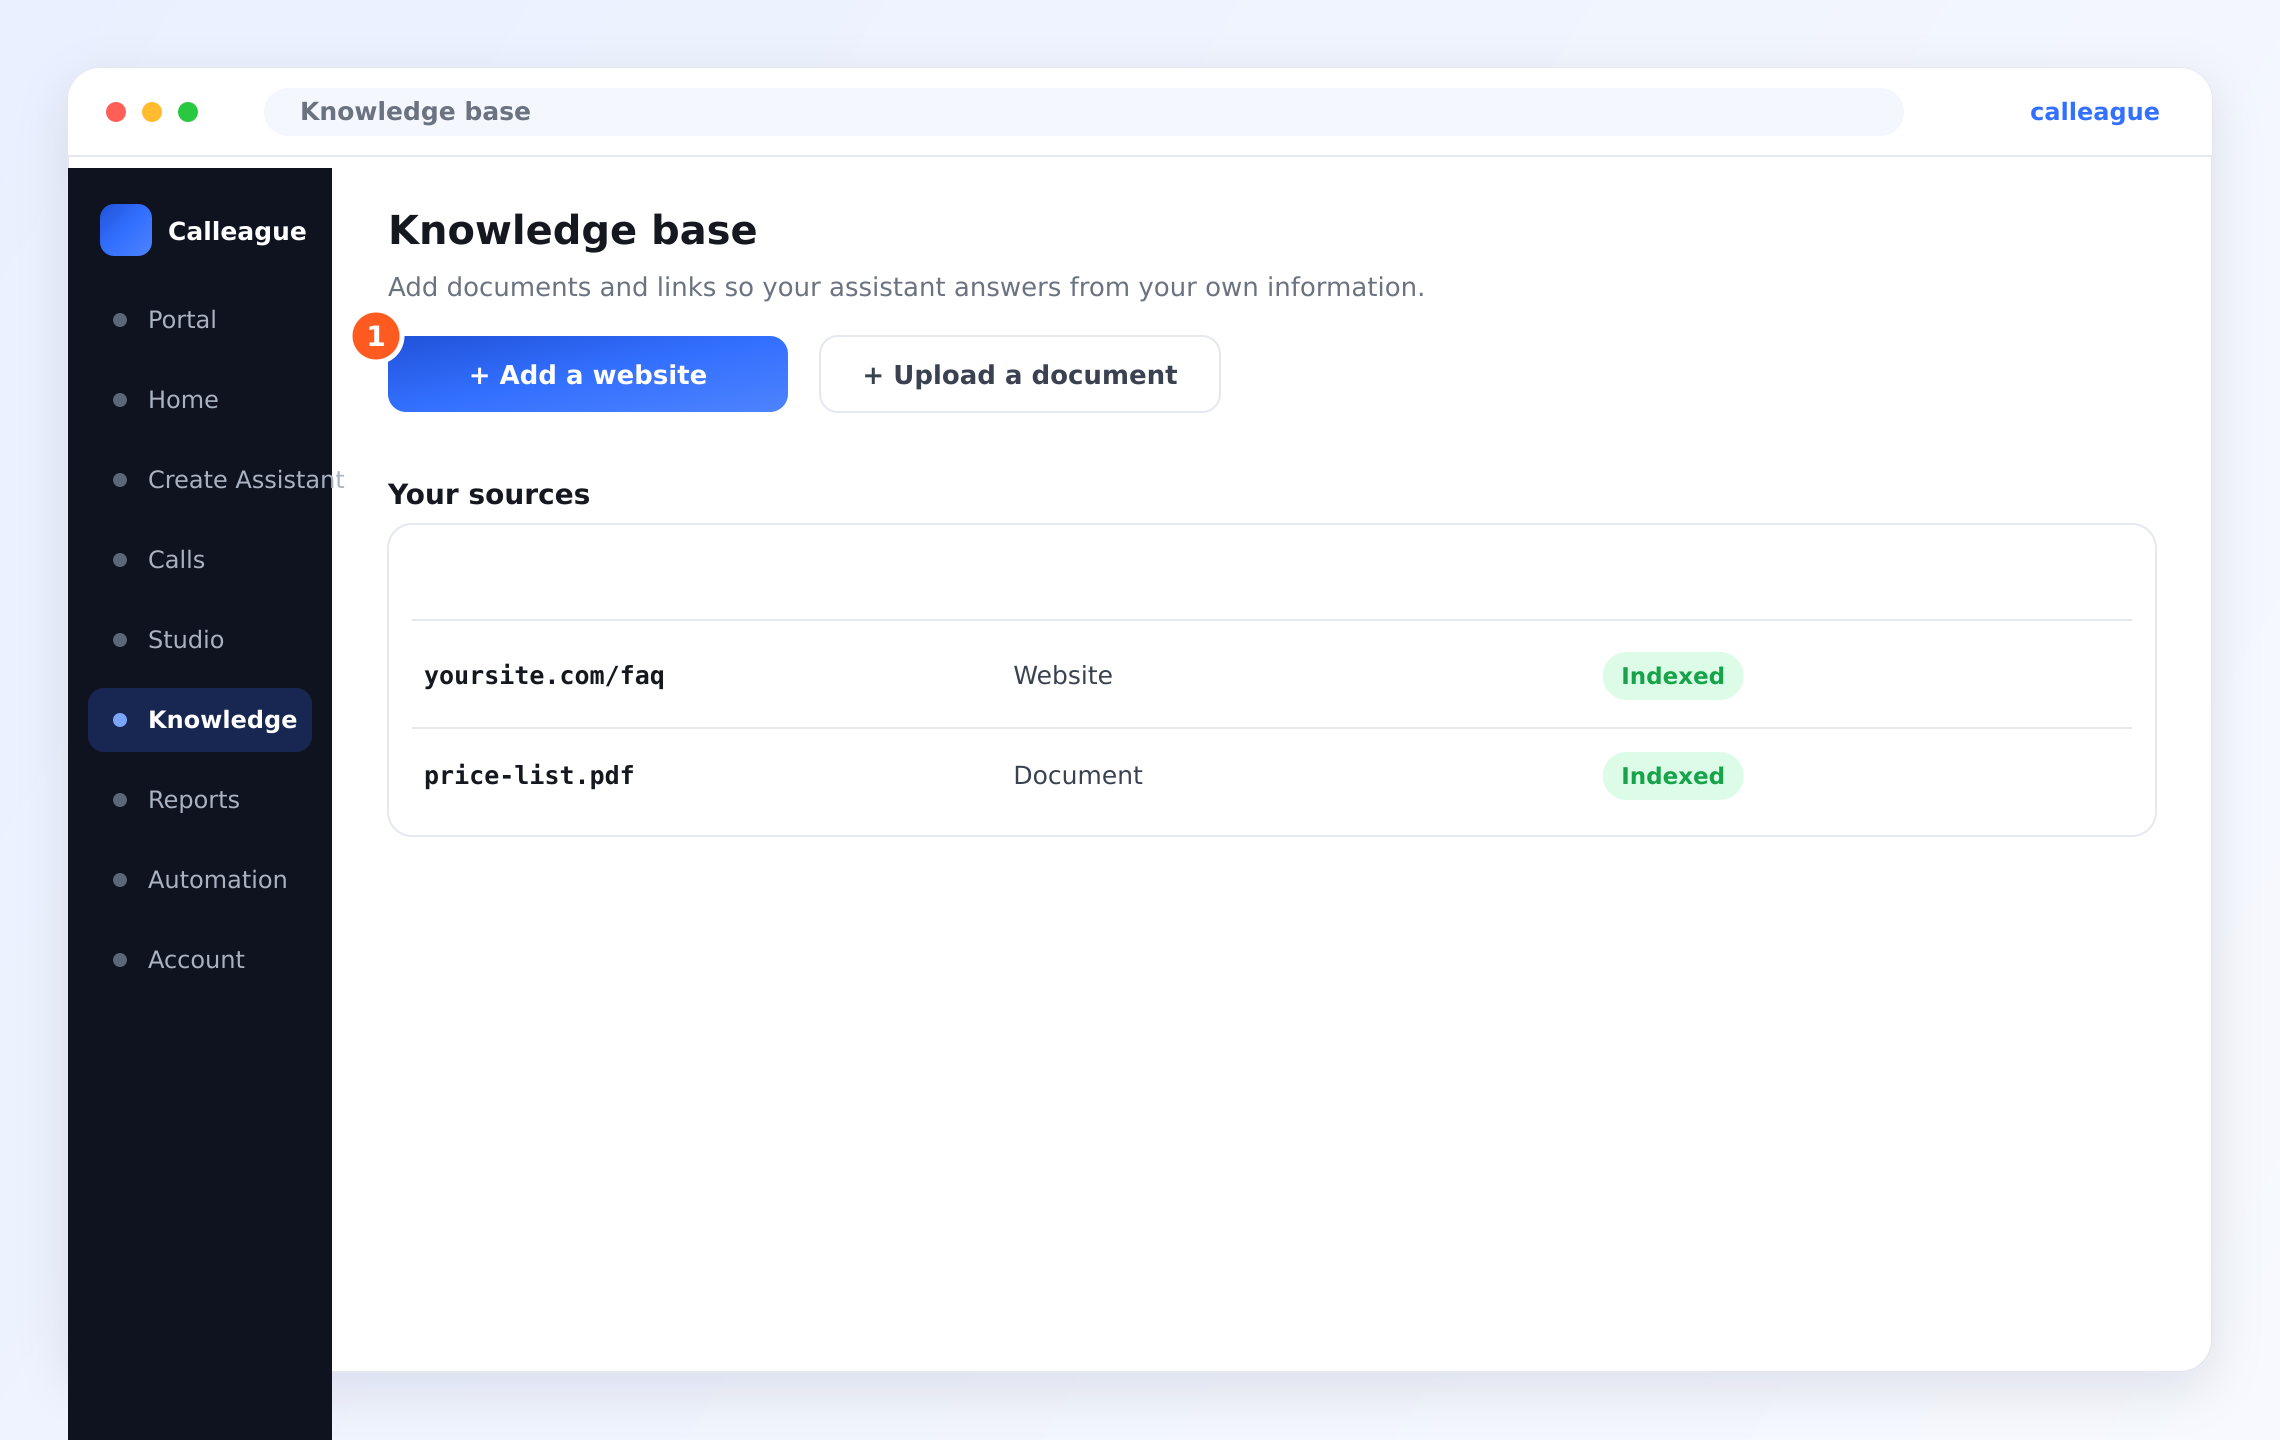
Use ① "+ Add a website" for a link, or "+ Upload a document" for a file. From a phone you can also upload a photo/JPG; if your menu is a photo, upload it as it is. Everything you add appears in the list below with a green Indexed label (2 sources in the example).
Publish it: website, share link, or phone
The last step of the wizard is Website. Here you customize the chat bubble (the widget: the little chat window that appears in the corner of your site) — Color / Position: Right-Left / Widget title — then click Copy snippet to get the one line of code (a small piece of text added to your site).
You don't need to understand this code. If you didn't build your site yourself, send this one line to whoever manages your site — they'll handle the rest. A short email you can use:
Hi,
We're adding a chat tool to our website. Could you add the one line of code
below (which I copied from Calleague) so it shows on every page of the site?

[I'll paste the code I copied here]

Thanks.
If you don't have a website, don't worry — this path is made for you. When the assistant is created, a share link is generated for you automatically. On this last step of the wizard you can click Open the app to use the assistant directly. You can also get the share link any time: open Studio from the left menu (on a phone, tap the three horizontal lines ☰ at the top left); you'll see your list of assistants.
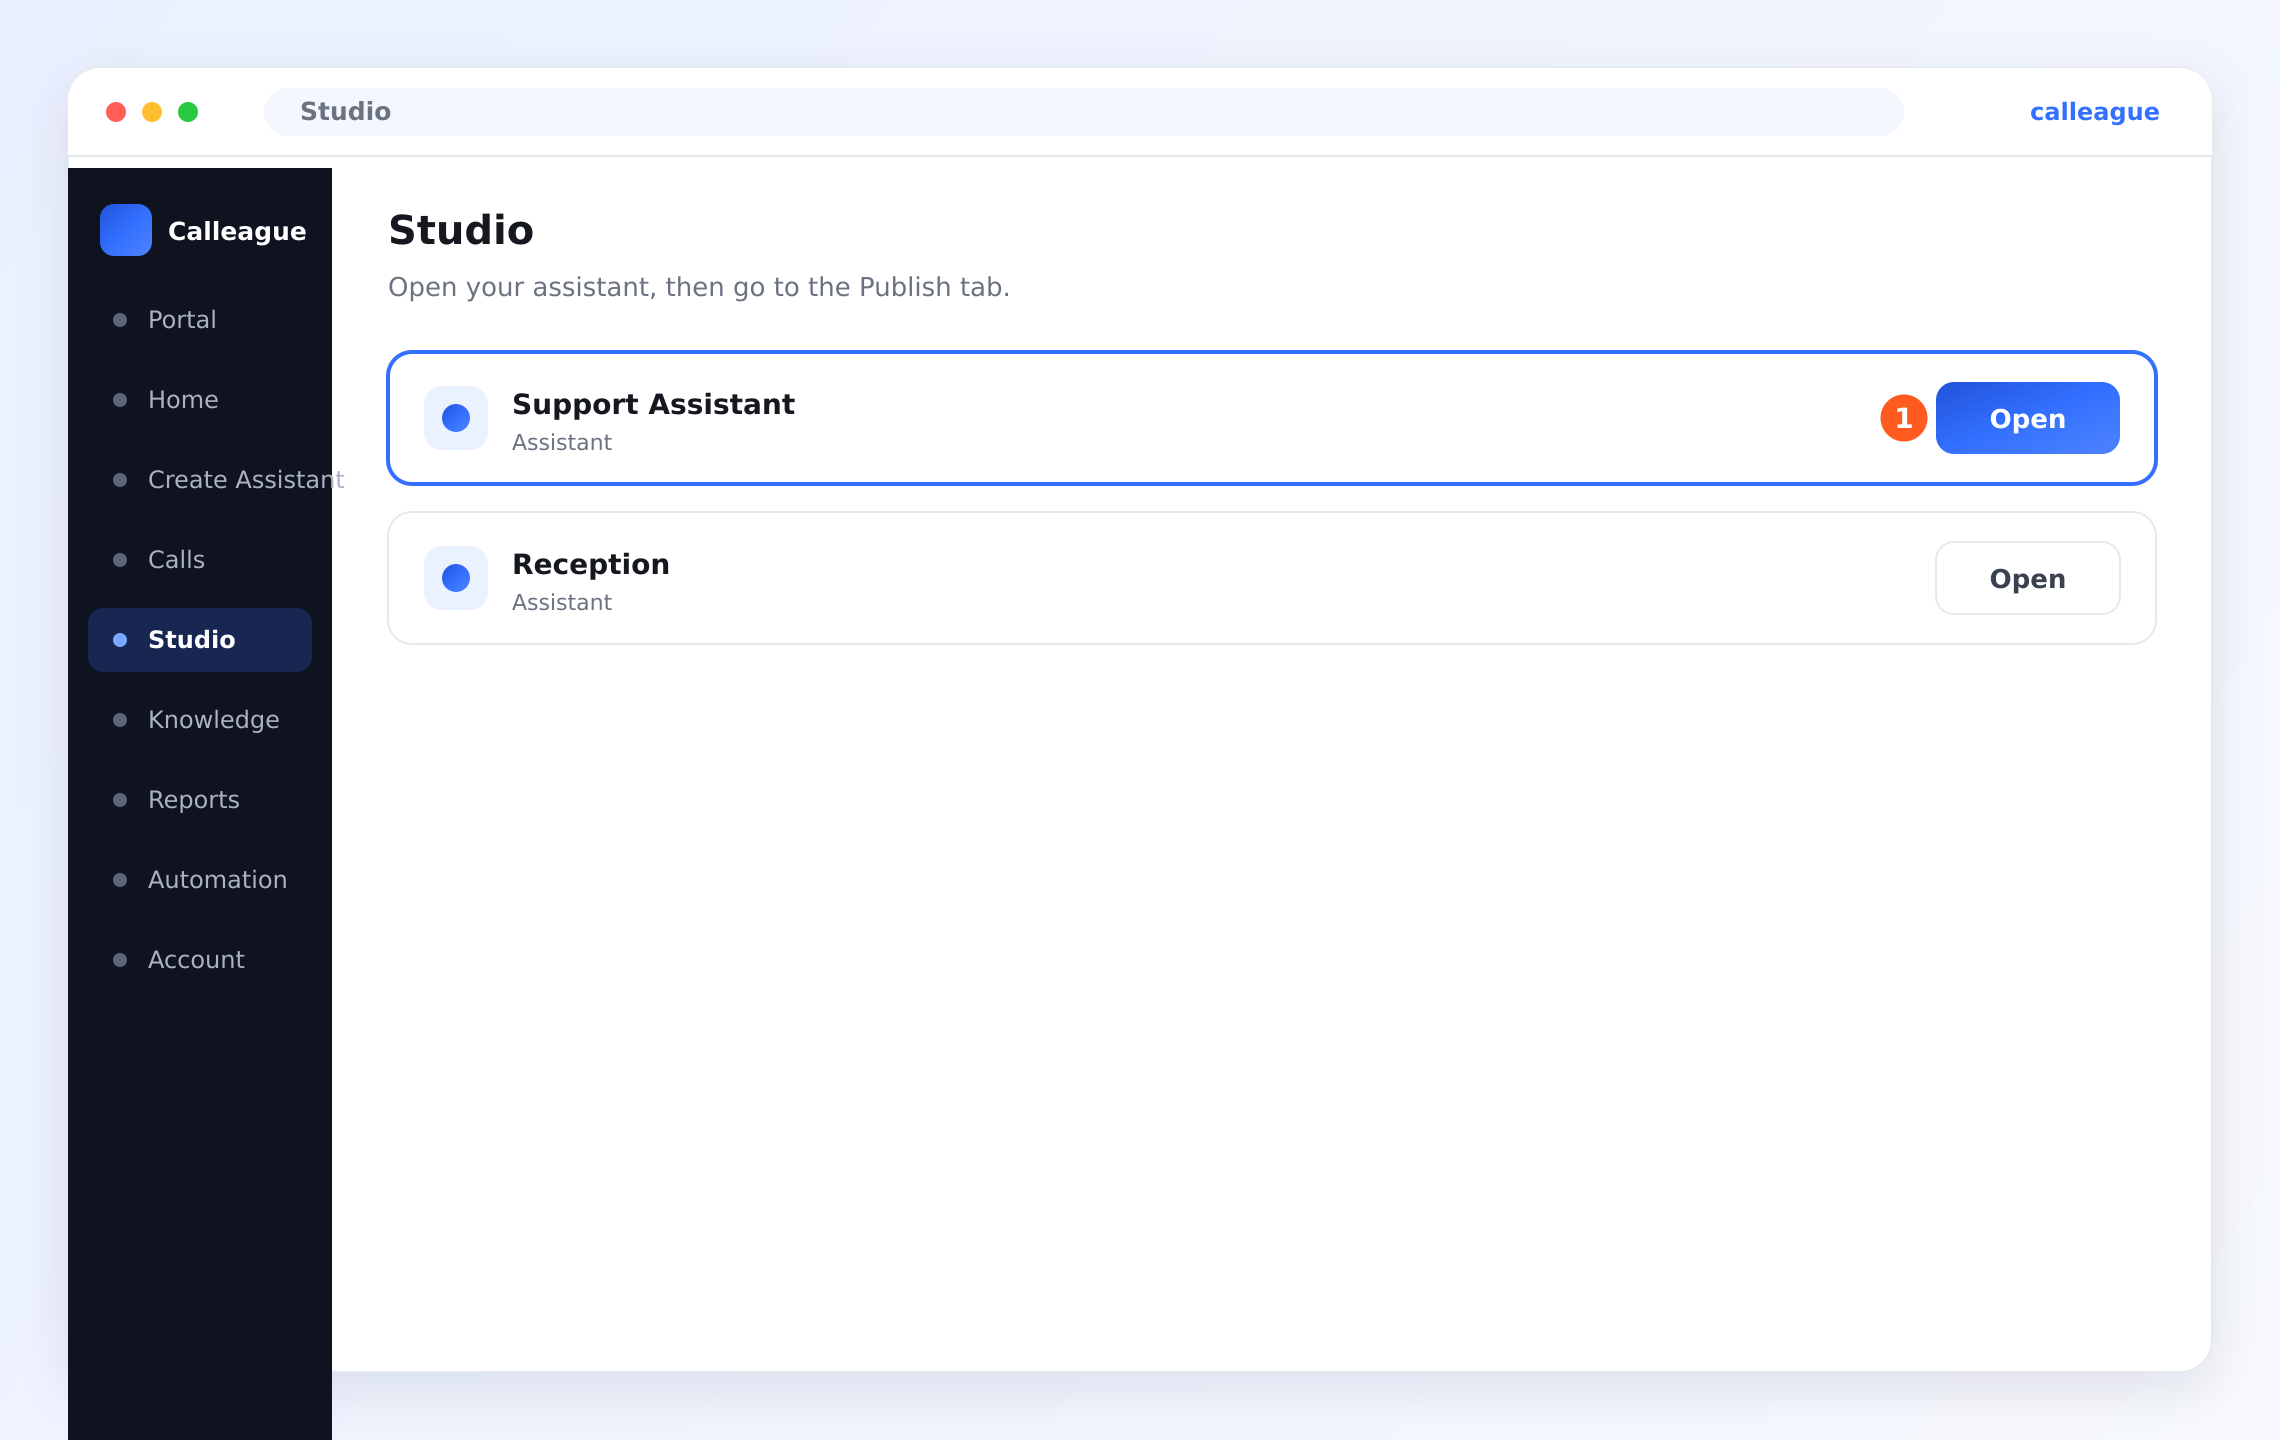
- ① Open — press the Open button on your assistant's row.
In the assistant that opens, switch to the Publish tab; in the Get started box here you'll see a ready Share link and a Copy link button:
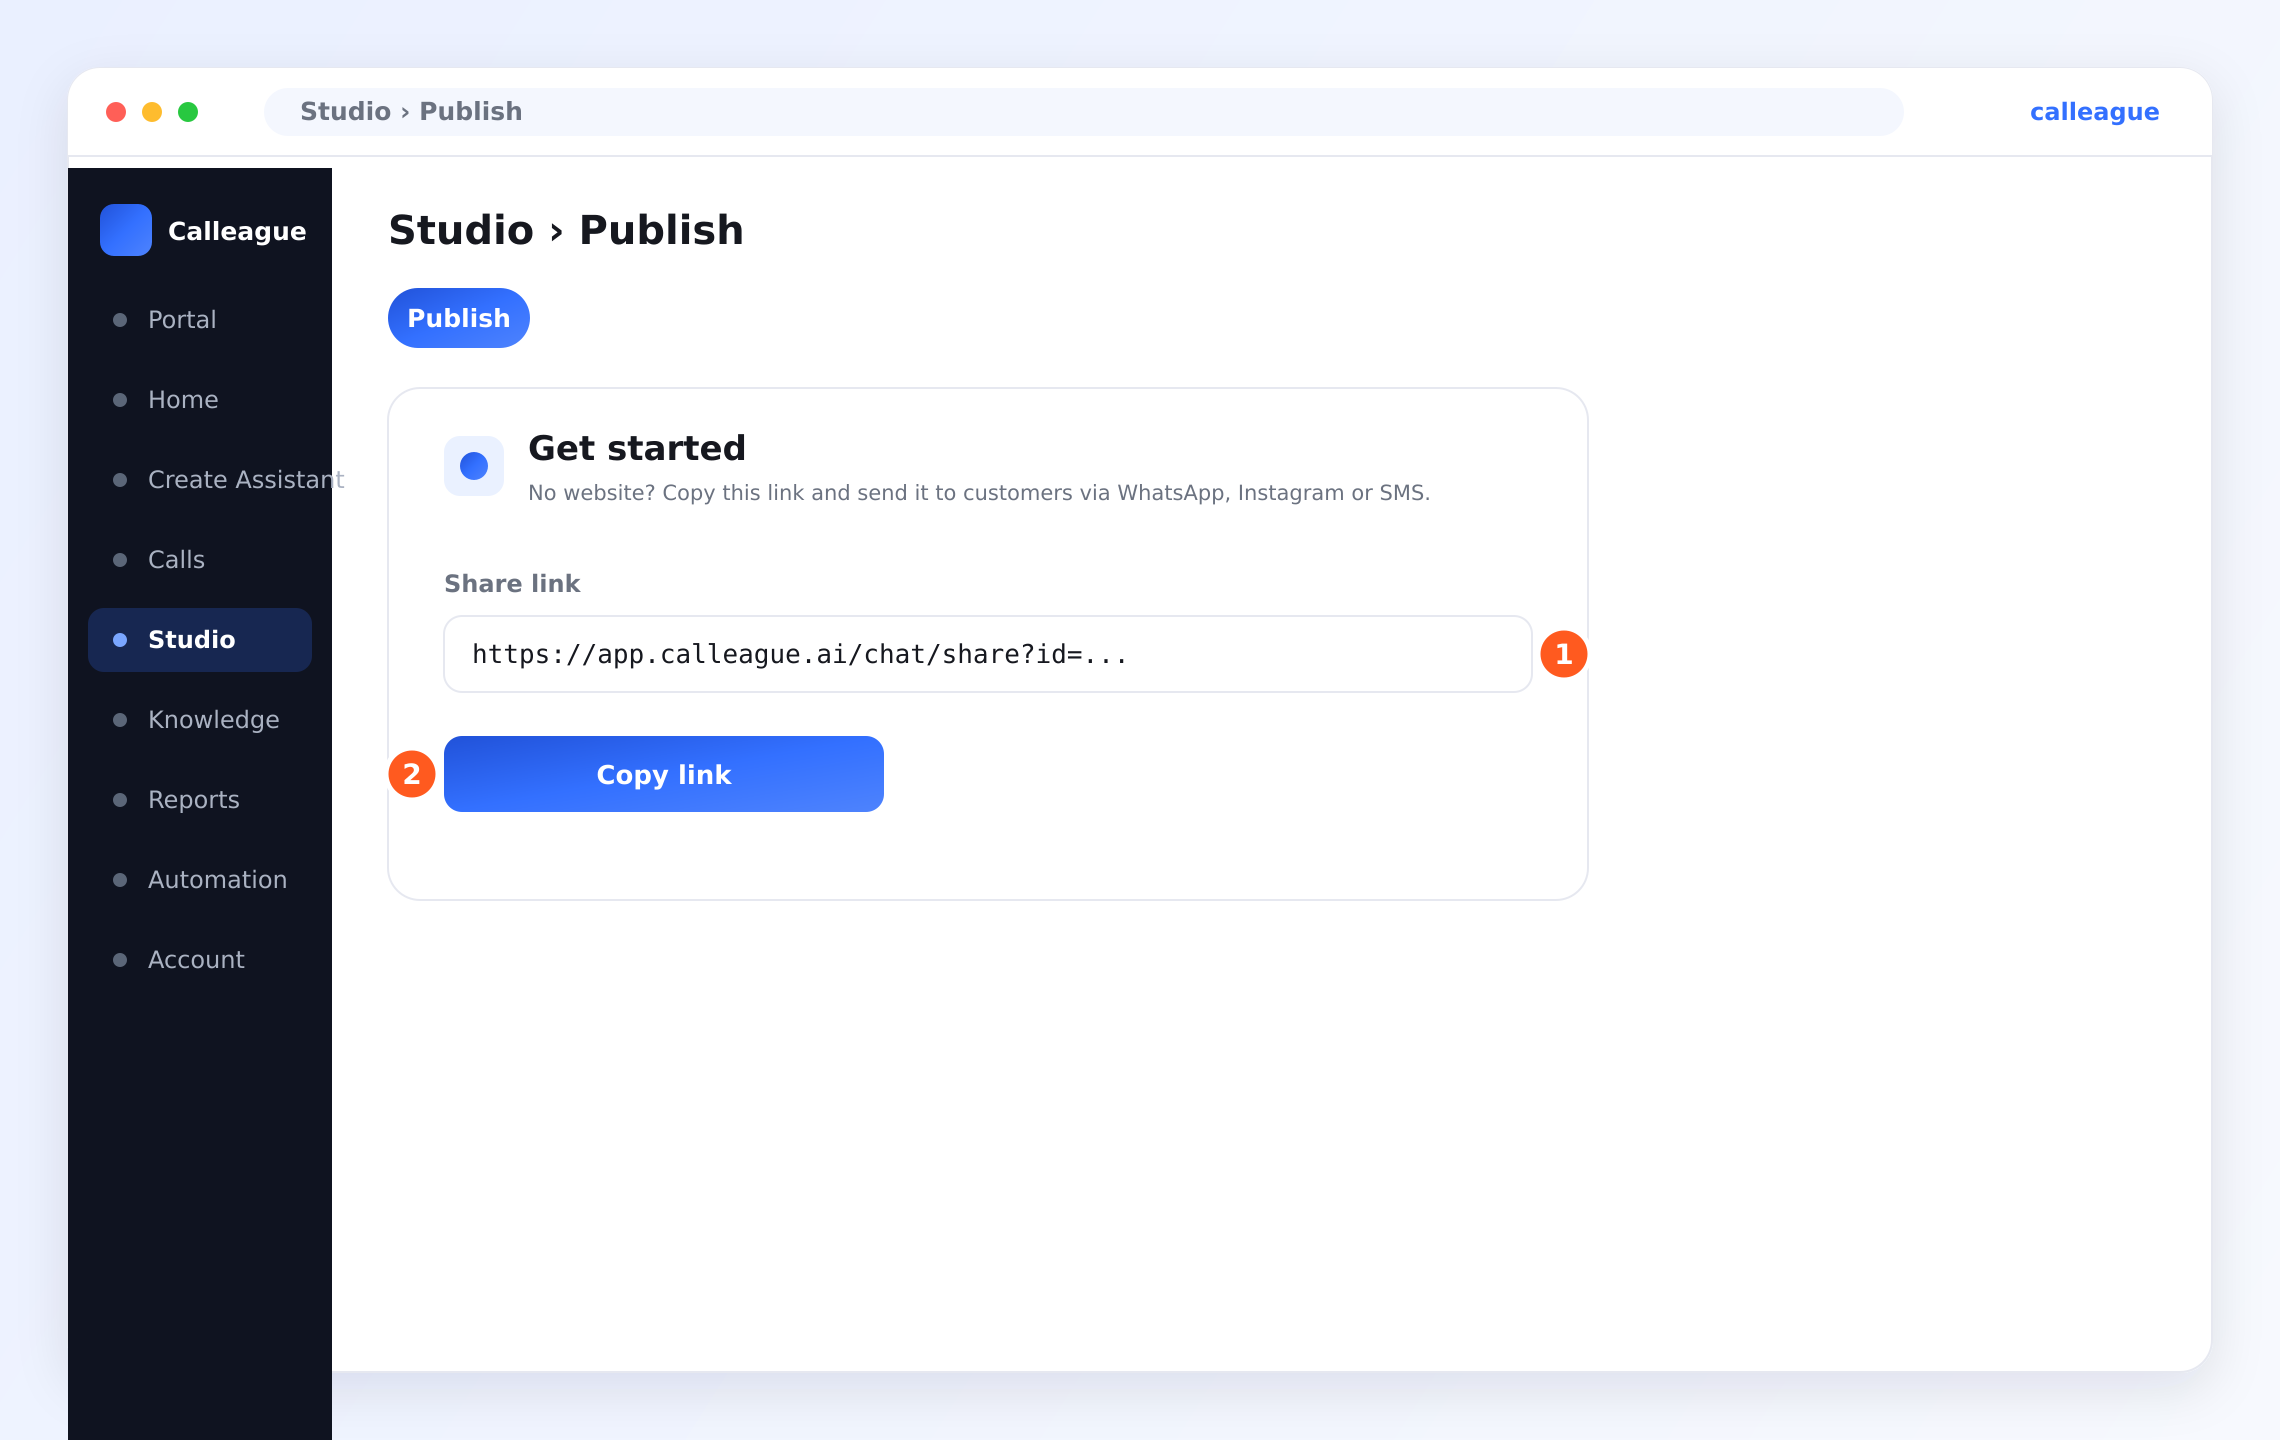
- ① Share link — your ready link appears here.
- ② Copy link — press this button to copy the link.
Click Copy link, then send this link to your customers over WhatsApp, Instagram, or SMS — anyone who taps it chats directly with your assistant. For example, to send it on WhatsApp: open WhatsApp → open a chat → press and hold the message box and tap "Paste" → Send. On Instagram, you can put this link in your profile (bio) link or send it in a DM/message. When your customer taps the link, they talk straight to your assistant. Full instructions: Put it on your website.
(Optional) Connect a phone number
Your assistant can answer the phone too. Phone-number settings are in the Voice Calls section inside Account. In the left menu (on a phone, the ☰ menu), open Account, then open the Voice Calls section on the page that opens.
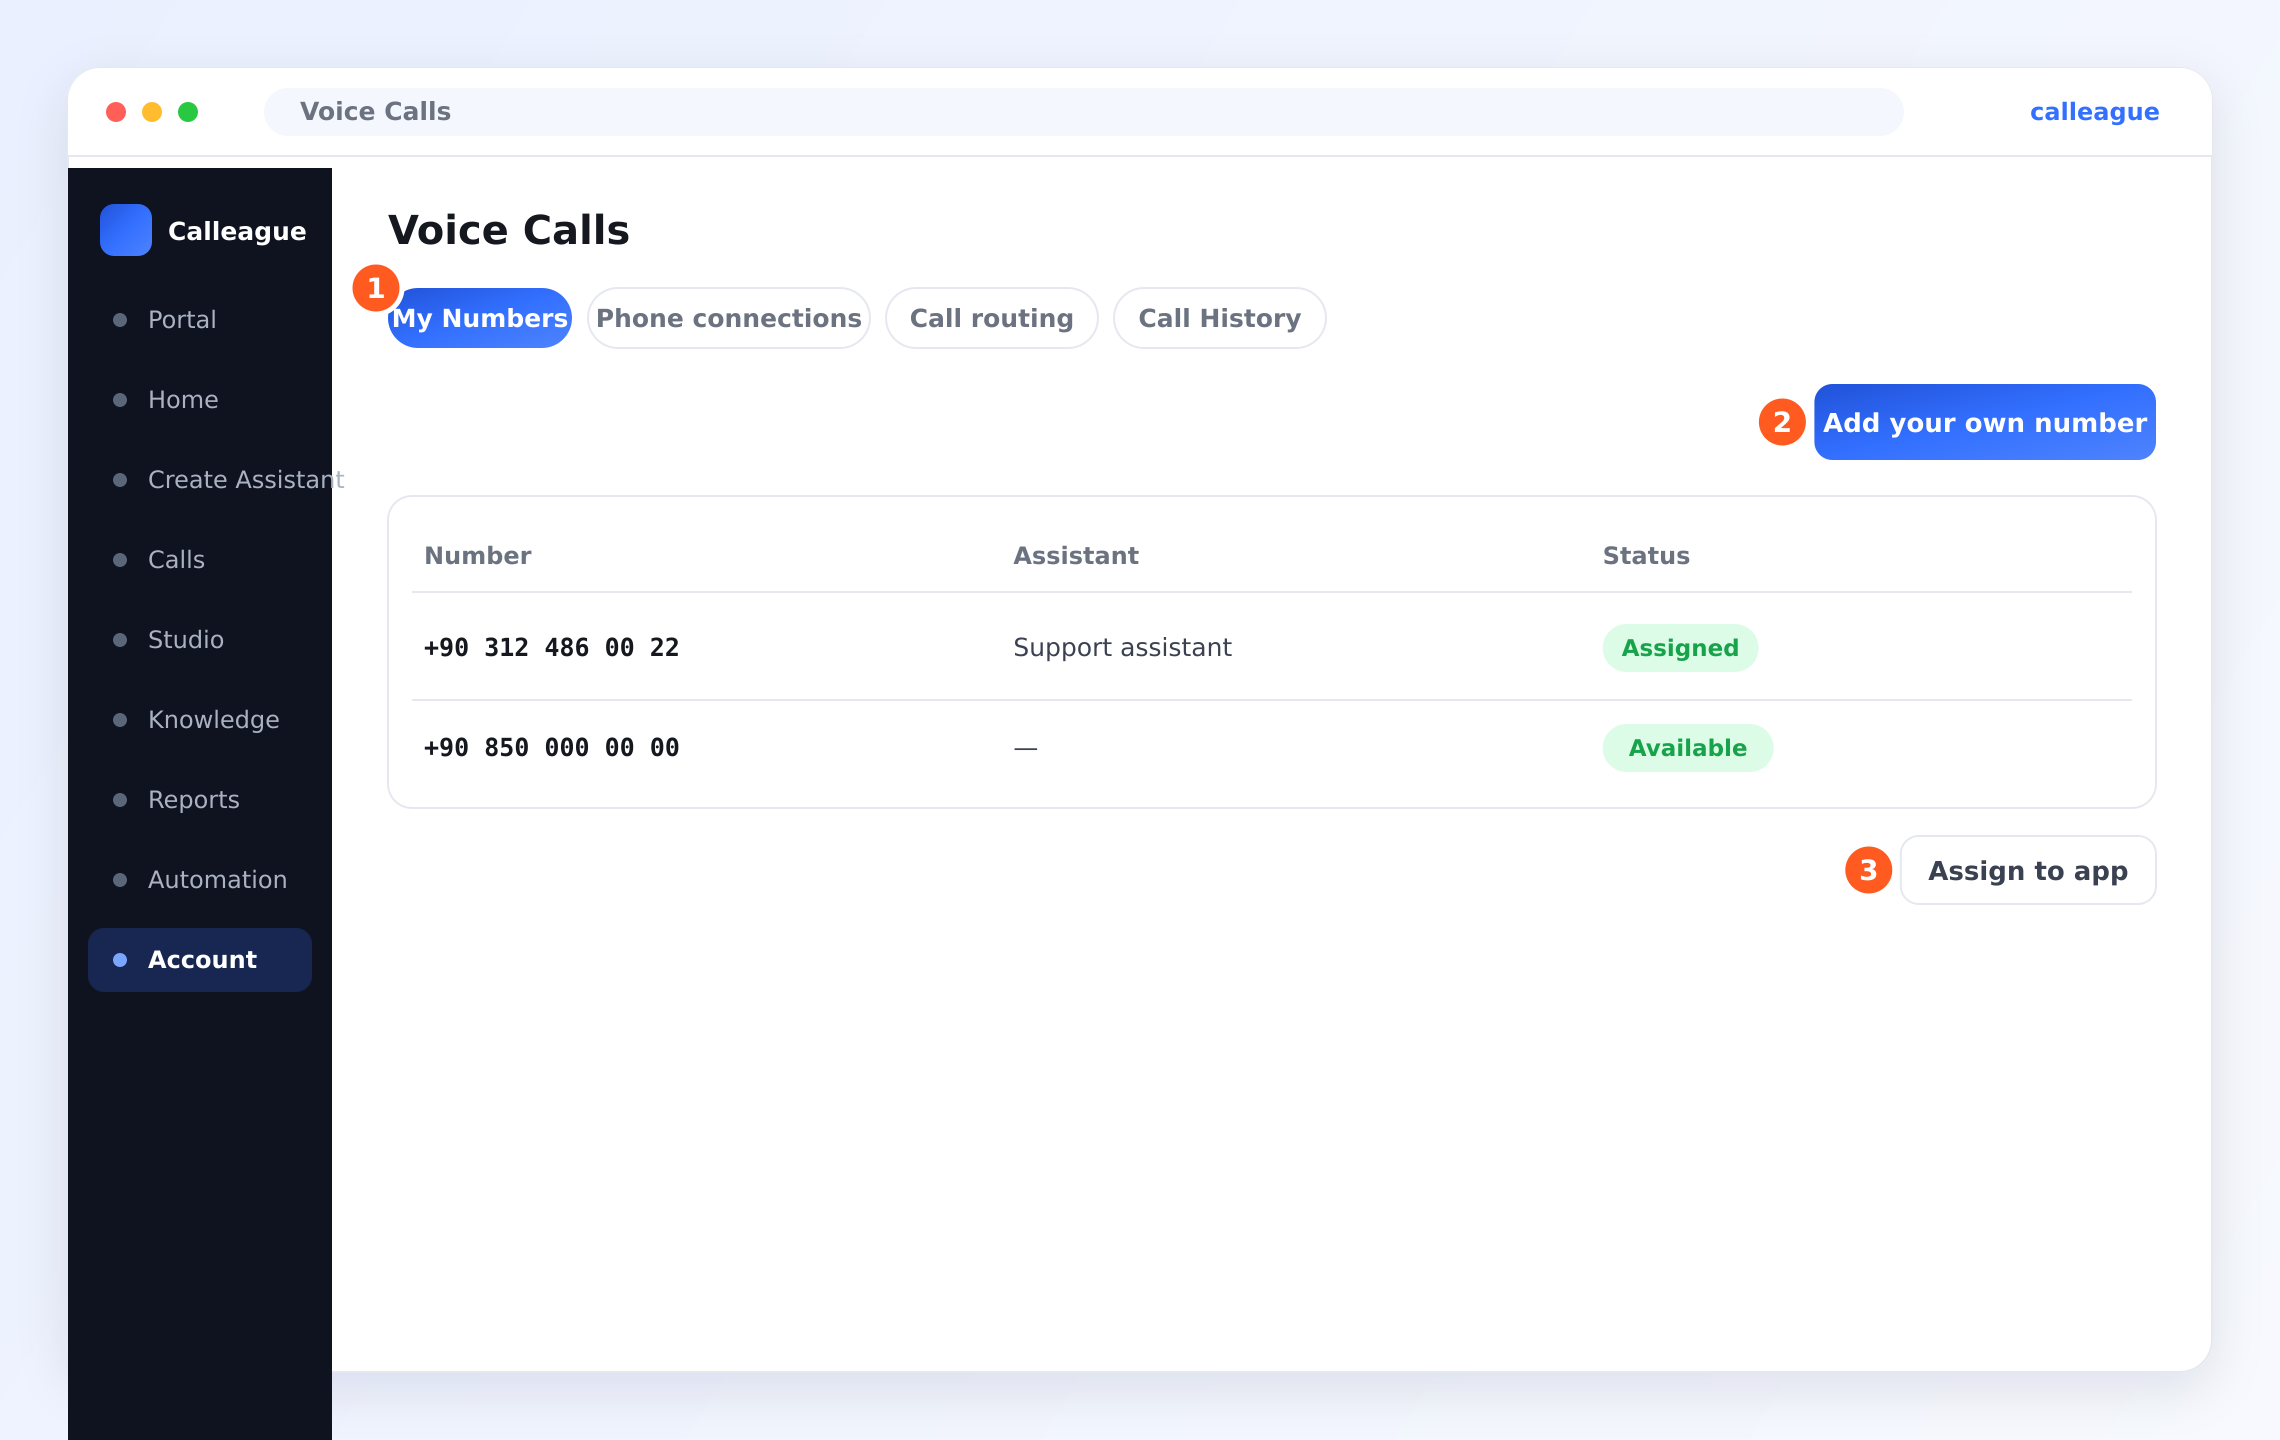
From the ① tabs at the top (a tab is one of the heading buttons at the top), open My Numbers, click the ② Add your own number button at the top right, and in the window that opens type the Phone Number and a Display Name. Then press the ③ Assign to app button below the number table to connect the number to your assistant. Once the number shows Assigned, it's ready to take calls.
The Getting started guide walks you through each of these steps one by one, with real screenshots.
On a brand-new account, the Calls, Knowledge and number lists look empty — that's normal. They fill up as you create your first assistant and have your first conversation.
Frequently asked questions
For the person who manages your site
If you don't manage your own site, you can skip this part; just pass that one line of code and the short note above to the person who does.
Next steps
Getting started
Sign in and create your first assistant in a few minutes.
Teach it about your business
Add your website or documents so it answers from your info.
Connect a phone number
Give your assistant a number to answer calls.
What is Calleague?
A friendly overview of the whole app.
Stuck? We're glad to help — write to us at info@arpanet.com.tr. Calleague is built by Arpanet Bilişim Teknolojileri A.Ş. in Ankara.
Last Updated
What is Calleague?
A friendly introduction to Calleague — your artificial intelligence (AI) assistant that talks to your customers by chat on your website and by phone, in many languages, set up entirely by clicking.
Getting started
Sign in to Calleague, get to know your Home screen, and get ready to build your first AI assistant — step by step, with no technical skills required.