Connect your tools
Give your assistant your own information — and link the everyday apps you use — so it can look things up and get real work done on a call.
Your assistant is already great at talking to people. It becomes genuinely useful the moment it can look things up and get things done while it is on the phone — find a price, answer a question from your own information, or book an appointment. You make that happen by giving it your information and connecting the everyday apps you already use. No technical skills needed.
Think of it like a brand-new helper on their first day. Hand them your price list and your appointment book, and they stop saying "let me take a message" and start saying "I found it — I have booked you in for Thursday at 2."
The simplest and most powerful place to start is your Knowledge base — your own information. You can do this yourself in a few minutes, and it is the foundation everything else builds on. This page walks you through it with real screenshots, then points you to the calendar and customer-list example.
What you'll do
Give your assistant your own information (websites and documents) so it can answer like you would, then see it work on a real call. Along the way you'll learn what other tools — like a calendar or customer list — let your assistant do.
At a glance
Here is what different kinds of tools let your assistant do on a call.
| Tool you connect | What your assistant can then do | Everyday example |
|---|---|---|
| Your information (websites, documents) | Answer questions from your own prices, hours, and policies | "A standard clean is 800 TL, and we're open until 6." |
| Customer list (CRM) | Recognise the caller and greet them by name, save a note | "Hello Ayşe, good to hear from you again." |
| Calendar / booking | Check free times, offer slots, book the appointment | "I can offer Thursday at 10 or Friday at 2." |
| Messaging (text / email) | Send a confirmation or follow-up after the call | "I've just texted you the address." |
| Spreadsheets / simple lists | Read a price or stock figure, look something up | "Yes, that's in stock — 12 left." |
You set each connection up once. After that your assistant can use it on every call, until you decide to change it. You are always in control of what each tool is allowed to do.
What "connecting" really means
Almost everything comes down to three simple ideas:
- Looking something up — the assistant finds an answer for the caller (a price, your opening hours, a booking).
- Saving something — the assistant writes something down for you (a note, a follow-up reminder).
- Doing something — the assistant takes an action for you (books a slot, sends a text).
You decide which of these each connection is allowed to do, and you can change your mind any time.
Connect your information — step by step
This is the part you can do right now, by yourself. You'll add a website and a document to your Knowledge base, then watch your assistant use them on a real call.
Start from your Home dashboard
Sign in at app.calleague.ai. You land on your Home dashboard.

You'll see four big cards and, on the left, your menu: Home, Create Assistant, Calls, Knowledge, Reports, Automation and Account. The card on the right, Knowledge base, has a Manage knowledge button — that's where we're heading.
Open your Knowledge base
Click Knowledge in the left menu (or the Manage knowledge button on the Home card).

You'll see the Knowledge base page. At the top sit two buttons — the ① + Add a website button and + Upload a document — and below them a Your sources list of everything you've already added.
Add a website or a document
Click + Add a website and paste a link (for example, your prices or FAQ page), or click + Upload a document to add a PDF, DOCX, TXT or MD file.
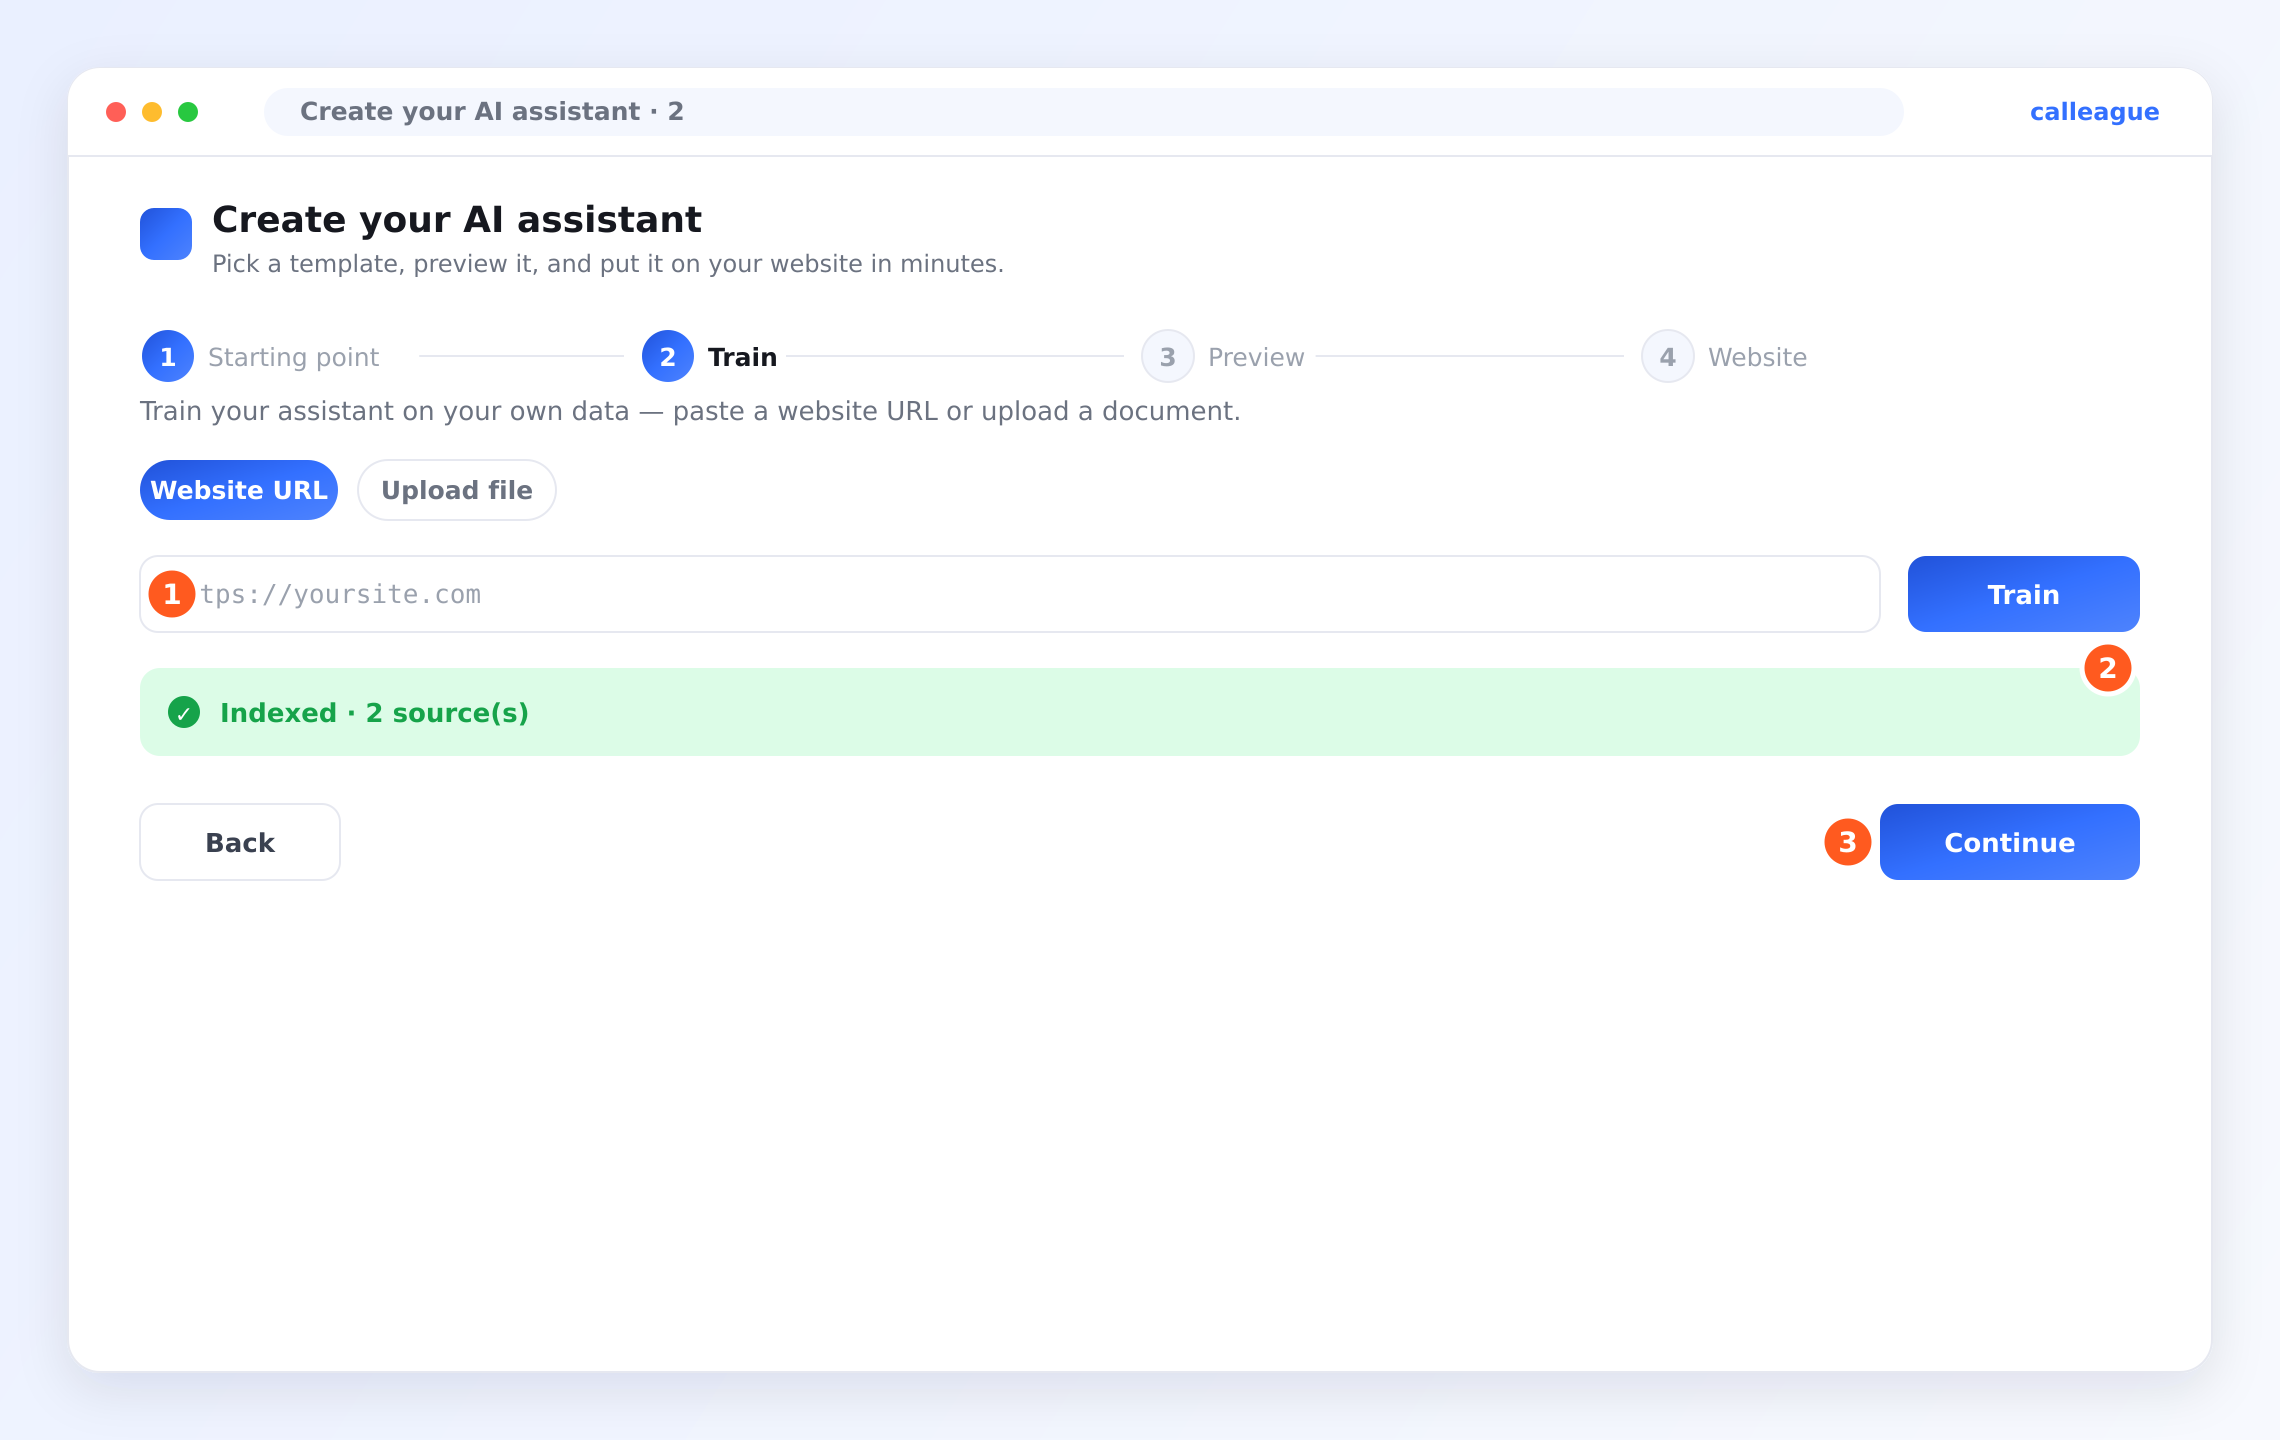
You'll see a green ② Indexed confirmation once your assistant has read the source — for example "Indexed · 2 source(s)". That means it's ready to answer from that information.
Try it on a real call
Open Calls in the left menu and click any call to open its detail.
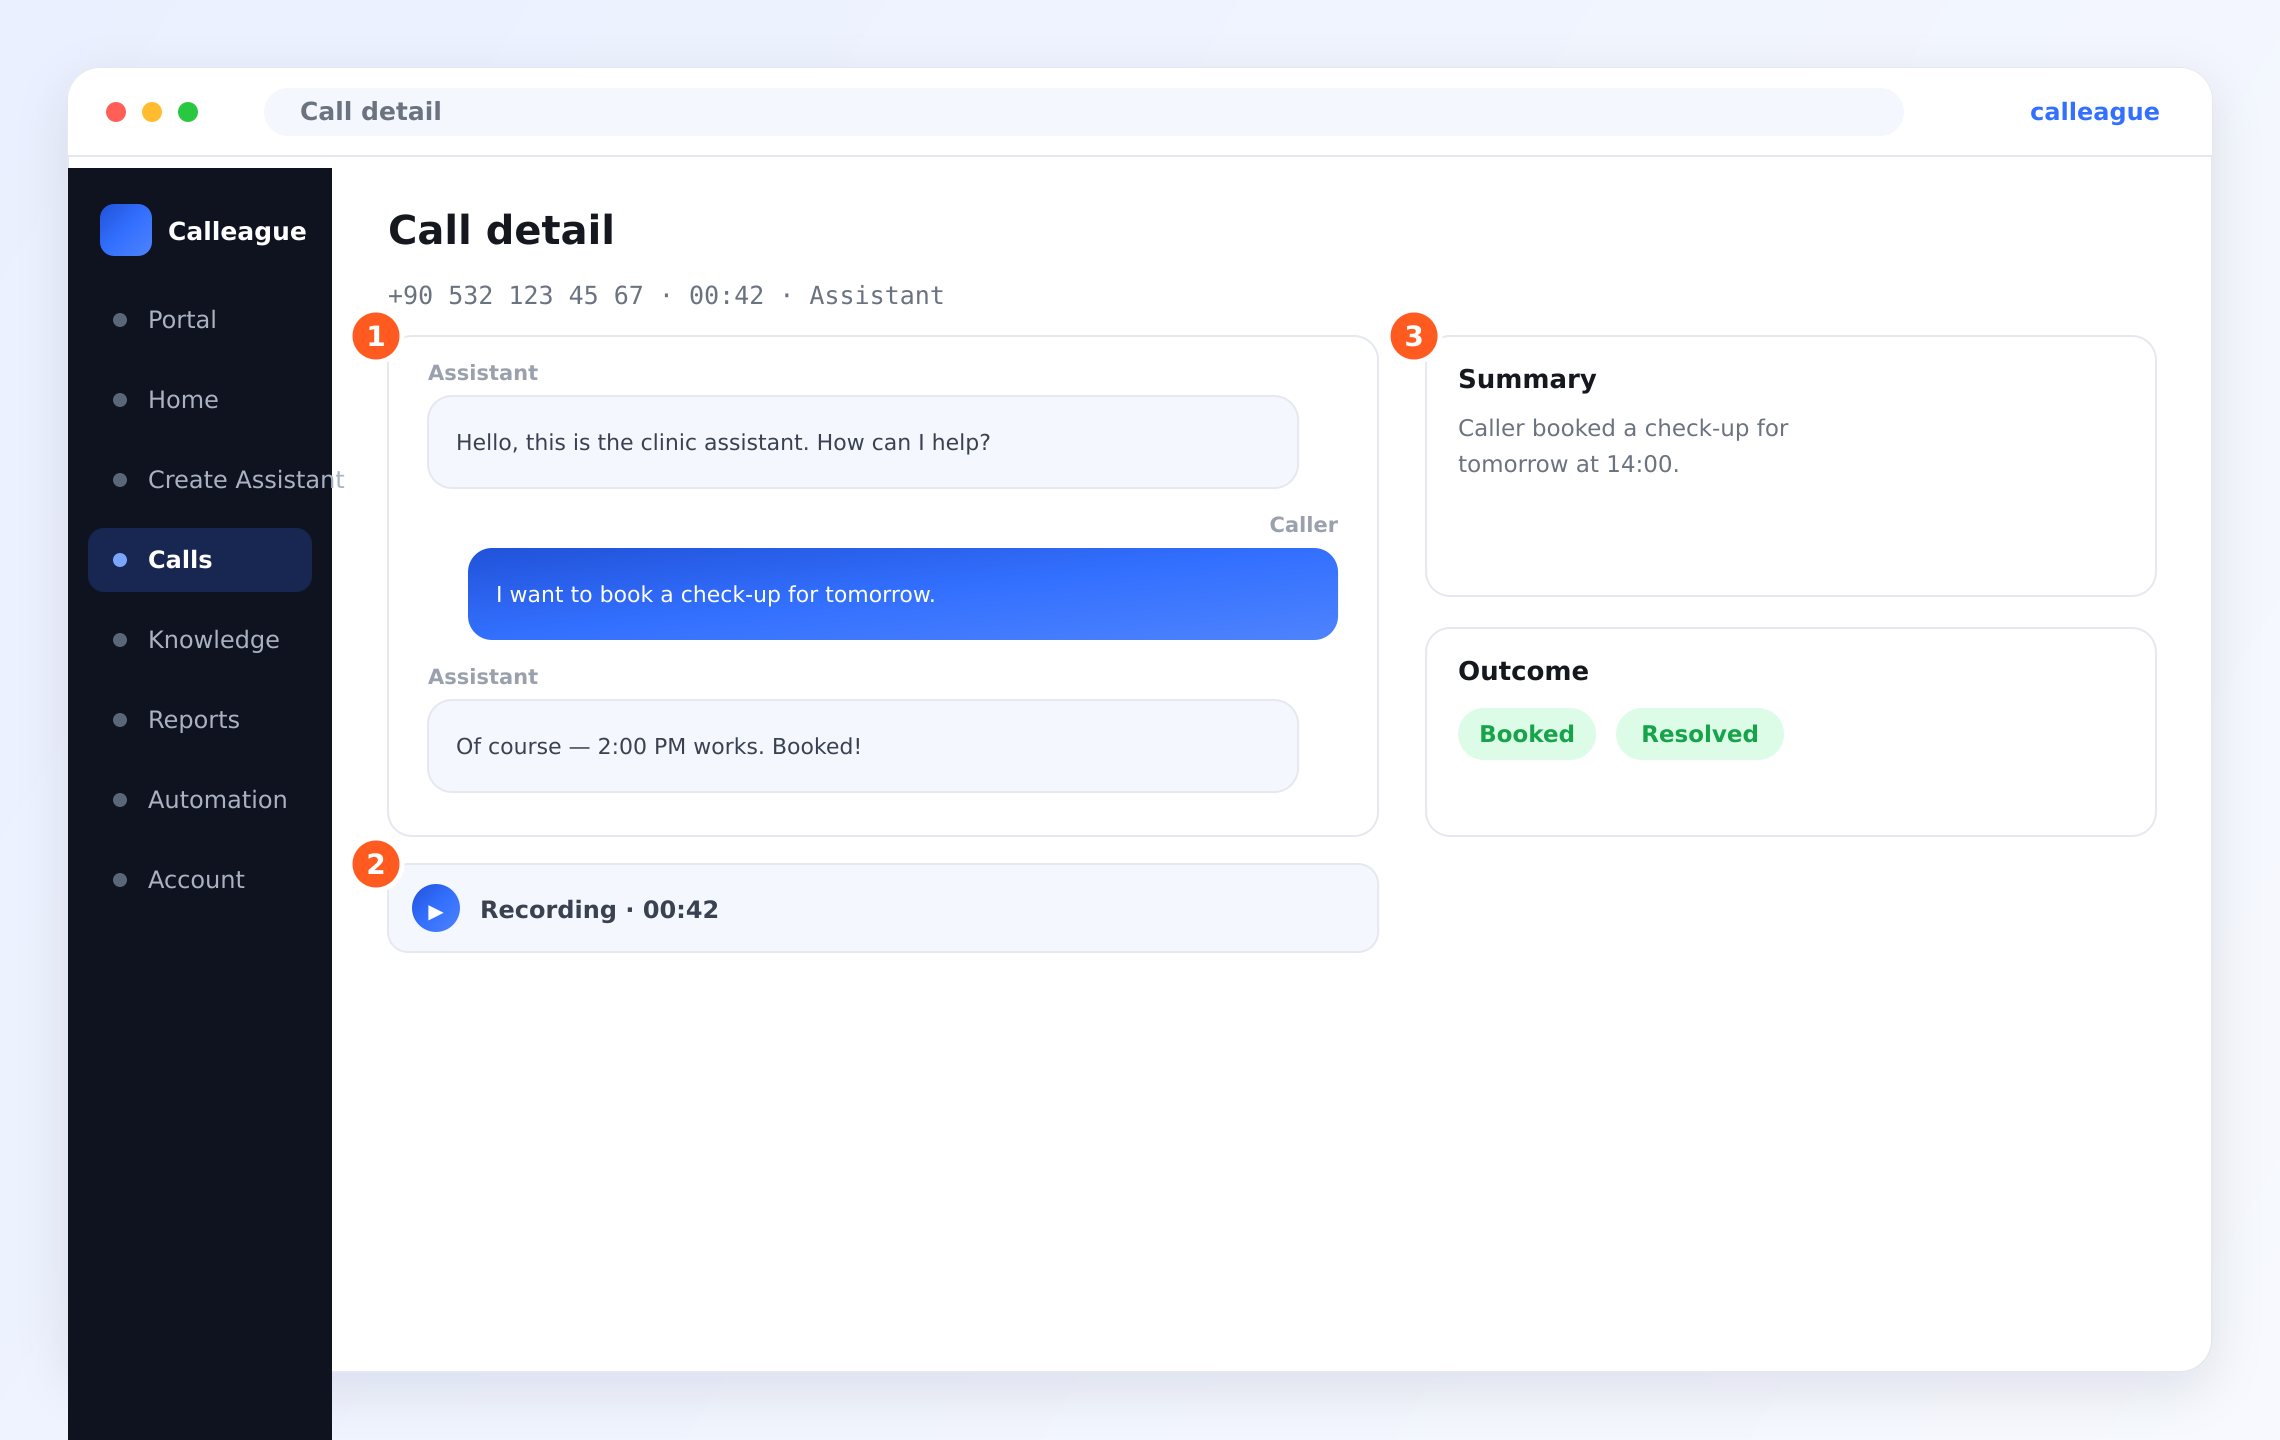
You'll see the full ① transcript (Assistant and Caller), a ② Recording you can play back, and on the right a ③ Summary and an Outcome such as Booked or Resolved — proof your assistant looked things up and got the job done.
That's the foundation in place. Your assistant can now answer from your own information on every call — and you didn't write a single line of anything technical.
Connecting a calendar or customer list
The example above gives your assistant your information so it can answer questions. To let it also do things in your other apps — recognise a caller from your customer list, or book a slot in your calendar — those connections are arranged together with us, so your accounts stay safe and set up correctly.
For a friendly, complete walk-through of that, see the worked example:
Want a calendar or customer list connected? Email info@arpanet.com.tr and we'll set it up with you. It usually takes one short call.
What you allow
For every connection you choose how much it can do. Switch on only what your assistant truly needs.
| Permission | What it does | Notes |
|---|---|---|
| Look up / see | Lets the assistant read information (a price, free times, a record) | Safe starting point — it can read, not change |
| Save / add | Lets it create something (a note, a contact, a booking) | Turn on when you want it to take bookings |
| Send | Lets it send a message after the call (a text or email) | Great for confirmations and follow-ups |
| Remove | Lets it delete something | Usually best left off — most businesses never need it |
Your assistant can only ever do what you've switched on. If it ever does more than you'd like, just turn that permission off — it stops straight away.
Keeping things safe
A few gentle habits keep everything tidy and private:
- Give the least it needs. If it only needs to read your calendar, don't also allow it to delete events.
- Start with one thing. Add your information first, test it, then add more once you're comfortable.
- Review now and then. Pop into your Knowledge base to check what's there and tidy up anything out of date.
Troubleshooting
| What you see | Why it happens | What to do |
|---|---|---|
| Your source isn't marked Indexed yet | A big page or document takes a little time to read | Wait a moment and refresh; it turns green when ready |
| The assistant doesn't know a fact | That information isn't in your Knowledge base | Add the website or document that contains it, then test again |
| A website link won't add | The page needs a login, or the link has a typo | Use a public page and check the link starts with https:// |
| The caller wasn't recognised by name | A customer list isn't connected yet | See the CRM & calendar example, or email us to set it up |
| Still stuck | Something specific to your setup | Email info@arpanet.com.tr and we'll walk through it with you |
Frequently asked questions
Next steps
Example: CRM & calendar
A full walk-through connecting your customer list and calendar.
Build your knowledge base
More ways to give your assistant your own information.
Set up automations
Do something automatically around every call.
Your data is safe
See how your information stays encrypted and private.
Not sure where to begin? We're glad to help — email info@arpanet.com.tr and we'll walk through it with you.
Knowledge base
Teach your assistant about your business — add a website or upload a document so it answers from your own information, in your own words.
Example: CRM & calendar
A friendly, complete walk-through — give your assistant your information and connect your customer list and calendar so it can recognise callers and book appointments.