Example: CRM & calendar
A friendly, complete walk-through — give your assistant your information and connect your customer list and calendar so it can recognise callers and book appointments.
Let's make this real with a small clinic. By the end, your assistant will answer questions from your own information, recognise who's calling, and book an appointment — all by itself. It takes a few minutes and you don't need any technical know-how.
This is the most popular setup for small businesses, because together these pieces turn your assistant from a polite message-taker into a real receptionist who knows your services, your customers, and your diary.
You can start with just your information today, on your own — that's the part with screenshots below. Adding a customer list and calendar is what makes calls feel personal and lets the assistant book on its own; we set those up together with you.
What you'll end up with
A caller's experience will look like this:
- Someone calls your clinic.
- Your assistant answers questions from your own information — services, prices, opening hours.
- It recognises the caller from your customer list and greets them by name.
- The caller asks for an appointment; the assistant checks your calendar and offers a couple of free times.
- The caller picks one, the assistant books it, and saves a quick note.
No call-backs, no double-booking, no sticky notes.
At a glance
| The piece | What it is | What your assistant uses it for |
|---|---|---|
| Your information | Your services, prices, hours, policies | Answering questions the way you would |
| Customer list (CRM) | Where you keep contacts and their history | Recognising the caller, greeting them by name, saving a note |
| Calendar | Your diary of appointments | Seeing free times, offering slots, creating the booking |
Before you begin
A couple of small things make this go smoothly:
- You have an assistant already created. If not, set one up first — see Create your assistant.
- You can sign in to your customer list and your calendar.
- Your customers' phone numbers are saved the same way they call from (including the country code).
Step 1 — Give your assistant your clinic's information
This part you can do right now, by yourself.
Open your Knowledge base
Sign in at app.calleague.ai, then click Knowledge in the left menu.

You'll see the Knowledge base page with the ① + Add a website button, a + Upload a document button, and a Your sources list below.
Add your services and prices
Click + Add a website and paste a link to your services or prices page, or click + Upload a document to add your price list as a PDF.
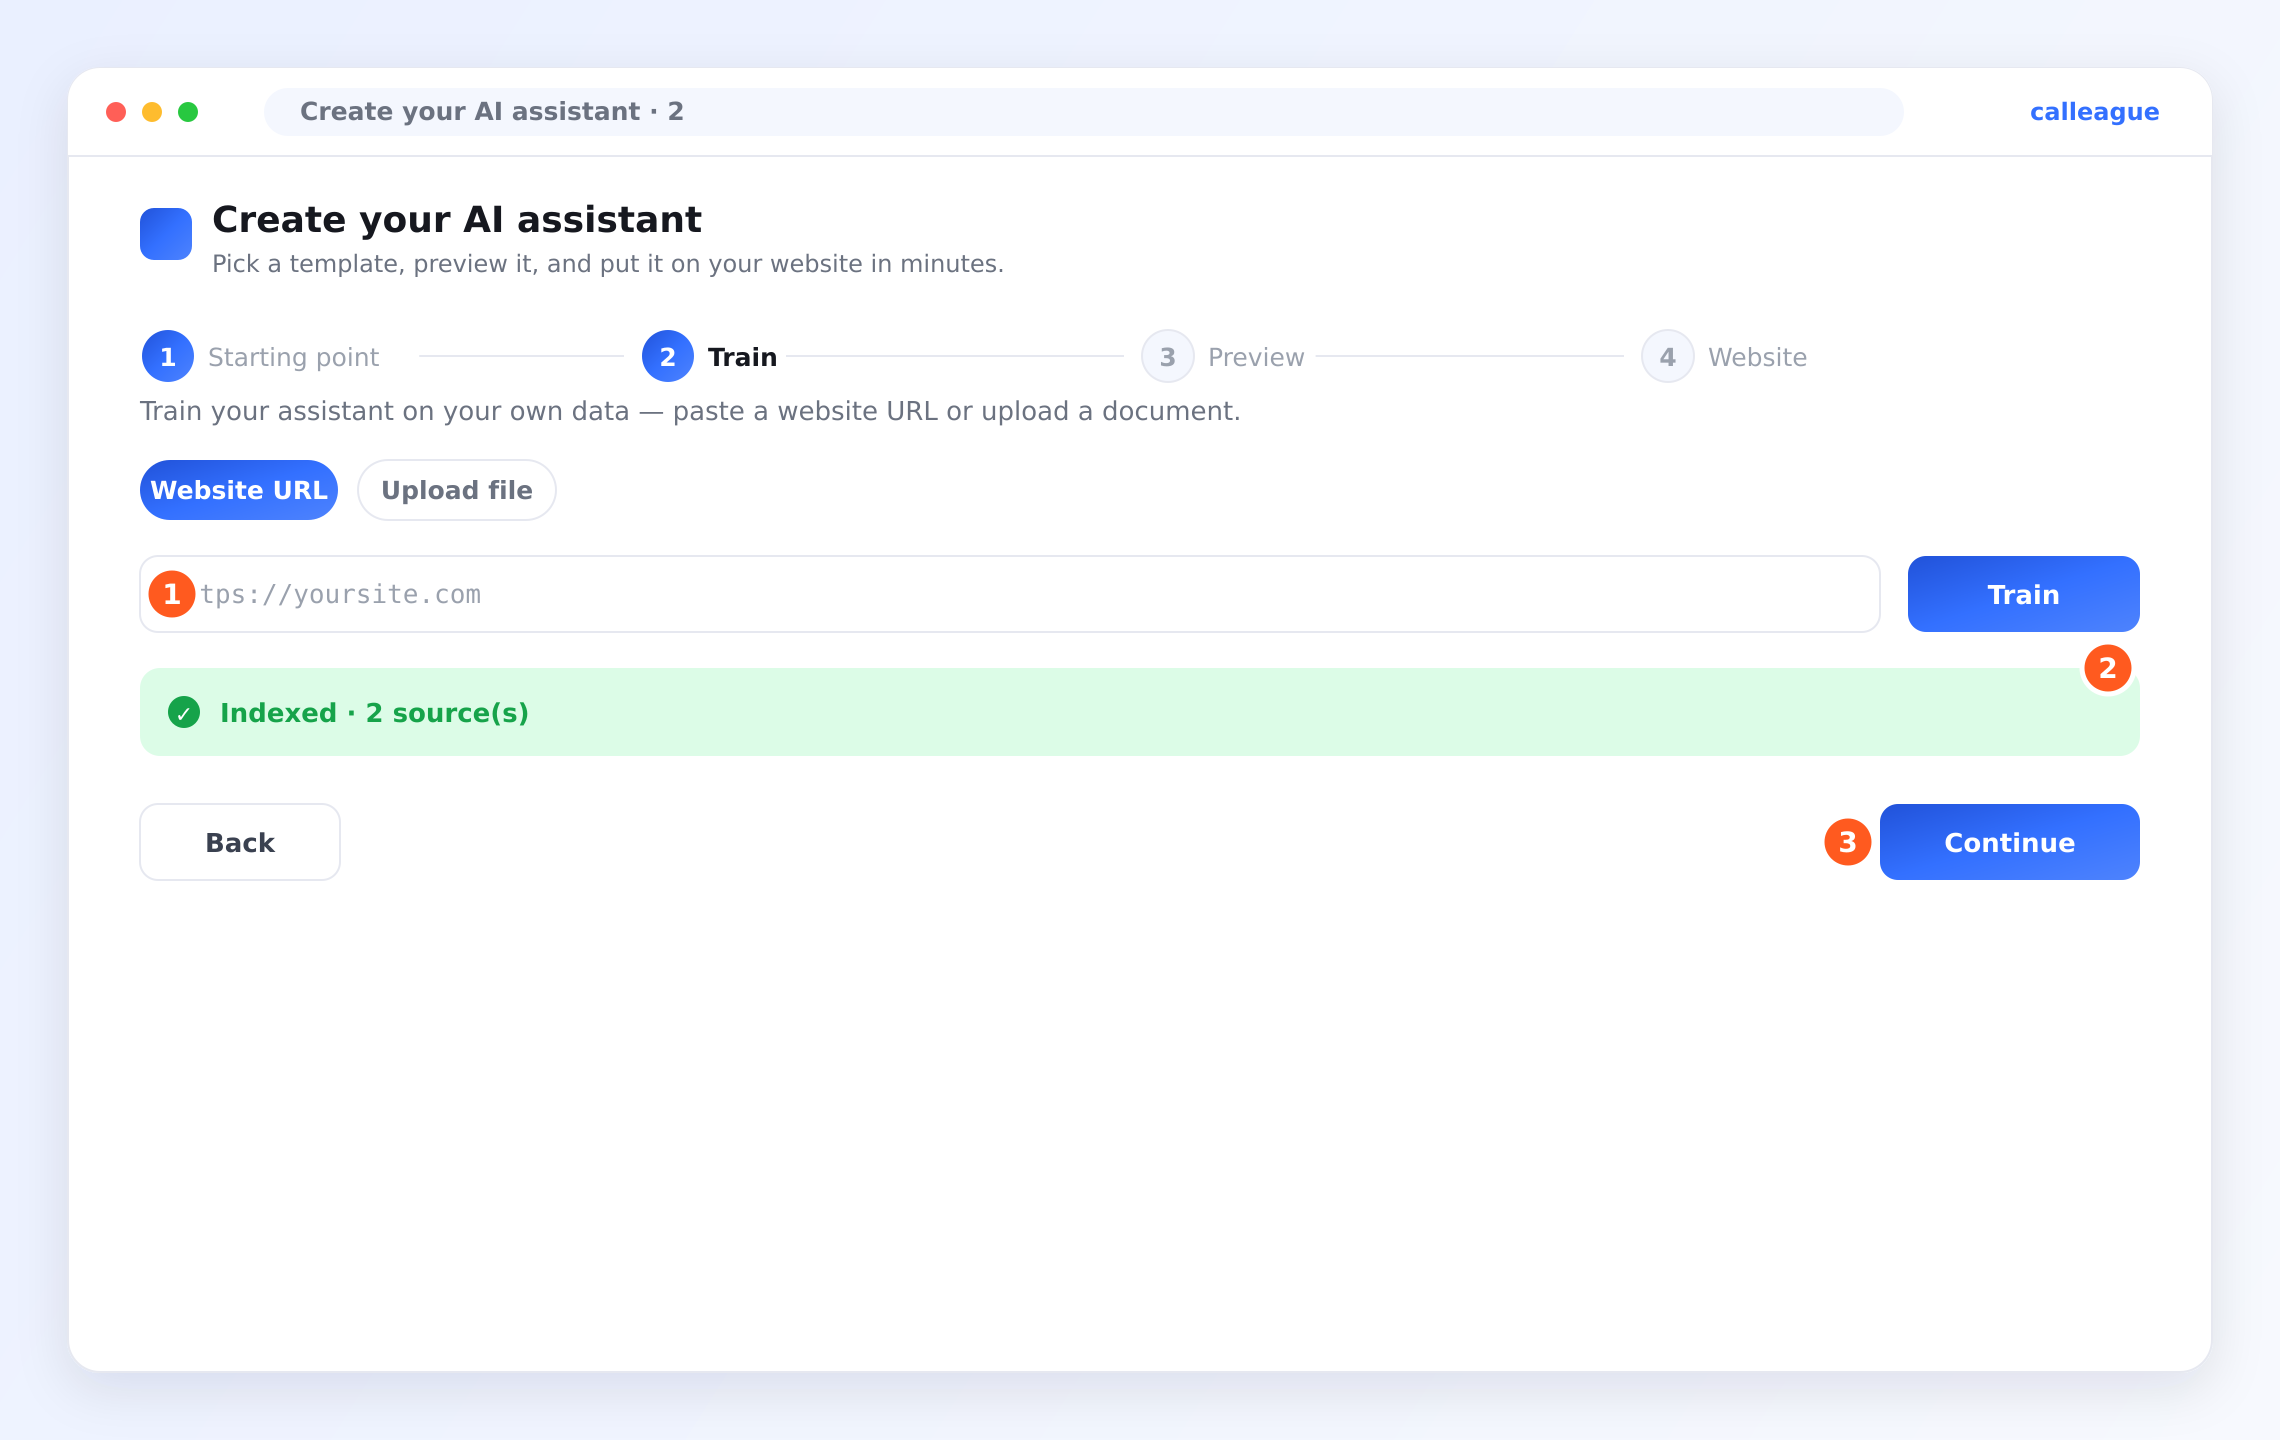
You'll see a green ② Indexed confirmation once your assistant has read it — for example "Indexed · 2 source(s)". Now it can answer questions like "How much is a check-up?" in your own words.
Step 2 — Connect your customer list and calendar
To let your assistant recognise callers and book appointments in your apps, we set up the connection together with you, so your accounts stay safe and correct.
Tell us which tools you use
Email info@arpanet.com.tr with the customer list and calendar you use (for example, the booking app your clinic already runs on).
Choose what the assistant may do
Together we'll switch on only what you need. For this clinic example, that's:
- Find a customer by phone number or name
- Save a note to a customer's record
- See free times in the calendar
- Create an appointment when a caller picks a slot
Everything else — especially deleting a customer or appointment — stays switched off.
Confirm and go live
Once it's connected, your assistant can recognise callers and book appointments on every call.
Notice we did not allow "delete a customer." Always switch on only what your assistant truly needs — you can adjust this any time, and your sign-in details are never shared.
A note on permissions
For each connection you decide how much access to give. This is your safety net.
| The assistant can | From which tool | On by default? |
|---|---|---|
| Answer questions about services and prices | Your information | Yes, once you've added it |
| Recognise a caller and greet them by name | Customer list | Only if you allowed "find a customer" |
| Save a note about the call | Customer list | Only if you allowed "save a note" |
| See which times are free | Calendar | Only if you allowed "see free times" |
| Book a new appointment | Calendar | Only if you allowed "create an appointment" |
| Delete a customer or appointment | Either | No — we recommend leaving this off |
If the assistant ever can't do something a caller asks, it's almost always because the matching row above is switched off — and that's on purpose, so nothing happens without your say-so.
Step 3 — Try a real booking call
Give it a go before real customers arrive, then check the result in Calls.
Call your assistant and ask for an appointment
Call it yourself, just like a customer would, and say something natural like "I'd like to book a check-up for tomorrow."
Open the call and check the outcome
In the left menu click Calls, then click the call you just made to open its detail.
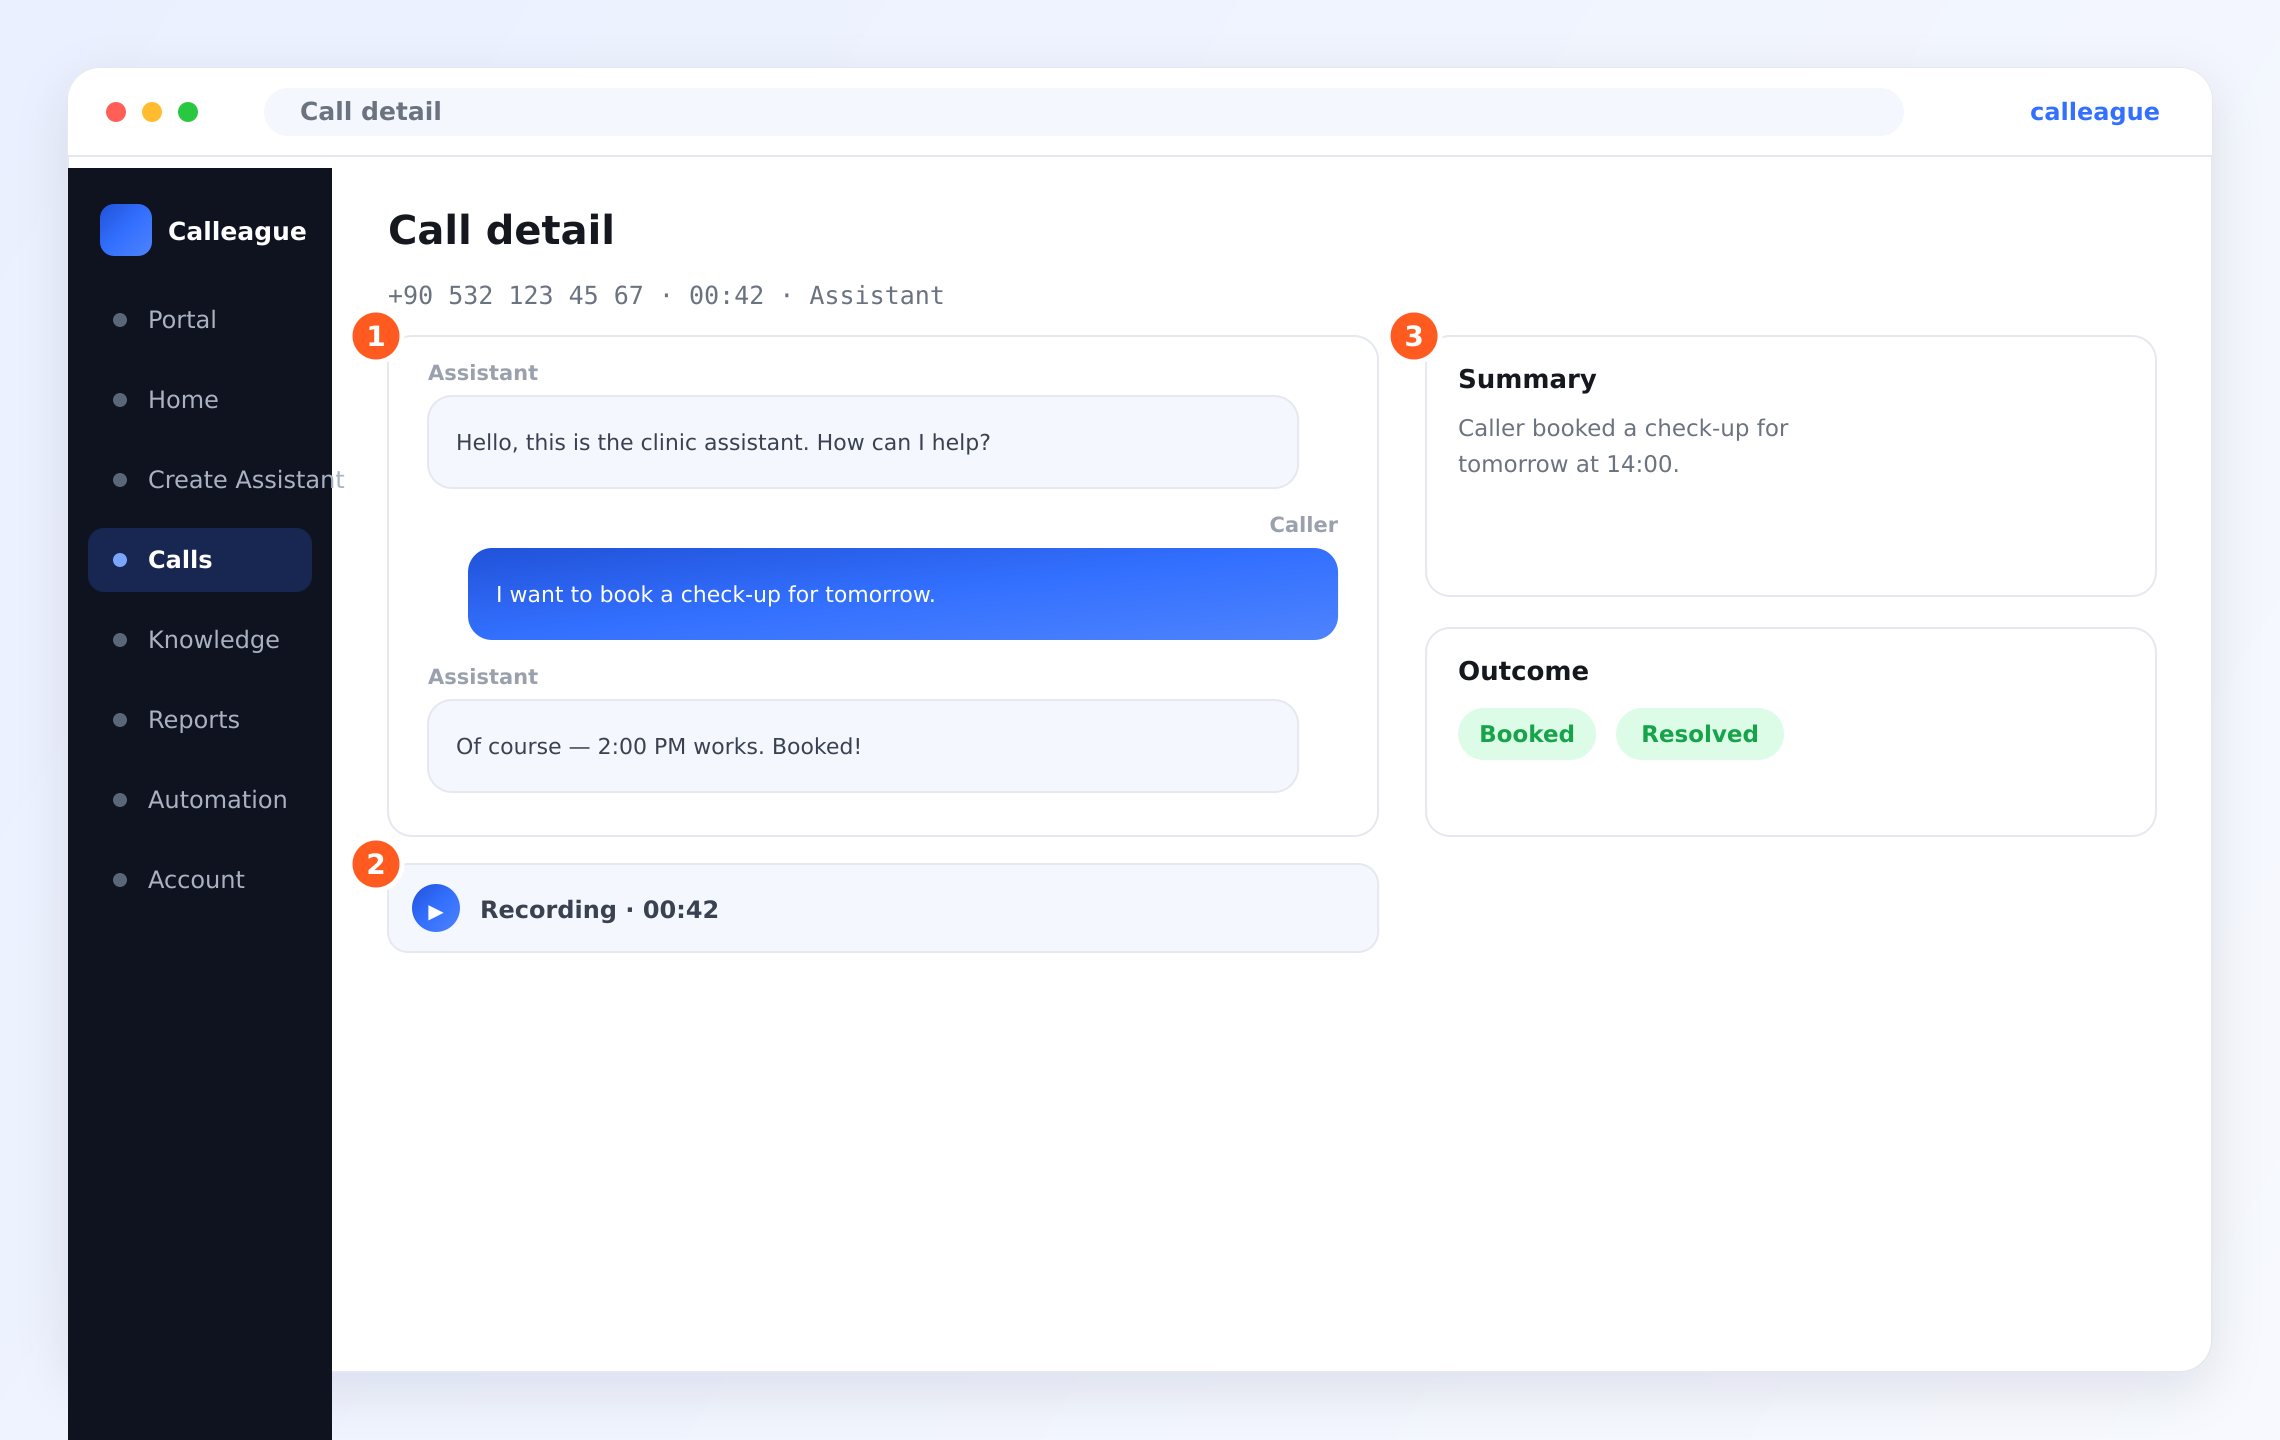
You'll see the ① transcript — here the Caller says "I want to book a check-up for tomorrow" and the Assistant replies "Of course — 2:00 PM works. Booked!" — a ② Recording to play back, and on the right a ③ Summary ("Caller booked a check-up for tomorrow at 14:00") with the Outcome marked Booked and Resolved.
Seeing that first appointment booked on its own is the moment most people fall in love with this. If it works, you're ready to go live.
An example call, word for word
Here's how a real call might sound once everything is connected.
Caller: Hi, it's Ayşe.
Assistant: Hello Ayşe, lovely to hear from you again. How can I help today?
Caller: I'd like to come in for a check-up sometime tomorrow.
Assistant: Of course. I have 10 in the morning, or 2 in the afternoon. Which suits you better?
Caller: Two in the afternoon, please.
Assistant: Perfect — you're booked for 2 PM. Anything else?
Caller: No, that's everything. Thank you!
Assistant: You're very welcome. See you tomorrow!
Behind the scenes, the assistant recognised Ayşe from the customer list, read the free times from the calendar, created the booking, and saved a note — all without anyone lifting the phone.
Troubleshooting
| What you see | Why it happens | What to do |
|---|---|---|
| The assistant doesn't know a price | That information isn't in your Knowledge base yet | Add the page or document with it (Step 1) and wait for the green Indexed label |
| The caller wasn't recognised | Their number is saved differently in your customer list | Make sure it's stored the same way they call from, including the country code |
| No appointment was created | "Create an appointment" is switched off | Ask us to switch that permission on |
| The note didn't save | "Save a note" is switched off | Ask us to switch that permission on |
| Still stuck | Something specific to your setup | Email info@arpanet.com.tr and we'll walk through it with you |
Frequently asked questions
Next steps
Connect your tools
The overview of every kind of tool you can link.
Watch your calls
See live transcripts, recordings and outcomes.
Set up automations
Send a follow-up or log the call automatically.
Your data is safe
How your customer information stays private.
If you ever get stuck, we're glad to help — email info@arpanet.com.tr and we'll walk through it with you.
Connect your tools
Give your assistant your own information — and link the everyday apps you use — so it can look things up and get real work done on a call.
Automations
Make the routine things around your calls happen on their own — like texting back a missed caller or adding a new booking to your calendar. You set a simple "when this happens, do that" rule once, and Calleague handles the rest.